December 31, 2012

Christmas Card Gift Tags

Saw this idea on Pinterest before Christmas, and was thrilled to finally have a use for those Christmas cards I  didn't want to throw away but couldn't justify keeping, either.  Convert cards into gift tags!  One hole punch later and I was in business.

Side note: This would be an excellent way to reuse cute gift bags and cards all year long; not just at the holidays.

I got the hole punch at Michael's for less than $10 (yay sale).  Hint: it's near the scrapbooking section, in the row with all the scissors.  I initially found one for twice the cost with all of the Martha Stewart craft stuff.  Persistence paid off here in looking for an alternative.

I'm a little OCD about wrapping gifts.  I like to match theme and if possible, match the wrap to the recipient. While this year's gift tags were very nice, I didn't have too many that were childish and cute for my nieces and nephews.  Making my own, I was able to do so!

I also came to accept that the tags were very fun if a bit off center and cropped off parts of the design.  They're spirited this way. :)

Lantern Treasure Box

This idea comes courtesy of my son!  Why keep all your favorite keepsakes hidden away in a box where you can't see them?  Let's put those treasures on display in a lantern. :)  I like that this looks decorative, instead of just functional (like using a mason jar to hold buttons).


Spaghetti with Butternut Squash

I'm back!  Happy holidays, everyone.  I hope you were all as pampered for Christmas as I was!  As much as I loved visiting with family, it was really nice to be back home and in my kitchen again.  I celebrated with a new meal last night: this very tasty take on spaghetti.  It has a great flavor, and even my picky husband was a fan after he doused his in extra Parmesan cheese.


Ingredients
  • 1 lb butternut squash, peeled and diced (I cheated and bought mine already diced for me!)
  • 1 tablespoon butter
  • 8 oz (1/2 box) spaghetti
  • 1 cup sliced leek (only use the stem, not the leaves), thoroughly cleaned in cold water
  • 3 cloves garlic, minced
  • 1/4 cup fresh shaved Parmesan cheese
  • 4 sage leaves, thinly sliced horizontally
  • Kosher salt and freshly ground black pepper, to taste
Directions
  1. Bring a large pot of salted water to boil.  Add squash and cook until soft, about 10 minutes.  Remove squash with a slotted spoon and place in a blender or food processor.  Blend until smooth and set aside.
  2. Add pasta to the boiling water and cook according to package directions, about 10 minutes.  Reserve 1 cup of the pasta water before draining.
  3. While pasta cooks, melt butter in a large nonstick skillet.  Saute the leeks and garlic over medium heat until soft and golden, about 5-7 minutes.  Add pureed squash, season with salt and pepper to taste, and add a little of the reserved pasta water to thin out sauce to desired consistency.  I kept mine pretty thick.  Stir in Parmesan cheese and sage, and mix in pasta until well coated.
  4. Sprinkle with additional Parmesan cheese to taste.

December 22, 2012

Brown Sugar Scrub

I'm on a roll today!  And this was supposed to be my do nothing day.  Maybe that's why it's been so fun. :)  I pinned a picture of homemade body scrub forever ago, and while I had all the ingredients on hand I didn't have anything to store it in.  Cue one sealed glass jar as part of a Christmas gift, and I was in business.

Look how pretty!

Supplies
  • 1 cup brown sugar, lightly packed
  • 1/4 cup olive oil
  • 1 tablespoon honey
  • 1 teaspoon vanilla
Easy peasy!

Directions
  1. Stir ingredients in a medium bowl. Transfer to sealed container.
YOU'RE DONE! Omgeez.  You just saved yourself $20 to $40!  With that kind of value, this definitely makes it onto the list of awesome things to make and give as gifts.  And I can say, having used the scrub in my shower today, it's great and smells like cookie dough. :)  I happen to like that, so win for me!  It reminds me of a body scrub I had done during a spa massage once. Heaven.


And with that, I'm probably done for the holidays!  Unless I figure out how to blog from my iphone while away from my computer visiting in the in-laws for Christmas...  no promises though. ;-)

Wrapping Paper Christmas Tree

Are you a compulsive keeper of leftover wrapping paper scraps?  Do you always tell yourself there will be *some* use for them?  Never mind that you don't actually have teensy tiny gifts to justify keeping a 3" x 2" piece of paper, or that you perhaps have individual pencils or pens to wrap that will be perfect for that one long strip of excess paper.  No, there's still SOME use.  Well, I've found it.  Now you can feel completely justified!  Using just that picture to kick start the idea, I made this cute little decoration!


I also had a little helper cutting scraps for me. ;-)


This was definitely a fun, simple craft for us to do together.  The only supply I bought specifically for this was the pack of snowflake buttons, and even that was optional.  We have tons of random buttons in my son's craft boxes that we could have used, but I wanted to indulge in some glittery snowflake goodness.

Supplies

  • Wrapping paper or scrapbook paper scraps
  • Glue
  • Scissors
  • Box top (that's what I glued my tree onto!), poster board, or other sturdy surface.
  • Buttons

Directions
  1. Roll paper and glue end.  Trim to desired length.  Make the rolls progressively smaller, though it's ok if a couple levels are very close in size.
  2. Glue dried paper rolls to poster board.
  3. Cut a piece to be your tree trunk.  Glue a small roll of paper into the board, and glue the trunk on top so it kind of floats at the same level as the rolled paper.  Do the same with a tree topper, like a snowflake, star, or angel.
  4. Arrange buttons as desired, then glue into place.  You may want to use hot glue for these if they don't stay in place nicely.
  5. When dried, hang or prop up somewhere for all to see and admire!  Look at you, being all crafty and impressive.

Chicken Florentine with Spinach Balls

I've loved chicken florentine for years now, and tried a few attempts at making it myself.  Last night's dinner was by far the winner.  The taste was amazing, my house still smells wonderful, and I was really happy with my approach to including spinach with the meal.  Giada never disappoints!  Adapted recipes work, too!

For this meal, I definitely got everything prepped and measured out beforehand.  I popped the spinach in the oven and then heated up the pan for my chicken to get that going.  The chicken cooks so quickly, I wouldn't have had much time to measure/prep simultaneously.  Also, this approach resulted in my spinach finishing a few minutes before the chicken.  Full disclosure. :)


Spinach Balls

Ingredients

  • 10 ounces of frozen spinach, thawed and well drained.
  • 1 small onion, finely chopped
  • 1 1/8 cups stuffing with herbs (I used Pepperidge Farm)
  • 3 eggs, beaten
  • 1/4 cup melted butter (1/2 stick)
  • 1/4 cup freshly grated Parmesan cheese
  • 1 teaspoon garlic salt
  • 1/2 teaspoon black pepper
  • Pinch of salt

Directions
Note: I've mentioned before that I'm impatient.  Thawing and draining spinach is no exception.  You really REALLY have to do this, or you'll get soupy weird spinach goo instead of a nice mixture you can shape into balls.  So fair warning there.  Not that I'm speaking from experience or anything...
  1. Mix all ingredients until well combined.
  2. Scoop a generous tablespoon of spinach mixture and form into a ball (about 1").  Place on a baking sheet sprayed with Pam.
  3. Bake at 350° for 20 minutes.  Makes approximately 30 balls.  Serves 4-6.

While the spinach balls bake, cook the chicken.

Chicken Florentine

Ingredients

  • 4 boneless skinless chicken breasts
  • Salt and freshly ground black pepper
  • All-purpose flour, for dredging
  • 4 tablespoons (1/2 stick) unsalted butter
  • 1 shallot, sliced
  • 2 cloves garlic, chopped
  • 1 1/2 cups dry white wine.  I actually used 3/4 cups white wine and 3/4 cups chicken broth.  It tasted great!
  • 1 cup whipping cream
  • 1 tablespoon chopped fresh Italian parsley

Directions
  1. Sprinkle both sides of the chicken with salt and pepper.  Dredge the chicken in flour to coat lightly, and shake off excess flour.
  2. Melt 2 tablespoons of butter in a large skillet over medium heat.  Add the chicken and cook until golden, about 5 minutes each side.  Transfer the chicken to a plate and tent with foil to keep it warm.
  3. Melt the remaining 2 tablespoons of butter in the same skillet over medium heat.  Add the shallots and garlic and saute until the shallots are translucent, about 1 minute.  Be sure to scrape up any browned bits from the bottom of the pan.  Add the wine and/or broth.  Increase the heat to medium-high and boil until the liquid is reduced by half, about 3 minutes.  Add the cream and boil until the sauce is reduced by half, about 3 more minutes.  Stir in the parsley.  Season the sauce to taste with salt and pepper (I didn't think it needed any).  Add the chicken and any accumulated juices to the sauce, and turn the chicken to coat.
  4. Serve the chicken with a spoonful of onions and sauce on top and a serving of spinach balls as a side. YUM!

December 16, 2012

Crock Pot Potato Soup

I absolutely love potato soup.  Sadly, I'm the only one in my house who eats soup.  The boys are weirdos.  So I made a big vat of potato soup in the crock pot today and it's ALL MINE, losers.  Ok, my mom will likely have some with me, but how could I be sad to have a week of potato soup in my future, plus more in the freezer?  The answer is: I couldn't.  Especially with this awesome recipe, courtesy of my friend Mel, who shared it courtesy of this recipe.  Easy and amazingly delicious: hits the spot.  Though I had a hard time waiting for it to be done.  I wanted to dive right in a whole 18 minutes after putting everything in the crock pot.  Patience is difficult for me.


Ingredients
  • 30-ounce bag of frozen, shredded hash browns (I used Ore Ida)
  • 42 ounces of chicken broth
  • 1 can of cream of chicken soup
  • 1/2 cup onion, chopped
  • 1/4 teaspoon ground pepper
  • 8-ounce package of cream cheese, cut into chunks (approximately 1-ounce pieces)
  • 1 1/2 cups shredded sharp cheddar cheese, plus more for topping
  • Green onions, bacon, or sour cream for topping (optional though highly recommended!)

Directions

  1. Add hash browns, chicken broth, chicken soup, onion, and pepper to crock pot.  Stir and set on low for 6-8 hours.
  2. 1 hour before serving, add cream cheese and 1 1/2 cups of cheddar cheese.  Stir occasionally until both cheeses are melted and incorporated into soup.
  3. Serve with desired toppings.

Most Awesome M&M Cookies of All Time

I have never tasted M&M cookies this delicious before.  I'm sad that I've given all but a few of them away.  Must make more ASAP.  Thanks to How Sweet Eats for this one!


Ingredients
  • 2 cups + 2 tablespoons all-purpose flour
  • 1/2 teaspoon baking soda
  • 1 1/2 sticks (12 tablespoons) salted butter, melted and cooled
  • 1 cup brown sugar
  • 1/2 cup sugar
  • 1 egg + 1 egg yolk, room temperature
  • 2 teaspoons vanilla extract
  • 1 cup mini M&Ms

Directions
  1. Preheat oven to 325°.  Mix the flour and baking soda in a bowl and set aside.  In another bowl, mix the butter and sugars until they are combined.  Add the egg, egg yolk, and vanilla and stir until mixed.  Gradually add flour mixture until dough forms.  It will look crumbly at first, but it will come together.  Fold in the M&Ms.
  2. Shape dough into tablespoon-sized balls and tear each ball in half.  Stack the halves on top of each other (first half flat side down, second half round side down) so they look like this.  Place 2 inches apart on cookie sheets.
  3. Bake 8-12 minutes or until the edges are slightly brown.  The centers should be soft and puffy.  Do not over bake.  Let sit on cookie sheet 2 minutes, then transfer to wire rack and cool completely.

Joy Door Decoration

I got the idea to spell out JOY with a jingle bell wreath as the O from this etsy listing.  I quickly decided I wanted to convert that into a new decoration for my front door.  The tired, slightly rusty old wreath I'd been using for about 10 years was ready to be retired.  I was intimidated by the idea of making my own jingle bell wreath, despite some simple enough tutorials, so I bought a cute one on Etsy.  Painted my own J and Y from Michaels, linked em with ribbon, and TA DA:


I'm going to toot my horn on this one.  My husband teased me that Pinterest is fun and all, but I don't have to copy everything from it exactly.  I *can* think of things on my own.  Well I'd say this is a nice adaptation, and I'm the one who thought to hang it vertically with ribbon!  The details may be lost on him but hey, I made it for me.  So there.  ;)

Supplies
  • J and Y unpainted wooden letters (got mine $3 each from Michaels)
  • Red paint
  • Ribbon
  • Jingle bell wreath (bought or made yourself; as long as the ring and the letters are about the same size, you're fine)
  • Way to hang your letters: I used Command wall hook strips; nail and a staple on the back of the J would do fine, too
  • Hot glue gun and glue to secure everything together


Directions
  1. Paint letters red and allow to dry.
  2. Glue thinner ribbon on top of thicker ribbon (optional if you just use one ribbon).
  3. Cut ribbon in half to have even lengths on top and bottom.
  4. Glue top of ribbon to bottom of J, run taught to the wreath, and secure to the wreath.  My wreath had a wire for hanging, so I looped the ribbon through the wire and glued it in place.
  5. Secure next length of ribbon to bottom of the wreath.  I didn't have a wire to loop through here and I was doubtful that the glue would hold well on such a lumpy surface without crinkling my ribbon, so I actually stuck on some velcro to the back of the wreath and the ribbon.  That'll hold, for sure!  Run the ribbon taught and glue to the Y.  Glue along the empty space in the Y so that the ribbon is attached at several points.
  6. Hang on the door so that it hangs evenly.  I stuck a Command strip to the vertical part of the J and the Y, so that it holds top and bottom.  It can get pretty windy in my corner of the neighborhood, and I didn't want the decoration clanging around in the middle of the night.  Because everything is lightweight, the strips are holding it up just fine.

December 14, 2012

Cookie Gift Basket

Ahh, my cookie madness has reached its endgame.  We had the silent auction at work today, and after lots and LOTS of bids, the basket ended up going for $64!  Hooray. :)

I've broken down the basket into individual pictures of each container to share ideas for packaging.  It looked great all put together, but any one of these cookie sets on its own would make for a sweet hostess gift, stocking stuffer, or tag along to a gift.  I hope you enjoy!

Mountain of cookies before sorting into containers.  Over 14 dozen in all!

First up: M&M cookies.  I didn't post the recipe for these when I made them, but I will next time I whip up a batch (UPDATE: Here 'tis!).  They are SUPER nummy.  I bought a set of 3 plain white treat boxes from Michael's for just a few dollars.  Tied up with ribbon I already had, and a little label I made up and printed taped front and center.

Love these chocolate cookies with peanut butter filling.  A cupcake treat box from Michael's: less than $5 for a pack of 3!

Using the mason jar for the chocolate gingerbread cookies was a great approach.  They're delicious but with such a strong scent, could easily have made the entire basket smell like gingerbread spices.  This kept them sealed away and adorable.  I definitely will keep the mason jar cookie gift idea in mind in the future!  For just a few dollars each, this is a great way to have a really special-looking gift.

I loooove my mom's snickerdoodle recipe.  Even after freezing and thawing, these still tasted perfectly soft and chewy and smelled amazing.  I need to write up this recipe, too.

Macaroons are so small!  My batch of a dozen only took up half a cookie box, so I filled the other half with the small stamped cookies that were the few success stories from my failed attempts at stamped sugar cookies.  See- all worked out in the end!

Ommmm nom nom nom love these bad boys.  That's why they got an awesome special ribbon.

I adored these treat bags from Michael's (just a few dollars for the set of 3).  I printed up the labels myself to compliment these packages in particular.  This one looks great with the simple red bow.  Which really helps to show off those awesome looking cookies through the window!

...but that doesn't mean we can't use a fun bow on the next one!  Note the stain on the left side of the box from buttery goodness seeping through from the pecan tarts, hahaha.  I accidentally doubled the butter in the dough for these when I made this batch.  WHOOPS.  Delicious mistake = super delicate and delectable tarts.  I'll take it.

Ahh, these tricky buggers definitely needed to be showcased appropriately.

Another unique packaging idea: kitchen canister!  I found this one at TJ Maxx with the sugar and flour canisters in the kitchen area: $3!  Another great way to seal in unique cookie scents.  The guy who won the auction on the gift basket was amazed at the idea of these nutella chocolate chip cookies and was asking for all the recipe details.

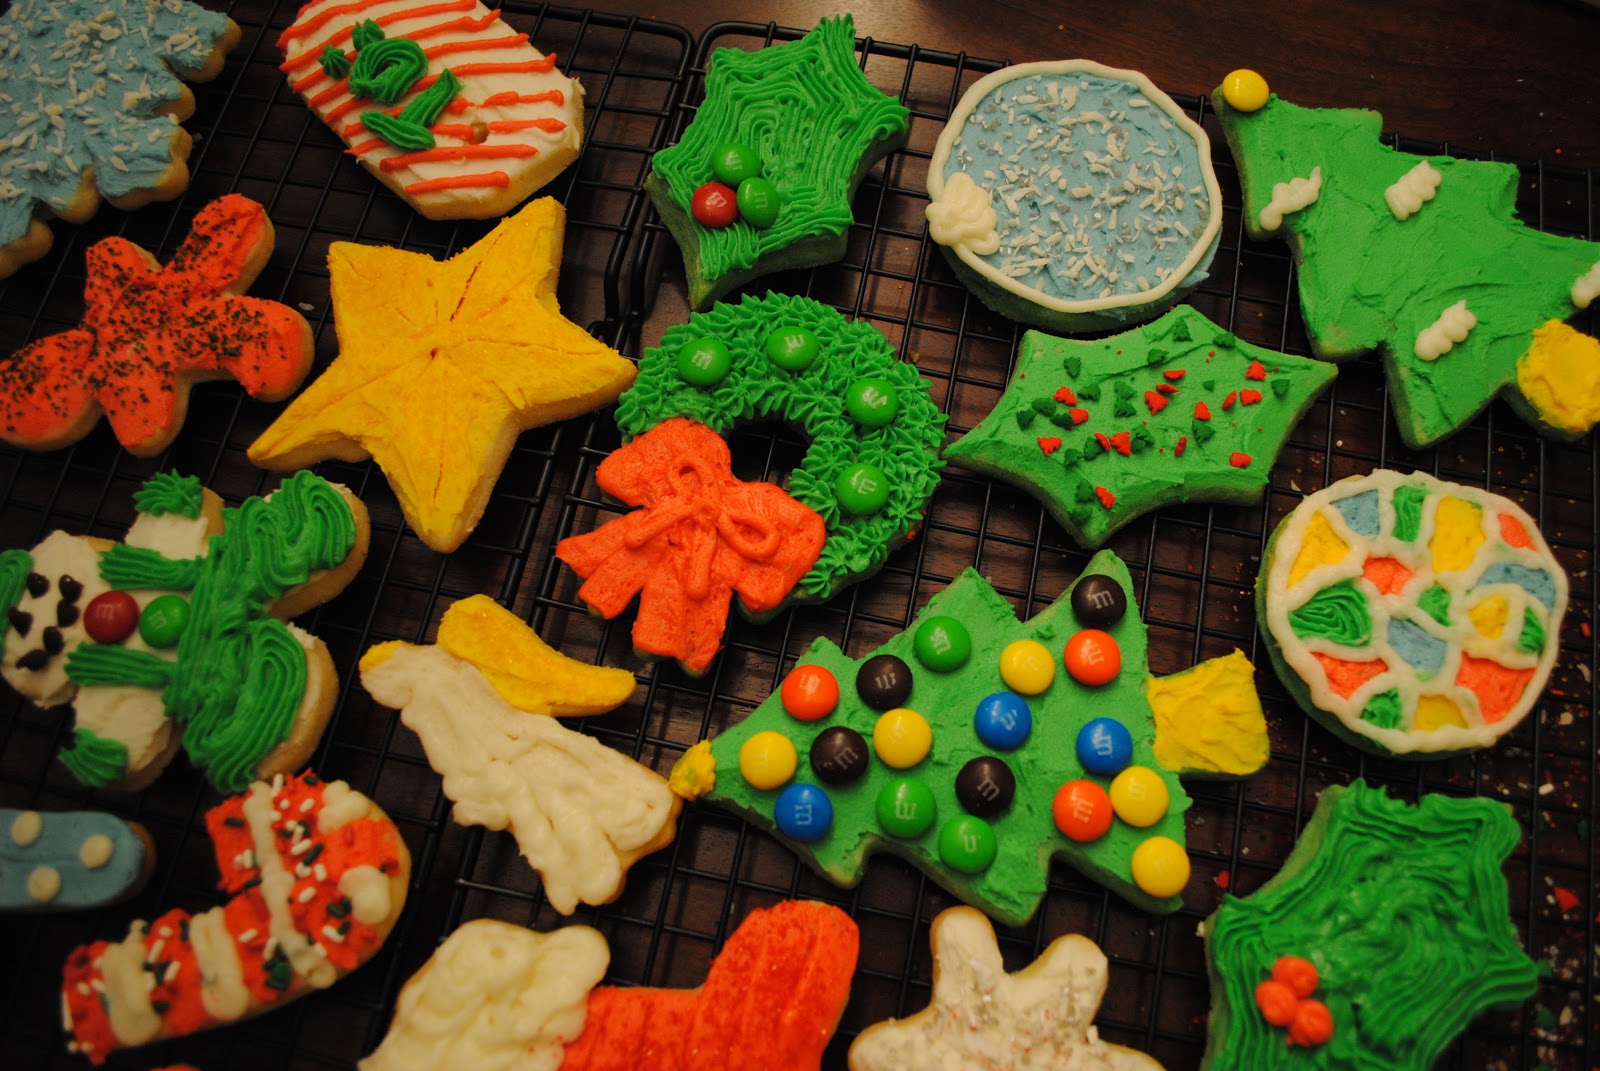
Final assembly.  I found the basket on sale at Michael's for $7 the day after Thanksgiving.  Score!  What's funny is that I had it all nicely put together, then realized that I'd left out the decorated cut out cookies.  Crud!  Time to play tetris all over again.  But all's well that ends well.

Closeup #1.  Look at all those bows.  Thank you Crabtree & Evelyn for schooling me well back in the day.

The scent of sugary buttery goodness followed me all day.

Warm holiday fuzzies all around!

December 13, 2012

Coconut Cream Cheese Pinwheels

Well well well- we've gotten to the home stretch in my cookie decathlon.  For the final batch, these tricky little monsters that are oh so delicious and oh so devilish to make.  I got the recipe from my Martha Stewart Cookies book, which is different from the one on her website.  Wonder why.  Anyway,  If you find any tricks to working with sticky cookie dough, please share!


Just look at those stealthy ninja star temptresses!

Ingredients
For the dough

  • 2 cups all-purpose flour, plus more for work surface
  • 2/3 cup sugar
  • 1/2 teaspoon baking powder
  • 1/2 cup (1 stick) unsalted butter, room temperature
  • 3 ounces cream cheese, room temperature
  • 1 large egg
  • 1 teaspoon pure vanilla extract
For the filling
  • 3 ounces cream cheese, room temperature
  • 3 tablespoons granulated sugar
  • 1 cup unsweetened shredded coconut (I get mine at Whole Foods)
  • 1/4 cup white chocolate chips
For the glaze
  • 1 large egg, lightly beaten
  • Fine sanding sugar, for sprinkling (I just used granulated sugar)
  • 1/3 cup strawberry jam

Directions
  1. Make dough by whisking together flour, sugar, and baking powder in a bowl.  Set aside.  Mix butter and cream cheese in the bowl of an electric mixer with the paddle attachment, set to medium-high speed for about 2 minutes or until butter mixture is fluffy.  Mix in egg and vanilla.  Reduce speed to low and add the flour mixture, mixing until just combined.  Divide dough in half, and pat into disks.  Wrap each piece in plastic wrap, and refrigerate until dough is firm, 1-2 hours.  Maybe overnight would help with the sticky factor.
  2. Preheat oven to 350°.  Line baking sheets with nonstick baking mats, such as Silpats.
  3. Make filling by creaming together cream cheese and sugar in an electric mixer with the paddle attachment, on medium speed, until fluffy.  Fold in coconut and chocolate chips.
  4. Remove one disk of dough from the refrigerator.  Roll about 1/8 inch thick on a lightly floured surface.  I tried rolling it out between pieces of wax paper, and had to be very careful with pulling the paper off my super thin dough.  I have no clue if I got it to 1/8 inch thickness, but it was as thin as I could go and still work with it.  
  5. With a fluted cookie cutter or pastry wheel, cut into fifteen 2 1/2 inch squares.  I broke out the tape measure for that, I kid you not!  Transfer to prepared baking sheets, spacing about 1 1/2 inches apart.  Refrigerate for 15 minutes.
  6. Using a fluted pastry wheel, cut 1-inch slits diagonally from each corner toward the center (but don't cut all the way to the middle; leave a spot in the middle for the filling).  Place 1 teaspoon of filling in the center of each square.  Fold over every other tip of the cut pastry to cover the filling, forming a pinwheel.  Press lightly to seal.  Use the tip of your finger to make a well in the top.
  7. Make the glaze by using a pastry brush to lightly brush the tops of the pinwheels with the beaten egg.  Sprinkle with sugar.  Bake 6 minutes.  Remove and use the lightly floured handle of a wooden spoon to make the well a little deeper in each cookie.  Fill each well with about 1/2 teaspoon of jam.  Return to oven and bake, rotating halfway through, 6 more minutes.
  8. Transfer sheets to wire racks and let cool 5 minutes.  Transfer cookies to rack and let cool completely.  Roll out remaining dough and repeat.

December 9, 2012

Spiced Honey-Brushed Chicken

My family's favorite chicken recipe is this one, adapted from Cooking Light.  Simple, fast to cook, and packed with tons of flavor.  I served it tonight with roasted potatoes and Brussels sprouts.  YUM.  If you've made it to adulthood without learning that Brussels sprouts are actually delicious, just try making them the way I do.  Once.  That's all I ask!  What do you have to lose?  A few dollars on produce?  Just dooo iiit.


For the Brussels sprouts
Ingredients

  • 1/2 to 1 lb small Brussels sprouts (the smaller the better)
  • 1/2 teaspoon olive oil
  • 1/2 teaspoon salt
  • 1/4 teaspoon pepper
Directions
  1. Preheat oven to 425°.  Trim stems off sprouts, cut in half vertically (stem to top, as seen in picture), and remove any loose outer leaves.
  2. Line a cookie sheet with aluminum foil.  Scatter sprouts in a single layer on sheet.  Drizzle with olive oil, sprinkle with salt and pepper, and toss to coat.
  3. Roast for 20-30 minutes, stirring occasionally so they cook evenly.  Some leaves will blacken and fall away, but that's fine.
  4. Set aside while you broil chicken.  Put sheet back in oven last 2 minutes while chicken is cooking to keep the sprouts nice and hot.


For the Chicken
Ingredients

  • 3-4 boneless, skinless chicken breasts
  • 1 teaspoon garlic powder
  • 1 teaspoon chili powder
  • 1/2 teaspoon salt
  • 1/2 teaspoon ground cumin
  • 1/2 teaspoon paprika
  • 1/4 teaspoon ground red pepper
  • 3 tablespoons honey
  • 1 teaspoon cider vinegar
Directions
  1. Preheat broiler.  Combine spices in a small tupperware container and shake to mix.  Line a baking sheet with aluminum foil and place chicken on top.  Sprinkle spice mixture generously on both sides of chicken breasts.  Use ALL of it!
  2. Broil chicken 5-7 minutes on each side.  While broiling, combine honey and vinegar in a small prep bowl, stirring well to thoroughly mix.
  3. Brush 1/2 of the honey mixture on the chicken.  Broil an additional 1 minute.  Take chicken out of oven, flip to other side, and brush with rest of the honey mixture.  Broil 1 additional minute or until chicken is done.

Cut Out Cookies

As my husband pointed out today, I just loooove decorating cut out cookies.  It's my chance to feel artistic. :)  I used my sugar cookie recipe and Martha Stewart's fluffy vanilla frosting recipe.  Two notes from this year's decorating adventure: it makes a world of difference using icing bags and fun tips, and omg do I love making frosting with a stand mixer.  SO MUCH easier!  OK, that's enough. Time for some fun pictures!

Christmas cookie bounty.

As I've been saying in many previous cookie posts, I'm putting together a cookie gift basket for a silent auction at my company's holiday party.  Hence the "To: USP" gift tag.  :)  I collected a selection of the prettiest cookies for the basket, but the tin I'm using for them isn't very big.  I only fit about 10 cookies in there, so the rest are allllll for me and the family.  Excellent.


I'm very proud of that wreath, thank you very much.  Also happy with the stained glass ornament.  I did a stained glass tree last year to rave reviews, and nobody wanted to eat it!  Also, I'm kind of in love with the simple tree in the top right corner.  It looks like it belongs in A Charlie Brown Christmas.


Very proud of this year's cookie house.

Nom nom nomedy nom.

December 8, 2012

Pecan Tarts

When I was in high school, one of my best friends had me over at her house for dinner all the time.  Including her mom and stepdad's annual Christmas party.  They made the *best* food, and my all time favorite thing they made were pecan tarts.  Now, this isn't their recipe (it's Martha Stewart's), but omg is it bringing back some serious memories of the golden light in their kitchen, smell of these tarts in the oven, laughing and goofing around and then settling down to listen to a Christmas story on a record.  I can't remember what the story was- maybe A Christmas Carol?  Something shorter?  Either way- treasured memories all brought to mind with this treasured treat.  Enjoy.


Ingredients
Dough
  • 1/2 cup pecans
  • 1/2 cup mascarpone cheese
  • 4 tablespoons (1/2 stick) unsalted butter, room temperature
  • 3/4 cup all-purpose flour
  • Pinch of salt


Filling
  • 1 large egg
  • 1/4 cup packed light brown sugar
  • 2 tablespoons maple syrup
  • 2 teaspoons pure vanilla extract
  • 1 tablespoon unsalted butter, room temperature
  • 1/4 teaspoon salt
  • 3/4 cup pecans, coarsely chopped
Directions
  1. Preheat oven to 350°.  Make dough: process pecans in a food processor until finely ground.  Put mascarpone and butter into the bowl of an electric mixer with the paddle attachment.  Mix on medium-high speed until well blended.  Add flour, ground pecans, and salt.  Mix just until dough comes together.
  2. Roll dough into 1-inch balls (should make 16) and press into bottoms and up sides of cups of mini muffin tins.  I used a nonstick tin and I didn't have to use spray or anything on it beforehand.
  3. Make filling: whisk the egg, brown sugar, maple syrup, vanilla, butter, and salt in a bowl.  Stir in pecans.  Spoon about 1 1/2 teaspoons of filling into each muffin cup.
  4. Bake until crust begins to turn golden, about 15 minutes.  Let cool completely in tins on wire rack.  Gently remove tarts from muffin tin.  I like to slip a spoon in a bit to wedge them out carefully.  I'm sure you could also place a plate on top and carefully flip the tin, emptying out the tarts.

Glitter Votives

After seeing how easy it was to make glitter ornaments, and finding myself with lots of extra floor finish and glitter on my hands, I wanted to try my hand at making more glittery things.  Clear glass candle holders and vases came to mind, and I came across some nice cheap ones at Walmart.  I also had some extra jingle bells on my hands, and a coworker reminded me of some pictures we'd each seen on Pinterest of centerpieces with votives and jingle bells.  Now we're in business.


Supplies
  • Clear glass votives (ones pictured $2 each from Walmart)
  • Pledge with future shine floor finish
  • Glitter
  • Optional: jingle bells in different sizes and tray
Directions
  1. Squirt about a teaspoon of floor finish into votive.  Gently rotate votive on its side to thoroughly coat.  I recommend doing this over a cardboard box or some other disposable work surface.  To coat upper rim of votive, squirt floor polish on a paper towel and run around the rim of the votive.  Pour out excess floor polish.
  2. Pour about 2 teaspoons of glitter into the votive.  Again gently rotate votive on its side to lightly coat the inside with glitter.  Shake out excess glitter.  Set aside and let dry completely.  I'm not sure about lighting candles in your chemical-soaked votives, so I recommend using electric candles in mine.  Fair warning. :)
Look how pretty this is! 

Reindeer Food

A coworker shared this treat last year, and I couldn't wait to break it out again for the holidays.  Easy, so tasty to munch on with a handful here and there, and it makes a nice little gift when visiting people for Christmas parties or just stopping in to say hi.  Go ahead and make it.  Right now!


Ingredients (yay for 3 ingredient treats!)
  • 6 cups Rice Chex or Chocolate Chex cereal
  • 12 oz (1 bag) white chocolate chips
  • 1/3 cup coarsely crushed peppermint candy canes (3 regular size, unwrapped)


Directions
  1. Lay out a piece of wax paper on counter or cookie sheet.
  2. Place cereal in a large bowl.  Crush candy canes.  I like to put mine in a ziplock bag and use the bottom of a glass to break them up.
  3. In a microwaveable bowl, microwave white chocolate uncovered on high at 30 second intervals, stirring in between, until chocolate is smooth and creamy.  Stir in half the crushed candy canes.
  4. Pour chocolate mixture over the cereal and toss evenly to coat.  
  5. Spread mix in a single layer on wax paper.  Immediately sprinkle with remaining candy cane pieces while mixture is still warm.
  6. Let stand until set, about 20 minutes.  Resist eating warm stragglers.  I dare you.  Gently break up mix and store in an airtight container.  I like to set mine in wax paper in holiday tins when I give it as a gift.

December 2, 2012

Glittery Snowflake Wreath

Ok, last post for the weekend: I swear!  I wrapped up the last of my Pinterest crafts I had planned on doing this weekend, and just in time, too.  I got the e-mail from the Christmas tree company: our tree comes Wednesday.  YAY!
So back to this project.  This was one of my very first pins when I first got on Pinterest last winter.  So pretty.  I didn't have time to get to this one on Saturday, but I made time tonight.

So I credit myself on this one in a few ways.  I adapted a bit from the original, but in ways I'm really happy with.  By far I think my best decision was to wrap the flat foam rings with ribbon.  The original either used opaque snowflakes (mine are clear) or the world's most invisible foam ring because I sure didn't see it in the picture.  Anyway, I recommend doing the same.  It's really easy- just hold one end of ribbon against the flat foam ring, and begin twisting the ribbon around.  After the first few loops that starting piece is already held in place.  I didn't measure out a length of ribbon- I just kept it on the spool until the whole circle was covered.  Then I tucked the ends in and hot glued that puppy in place.


Supplies (per wreath)

  • Flat foam ring
  • Ribbon- your choice on variety.  I used silver on the foam ring, a wide red ribbon with gold trim to hang the wreath, with cream snowflake lace ribbon as an accent.  Probably about 5' of each type.
  • Glitter snowflakes.  Mine are clear plastic.  I definitely recommend plastic on this one!  Glass would scare me, and I think anything but thick paper would burn from the hot glue.  You could always use cold glue buuut... I don't know how nice it would look when it was all said and done.
  • Hot glue gun and glue
  • Masking tape
Directions

  1. Wrap foam ring in ribbon and glue last piece in place.
  2. Glue snowflakes onto ring, either just touching or slightly overlapping each other, depending on how many you have for your ring and the effect you want.
  3. Cut a long length of red ribbon to hang the wreath.  Vary the length depending on where you plan to hang it and how you want to hang it.  I put mine over the top of a closet door, so I allowed some excess to go over the door and tape it off to hold it in place.
  4. Cut a length of accent ribbon just over half the length of the red ribbon (you only need it to decorate the front with enough to loop through the wreath and extend up the back a little, not the entire length of the red ribbon front and back).
  5. Loop the red ribbon through your wreath, and glue the ends together.  Then glue the bottom of your loop against the wreath, front and back.
  6. Glue the accent ribbon in place at 3 points: the very top of your ribbon loop, about halfway down the front of the ribbon, and the back side of the ribbon.
  7. Position your wreath in place, and if hanging over the top of a door where the back won't be seen, you can tape it in place with masking tape.  The door being closed will do most of the work for holding your wreath in place (the wreath and ribbon are really light), and the tape is just to make it secure.  You may want to try another approach if using for a main entry door where you'll see the top of the ribbon all the time.


Doesn't that just look so festive and happy?


Mocha Hazelnut Cookies

I discovered and fell in love with these cookies within the last couple years.  Nutty and chocolaty with a hint of coffee flavor- mmmm.  It's like putting awesome coffee house smells into a cookie!  If you have a hard time finding hazelnuts and hazelnut syrup, I found mine at Whole Foods.  I've also found hazelnuts cheaper online, and they're just as fresh as the whole ones I found in the store.  Bonus- they were already roasted when bought online!

Ingredients

  • 1 pouch (1 lb 1.5 oz) Betty Crocker sugar cookie mix
  • 1/3 cup unsweetened baking cocoa
  • 3 tablespoons instant coffee granules or crystals
  • 1/2 cup butter, room temperature
  • 3 tablespoons hazelnut-flavored syrup for beverages
  • 1 egg
  • 1 1/2 cups toasted hazelnuts, chopped (I pulse mine just a few times in the food processor) and divided
  • 1 cup miniature semisweet chocolate chips
  • 2/3 cups Betty Crocker Rich & Creamy chocolate frosting
  • 4 1/2 teaspoons hazelnut-flavored syrup for beverages


Directions
  1. Preheat oven to 350°.  In a large bowl or mixer stir together cookie mix, cocoa, and instant coffee.  Ad butter, 3 tablespoons of syrup, and the egg.  Stir until a soft dough forms.  Mix in 1 cup of the nuts and the chocolate chips.
  2. On an ungreased cookie sheet, drop rounded tablespoons of dough about 2 inches apart.  Press each mound with the bottom of a measuring cup to flatten softly, then pick up dough so it isn't stuck to cookie sheet.
  3. Bake 8-10 minutes, rotating halfway through, until set.  Cool 3 minutes, then transfer to wire rack and cool completely (about 15 minutes).
  4. In a small bowl, stir frosting and 4 1/2 teaspoons syrup.  Spread about 1 teaspoon of frosting on each cookie.  Sprinkle with remaining 1/2 cup of nuts.

Glitter Reindeer Silhouette

I saw a couple variations on the glitter reindeer silhouette, and really liked the idea- especially the framed one instead of the one on canvas.  Now, I know I bought some shiny poster board at Michael's, but I'm pretty sure that got left behind at the register.  Or may be hidden in my car or house somewhere.  Either way, it was nowhere to be found when crafty time rolled around, so I improvised.  I'm impressed with my ingenuity on this one.  I cut up a JCPenny's box lid to use as my canvas.  Shiny and seasonally appropriate: win!
Supplies
  • Reindeer silhouette to use as stencil.  I printed mine out from a Google image search of "reindeer silhouette".
  • Frame
  • Poster board (or box lid!)
  • Masking tape
  • Pencil or sharpie same color as your glitter
  • Glitter
  • Glue
  • Paint brush
  • Patience


Directions
  1. Cut out poster board to fit the frame.
  2. Put a small loop of tape on the back of your silhouette and tape to the center of your poster board.
  3. Trace the silhouette lightly.  Gently remove the silhouette so as not to tear the poster board.  Masking tape really works best for this.
  4. Fill the outline of the silhouette with glue.  I was generous with the glue, pouring in the center of the silhouette and a little bit down the legs and through the antlers.  I then used a paint brush to carefully trace the edges and skinny details.
  5. Shake on glitter- you can be very generous!
  6. Let sit at least 10-15 minutes before shaking off excess.  I tapped mine off almost immediately and I made my reindeer fat, the poor guy.  The glue shifted down to his belly and started to look a bit clumpy.
  7. Allow to dry completely (overnight is best) before framing.  I framed mine too soon, and it was... unfortunate.  The glue started to push around from the pressure of the frame and, well, my reindeer ended up being a boy reindeer.  Very obviously.  While hilarious, it wasn't so appropriate to have around my 2 year old.  I had to take apart the frame and wipe up the new addition with a wet paper towel.  Good news: plain Elmer's glue wipes up very easily!

Ornaments!

I didn't really realize it until yesterday's Pinterest Party was pretty much over, but I spent most of my time making ornaments.  I got sucked in and was having a lot of fun, so no regrets there!  I just didn't realize the mania until it was over, haha.


Glitter ornaments are clever and pretty easy to make.  I was excited to find a way to have glittery ornaments that actually wouldn't spread glitter to everything within 10 feet of them.  The secret to these is floor polish.  Weird, but it works!

Supplies
  • Clear ornaments (glass or plastic)
  • Glitter
  • Pledge floor finish with future shine (you can't make substitutions on the kind of finish.  I got mine on Amazon (yay free shipping), but it's sold at Walmart and hardware stores like Ace or True Value)
  • Funnel or paper to make a cone


Directions
  1. Take the topper off of the ornaments.  Pour in about 1 teaspoon of Pledge into each ornament.
  2. Gently rotate the ornament to evenly coat the inside with Pledge.  You don't want to shake (air bubbles will cause lumps in the glitter later).  You may want to cover the top of the ornament with a paper towel while you try to coat the very top of the ornament.  If you just cover with your fingers and get the Pledge on your fingers, it gets a bit sticky.  Then you get fingerprints on your ornament (or your friend Marian does, and worries about it).  You won't notice them when the ornaments are done, but it makes things messier than they have to be.
  3. Pour out excess Pledge back into bottle.
  4. Put funnel or paper cone into neck of ornament.  Pour in a generous amount of glitter (a couple tablespoons worth).  Take out funnel and set aside somewhere that can be glittery (I had a trash box next to me for crafting madness).  Again gently rotate the ornament to evenly coat with glitter.
  5. Pour out excess glitter back into container.
  6. Pop your topper back in and you're done!


Painted glass ornaments were deceptive from the original pin, but still really nice in the way they turned out in the end.  The pin said to put drops of paint into an ornament and shake to get the effect seen in the picture.  I don't believe that's what they did- it looks more like someone painstakingly painted the inside of their ornaments.  Anyway, here's how I did it.

Supplies
  • Clear ornaments (plastic or glass)
  • Acrylic paint
Yay for two supply crafts!

Directions
  • Pour a streak of paint into the ornament, trying to angle so that it drips along the side.  Alternate colors in a couple areas of the ornament.  Gently swirl the ornament to get a marbleized effect with the paint. It worked best when I would add just a couple streaks of paint, swirl, add a couple more, etc. rather than try to add all the paint in the beginning.
  • Optional: put a small straw in the opening of the ornament, and blow to push the paint around.  I didn't really notice this making much of a difference, but it did change the way the paint moved around in the ornament.
  • Add drops of paint strategically around the ornament to cover any blank spots, and gently rotate to thoroughly coat.
  • I recommend draining the excess paint into a plastic cup.  I didn't, and I can see where some of my ornaments had excess paint dry in a pool on one part of the inside.  It's not bad, and creates an interesting shadow when held up to the light, but it will affect how evenly the ornaments hang I'm sure.
  • When dry, put toppers back in the ornaments.  If you put them in while still wet, they may streak the paint at the top of the ornament, making blank spots.


Confetti ornaments are an adaption from a pin making confetti tumblers, which in itself is a knockoff of glasses sold at Anthropologie.  So the idea several times removed just came down to me going Seurat on an ornament and getting bored.  Hence why there's only one, and it's not nearly as densely covered as the tumblers in the pin.  I needed coaching to go that far.  Still, very pretty!

Supplies
  • Clear ornaments (glass or plastic)
  • Acrylic paint
  • Paint brush (q tips would work just fine too, but you'd need a batch of them.  They'd wear down with the number of dots you need to make.)


Directions
  • Take the topper off of the ornament.  Squeeze blobs of paint into a paper plate (or palette if you're fancy).
  • Paint different color dots all over bottom part of ornament, being careful to alternate colors regularly.  Keep in mind that the first layer is the one primarily seen in the ornament, so it's most important to keep that one varied.  When you start overlapping colors, it's ok to be a little less OCD about how much variation you have.
  • This is a "can't see the forest for the trees" project, to be sure.  You have to hold the ornament different ways, at different angles, and even have other people take a look at it for you to see if you're covering it evenly.  For some reason I had a hard time getting paint on one portion of the ornament.  My brain just wouldn't accept it, even though my friends and I could clearly see one spot was a bit more bare than the rest.  See the right side of my ornament?  Oh well.  Accept the quirkiness.
  • Pop your topper back in and rally yourself if you want to do more than one. :)


This last one was what I was most excited to make.  I was thrilled when I got the idea for a golden snitch ornament from Pinterest.  My husband and I love Harry Potter, and we can't wait for our son to be old enough for the books.  Being a nerd, I did a Google image search of golden snitches, and made some modifications to the picture I first saw on Pinterest.  I wanted its wings to look more like they did in the movies, and while I agreed there were some swirly gold patterns on the ball I didn't care about making THAT exact of a replica.  We need to set expectations appropriately here.  I also didn't like the way they glued the wings to the ornament.  They looked clunky, so I found another way to secure mine.


Supplies
  • Small gold ornament
  • Gold ribbon with wire (can't just be silk ribbon- you need to be able to manipulate and shape it)
  • Glitter gold paint
  • Paint brush and scissors
  • Glue (optional)


Directions
  1. Paint designs on ornament and set aside to dry.
  2. Cut proportionate lengths of ribbon for the wings.  Mine are about 4" for each wing for a 2" diameter ornament.
  3. Shape wings with a subtle curve to look like snitch wings!
  4. Trim bottom side of each wing to have an arch, similar to the shape from the movie still I linked to.
  5. Cut vertical slits in the bottom half of the wings so that they can move and kind of flutter.  My slits were every 1/2" or so.
  6. When ornament is dry, pull off topper.  Put ends of ribbon into neck of ornament and replace ornament topper to hold them in place.  You may need a dab of glue to secure them.

And that's the end of my ornament crafting revelry.  It was great and fun and I'm really proud of how nice they look, considering that this was my first attempt at projects like these.  Enjoy!