December 29, 2013

Crock Pot Pork Chops with Apples and Shallots

Yesterday I adapted my original Pork Chops with Apples and Shallots recipe for the crock pot, and got equally tasty results.  The texture of the pork was different, though- fall apart pork roast style.  I thought I'd share the adaptations I made for the crock pot, and hope you enjoy!


Pork Chops with Apples and Shallots

Ingredients
  • 2 tablespoons olive oil
  • 2 medium shallots, quartered lengthwise
  • 2 granny smith apples, peeled, cored, and sliced into eighths
  • 1/2 cup white wine and 1 cup chicken broth, or 1 1/2 cups apple cider (I used the white wine and water because I was out of broth)
  • 4 bone-in pork chops
  • Salt and freshly ground black pepper
Directions
  1. Place shallots, apples, and the wine/broth mixture or cider in crock pot.
  2. Heat olive oil in a pan over medium heat.
  3. Pan sear pork chops until just golden on each side.  Season with salt and pepper, then transfer to crock pot, on top of apples and shallots.
  4. Cook on low 4-6 hours.
  5. Turn pork chops in juices before serving.  Serve pork chops with warm apples and shallots and a spoonful of crock pot juices spooned over top.

December 26, 2013

Candy sleigh gifts

So we all run into that situation where you need a little gift for your coworkers, a neighbor, or acquaintance to show that you care without breaking the bank.  Especially when you need to make multiples of said gift!  Cue this adorable idea I got from Pinterest last year, modified to be more affordable and use tape instead of hot glue.  The original pin used full size candy bars with pyramids of candy on top!  Maybe that works if you're making just one or two of these cute sleighs, but when you have to make a dozen, break out the mini candy.  I was able to put all 12 of these together for less than $20, with supplies to spare.  Also?  Mine have little sleigh drivers who bobble and sway for your gift givees, which is a bonus dash of holiday cheer.  ;)


Supplies (for 12 sleighs)

  • 24 full size candy canes
  • 12 pieces of cardstock, cut approx. 3" x 4" (just large enough to be a base for your sleigh)
  • 12 mini Reese's peanut butter trees
  • 1 bag of Kit Kat minis (enough to have 24)
  • Toy toppers (I got mine from Oriental Trading Co.)
  • Ribbon
  • Tape
Directions (photos to follow)
  1. Tape two candy canes to a piece of card stock.  I recommend taping each candy cane at each end of the card, rather than at just one spot, so your candy cane doesn't tip over.
  2. Tape the Reese's to the card stock between the candy canes.
  3. Tape the Kit Kat minis on top.
  4. Tape the toy topper at one end to the candy.
  5. Wrap your ribbon around the sleigh multiple times, and tie with a bow on top.  (Optional: slide a gift tag on the ribbon before tying, or place a sticker for your recipient somewhere on the sleigh.)
Tape candy canes in place one at a time, at each end of the card.  You want the candy cane near the edge.

Other candy cane in place, and Reese's tree taped in the middle.

Layered on the Kit Kat minis and our topper- almost done!

Make it festive with a bow, and this guy is ready for business.

Snowflake Stamp Ornament

So this simple idea dawned on me after the last Pinterest party, where I never got around to using my snowflake hole punch to make pretty garland for the kitchen windows.  I still wanted to use it, but switched it around to make an ornament with the snowflake cutouts.  I glued the center of each flake to a foam ball, and ta da- gorgeous ornament.  It was so simple, my 3-year-old could help, though.  I'd dab the glue on the ball, he'd plop a snowflake down, and we'd move on to the next.  Easy peasy!


Supplies

  • Snowflake hole punch
  • 5+ sheets of white paper (I just used printer paper)
  • Medium foam ball/ornament
  • Hot glue gun and glue
  • Ribbon or string to hang the ornament
  • Long pin, like for a boutonniere 
Directions
  1. Punch out at least 50 snowflakes from the white paper.
  2. Fold the edges of each flake away from the center.
  3. Place a dab of hot glue on the foam ball, and glue the center of the snowflake in place.  Repeat, clustering the centers of the snowflakes closely together (nearly touching) so that the arms of the snowflakes mingle a bit.
  4. Repeat until entire ornament is covered.
  5. Place a dab of glue on the ornament, and pin the ribbon in place.  Let dry before hanging.

December 10, 2013

Pregnancy Announcement

What better, more accurate way to say "Woo hoo!  I'm a pregnant, achy, nauseous, blob!" than with adorable snowmen?  That's how my hubby and I broke the news today, with this picture:


We've got daddy snowman wearing his beloved Steelers hat, momma in my hat, little kid snowman in my son's hat, and a baby snowman wearing an old baby cap and pacifier.  Roll up some snowballs, decorate with buttons and carrot noses, twig arms, family winter gear, and you're in business.

Also, I finally finished my MBA.  Is this a week for celebrating or what?  Bonus: now I have time to blog again!  Believe me, I've got a piled up bunch of pics and topics for posts and just needed the time (and absence of nausea) to write them all out.

Happy holidays!
-Linds

November 12, 2013

Christmas Crafts!

Hello, Buddy the Elf, what's your favorite color?  Mine is SPARKLES!  Ok maybe I'm not that extreme, but I have no shame in getting started on Christmas things a bit earlier because 1. Momma has a busy schedule and 2. It was an excuse to have a few quiet hours with friends on a Saturday.

Fist up, a tasty but unfortunate looking pinstrosity in the form of an apple tart.  It had all things fall going for it, but with a phyllo dough crust it just didn't break up into squares well.  You know what would be fun and evil?  Putting out this beautiful dessert and letting your guests feel the guilt of massacring it.  Then you don't have to make any half-hearted attempts to say how pretty it was when it came out of the oven.

Before cutting.  Oooh, ahh, the beauty!

After cutting.  Why do you hate us?

Next up is the insanely simple and adorable batch of Christmas cards I made.  I found a pack of 50 blank cards at Michaels- already with a fold in place and envelops and everything!  I thought I was going to have to use raw card stock for these, and it was a happy surprise to find a kit all ready to go.  Drew on the cute lines and bows with thin sharpie, wrote Merry Christmas with a nice thick silver sharpie, and hot glued red and green ornaments all over the place.  Ta da- adorable and simple.

Last up was my wreath.  I made this wonderful candy corn wreath for Halloween, and really loved the technique.  I had a clear vision of a similar wreath, all in white, with these squares of shiny patterned snowflake fabric interspersed throughout.  A pretty red ribbon gives the idea of a candy cane without being precisely literal.  Now, I was only able to get about 1/3 of the squares pinned during the party.  The rest were done catching up on The Vampire Diaries, SNL, Big Bang Theory, and watching what was left of The Dark Knight Rises because I was too indifferent to channel surf much.  Anyway, end result is pretty adorbs.

And last up, this was a Sunday craft that I didn't get to during the Pinterest party.  Happy buttons hot glued over a foam ball, in a couple strategic layers to cover up the gaps.  That thing is heavy.  I could whack a burglar pretty hard and at least give him a black eye if he gets too close to my Christmas presents.  You know, once I have a tree and presents out.  Christmas ornament/mace: what every crafty mom needs.

Ok, time to put down the peppermint mocha.  This Christmas/winter-time post has gotten me too wound up!

November 3, 2013

Winter in a Jar

Ever since I made my creepy pumpkin diorama, I wanted to translate that idea to a wintry display.  I knew I wanted to use something with a lid, elevated (think cake stand), with fairy lights hiding in the lid to create a pretty glow.  I was momentarily tempted by this adorable idea involving scrapbook paper and kind of a pop up book arrangement, but didn't see any scrapbook paper that fit the bill.  Going back to my original idea, I didn't like any of the miniature figures I saw in the craft stores.  They looked plasticy and oddly painted and just not the feel I wanted.  I decided I wanted a cute cabin in the woods- simple and sweet.

I was all set on my plan, ordered the fairy lights from Amazon, and went to Michael's yesterday.  I couldn't find this dome on a stand thing I'd conjured in my head, and was starting to feel let down at the end of my excursion.  Then within about 5 minutes, it all started coming together.  I had to let go of the odd specifics I'd worked up in my head, and instead see possibilities in the materials I actually had at my disposal.  A footed jar with a dome could work, even if it didn't have a perfectly flat base.  A funny centerpiece with bottle brush trees could be cut down to size, as could a plain wooden bird house ornament to serve as my cabin.  Little Christmas light buttons could be glued to the cabin to look just right.  Yes- it was coming together!

Within a couple hours (to let things dry), and for less than $25, I ended up with this:

Success!  Also a 100% original creation, which impressed my husband and made me feel proud.  :)  I'm so excited to share it with everyone!  Please share pics if you make one.  I'd love to see what other people do with this idea.

Supplies

  • Medium or large lidded jar
  • Cotton stuffed animal stuffing
  • 3 bottle brush trees, painted green with white snow, various sizes
  • Small cabin ornament, 3-d sticker, or even a tiny bird house
  • 1 popsicle stick
  • Elmer's glue
  • 1 pack of Christmas light buttons.  Sequins or plain buttons could also give the same impression in a different style.
  • Hot glue gun and glue
  • 1 small strand of white fairy lights (like these)
  • Silver glitter
  • Glue
  • White paint or white spray paint
  • Paint brush
  • Small stick or velcro to secure fairy lights to lid
  • Optional: paint for cabin, if you buy a plain one (brown for walls; green or red for roof and windows)

Directions (pictures below)

  1. Tilt lid upside down, and paint the inside of the lid with glue.  I chose just to do a large splotch in the center, not the whole thing.  Pour on glitter and shake off excess.  Set aside to try.
  2. Break a popsicle stick in half, to be your cabin's chimney.  Place a little bit of cotton stuffing trailing past the top of one half, then glue the other half on top (wedging the stuffing in between but floating out the top of the sticks as the chimney's smoke).  Let dry.  Glue to back of cabin and let dry.
    • Alternative: paint a straw to be your chimney, add cotton "smoke," and glue to cabin.
  3. If necessary, paint cabin.  Set aside to dry.
  4. Paint rest of lid with white paint or spray with spray paint.  Set aside to dry.
  5. Hot glue the Christmas light buttons to the cabin.
  6. Twist the fairy lights inside the dried lid, taping in place as necessary so they won't pop down into your display (unless you want that!).  Secure the battery pack in place, switch still accessible, with a popsicle stick wedged in place or by affixing velcro to the lid and battery pack.
  7. Hot glue the cabin and trees to the bottom of the jar.  Place cotton snow around and under the pieces.
  8. Turn on your lights, put the lid on, and smile like a fool.  :)  Look what you did!
Glue and glitter on the lid.  This will look like happy snow when done!

Painted lid.  Spray paint may have been better, but I'm ok with this.  Wintry AND hiding the fairy lights: double win.

Cabin cut down to size, with popsicle stick chimney and cotton smoke, painted, and button lights glued in place.

Fairy lights twisted around so the whole lid is covered, and battery pack wedged in place.

Pieces hot glued to the jar and snow arranged around everything.  I even put some snow on the cabin.

Close up of the little happy scene.

This happy piece of winter looks great on the bookshelf, way out of reach of my 3-year-old.  :)

October 27, 2013

Crock Pot Pumpkin Spice Lattes

Ready for an extra special fall treat for yourself and/or your friends?  Pop some coffee, milk, and pumpkiny goodness in your crock pot and you're set.  The recipe really is delicious and hit the spot on a fall afternoon.  Thanks go to Crock-a-doodle-do for the recipe!


Ingredients
  • 4 cups strong brewed coffee
  • 6 cups milk
  • 6 tablespoons canned pumpkin
  • 6 tablespoons granulated sugar
  • 4 tablespoons vanilla
  • 1 1/2 teaspoons pumpkin pie spice
  • Whipped cream and cinnamon sugar for topping
Directions
  1. Pour coffee and milk into crock pot.  Whisk in pumpkin, sugar, vanilla, and pumpkin pie spice.  
  2. Cover and set on low for 4 hours, or high for 2.  
  3. Turn crock pot down to "keep warm" setting or just turn off 30 minutes before serving, unless you want coffee scorching hot.  Whisk before serving.
  4. Top with whipped cream and a sprinkle of cinnamon sugar to serve.

Grape Demon Eyes (filled with goat cheese and pistachios)

Continuing our trend of creepy and delicious original creations, here's a twist on one of my favorite appetizers: grapes rolled in goat cheese and crushed pistachios.  Same flavors, different display.  While this is a snack that scares off many people for multiple reasons, for those who enjoy it it hits the spot wonderfully.


Ingredients
  • 24 green grapes
  • 24 pistachios, shelled
  • 1-2 ounces goat cheese
Directions
  1. Cut a hole in the middle of each grape and fill with goat cheese.  Press in pistachio.
  2. Arrange in pairs on a plate or serving tray and chill until ready to serve.

Witches' Fingers (chocolate covered pretzels)

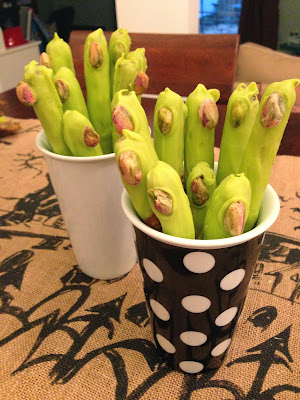
I was very proud of myself for the ORIGINAL Halloween creation (no Pinterest to steal my thunder here!), which was a huge hit all around.  Cover pretzel rods with green chocolate, add a creepy pistachio finger nail, and you're set.  Tasty and ghoulish = just right for Halloween.


Ingredients
  • 1 bag pretzel rods (about 20 rods)
  • 1 bag Wilton green colored chocolate discs
  • 1 tablespoon butter (optional)
  • About 24 pistachios, shelled
  • Witches' Fingers label (optional)
Directions (pictures below)
  1. Line a cookie sheet with parchment paper or Silpat sheet.
  2. Melt chocolate according to package directions.  Optional: mix in butter while melting to make a smoother consistency.
  3. Pour melted chocolate into a tall glass.  I came up with this technique because I'm a velociraptor (read: clever girl), and realized this would mean I could just dip the rods in the chocolate instead of trying any number of inefficient ways to cover the awkward shape in chocolate.
  4. Dip each rod into the glass of chocolate until covered at least 1/2 way.  Lay flat on prepared cookie sheet.  Repeat until all rods are covered with chocolate.
  5. Place a pistachio on the end of each chocolate covered part of the rod, to be the "fingernail".
  6. Suggested additional decorations: extra blobs of chocolate to look like warts; raisins to look like moles; cover parts of the pretzel with torn up marshmallow to make fingers lumpy or have large knuckles.
  7. Place cookie sheet in freezer for 5 minutes or until chocolate is set.
  8. Store in an airtight container at room temperature or in refrigerator if storing for several days.
  9. When serving, I recommend a cute printable like the one I made just using Word.
 Fill the glass with chocolate.  So much easier to cover the pretzels by dipping!  Stir occasionally.

Aaaand dip!

So easy!  Even my 3-year-old was able to do some.

Line em up on your Slipat- or parchment paper-covered cookie sheet.  Also, photobombs by the family dog are welcome.  Add pistachio fingernails.

Freeze until set, then arrange for display.  I really like how perfect these to-go coffee mugs were because they hid the pretzel part, just showing the creepy fingers.


Labels make everything better, no?

October 20, 2013

Batty Goody Bags

I really have tried to keep the crafting mayhem in check, but I was determined to find a cute way to do the goody bags for the Halloween party.  A quick Pinterest scour and I was set.  Even better: all I needed to buy were the black bags.  I already had the other supplies at home!


Supplies (for 4 bags)

  • 1 5x7 sheet of white foam 
  • 1 5x7 sheet of black foam
  • Scissors
  • 4 paper bags
  • 8 googly eyes, preferably different sizes
  • Hot glue gun and glue
Directions
  1. Fill bags with treats and glue or tape closed.
  2. Cut out smiles with fangs from the white foam.
  3. Cut out bat wings and ears from the black foam.
  4. Glue all pieces, as well as googly eyes, to bags.

Pumpkin Hunt Treats

Next weekend is our first ever kids Halloween party.  Yay!  One of the activities I have in mind is to do an Easter egg hunt with pumpkins.  I saw this super cute idea from Martha Stewart to have tear open treat pouches shaped like pumpkins.  I thought it would be great to use those for a little pumpkin hunt.


I just filled them with a piece of candy and a sticker, nothing too crazy because the kids will have goodie bags, too.

Supplies

  • Orange tissue paper
  • Green masking tape or florist tape (they had the green masking tape in the school supply aisle at Target)
  • Candy, stickers, or small toys to wrap up in pumpkins
Directions
  1. Cut the tissue paper into 4 pieces, or whatever size necessary to wrap up around your goodies.
  2. Pull up the corners and twist around the top to form a stem and close up the tissue paper.
  3. Wrap tape around the top, and then twist excess to form the vine.  Fold a larger square at the end to be a leaf.
Very simple, and I like that it's more the impression of a pumpkin than these perfect pumpkin shapes like crazy Martha made.  ;)


Pumpkin Die-o-rama!

Ahhh Pinterest Parties.  A chance to get out of the house, spend some time doing all the fun pins I might not otherwise get to, and basically have a 3-hour therapy session complete with cheese and desserts.  Yesterday was another one for the books and I'm glad we have another one coming up so soon.  So what did I work on yesterday?  I spent about 30 minutes on my pumpkin die-o-rama and the rest of the time in pom pom hell, but that's for another post.
I got this amazing idea from Pinterest last year, just after Halloween.  I'm so glad Pinterest exists so I can just look through my Fall board to remember these fun projects!  A trip to Michaels was all I needed to get the goodies for this fun scene, and it really was easy to put it all together.


Isn't that so great!?!?  I have two electric votives in there.  One is behind the haunted house, and the other is buried in the moss on the left.

Supplies

  • Large white hollow foam pumpkin.  Michael's pretty much sells these half off all fall.
  • Serrated pumpkin carving knife
  • Wet floral foam block (green)
  • 1 medium bag fake moss
  • 4 small ravens
  • 3 small skeletons
  • 3-d haunted house scrapbook sticker
  • Halloween scrapbook sticker set (included the moon, tree, grave stone, bat, and spider stickers)
  • 2 small flameless electric tea lights
  • Hot glue gun and glue
Directions
  1. Use the serrated knife to cut out the opening in the front of the pumpkin.
  2. Cut the foam block to fit inside your pumpkin.  I cut it in half, put the large half in the center of pumpkin, and cut the remaining part in two, to go on either side of the large piece.
  3. Hot glue the top of the foam and cover with moss.  Fill gaps between foam block and pumpkin with loose moss.
  4. Place one votive in the back of the pumpkin, and rest haunted house sticker in front of it.  You'll want to be able to move the haunted house to turn the candle on and off, so don't secure it in place.  It should be able to rest against the candle and pumpkin and stay in place just fine.
  5. Place scrapbook stickers throughout the pumpkin.  I did hot glue the moon because it was a thicker, glassy thing that came with the haunted house.  I wasn't sure if it would stick well to the pumpkin so when in doubt, hot glue.
  6. Place the skeletons wherever desired.  I left two whole (one is laying by the grave, the other is hanging from a noose, hot glued to the top of the pumpkin), and broke one up to have bones scattered around the scene.
  7. Place the ravens where desired.  I do recommend hot gluing them in place, especially so you can have them floating or resting on top of things.  I have one sitting on a rib cage and another glued to the haunted house.
  8. Hide remaining tea light under a fluffy patch of loose moss, again so you can remove to light and put back easily.
Ta da!  Look how impressive you are, with almost 0 skill required.  :)


October 8, 2013

Toilet Decoration

Well, in a sign of craftiness taken to a new level, I present you with my house's current (and only) toilet decoration.  The toilet monster?  Potty poltergeist?  Suggested names welcome!  I also must note that I am not the only person to ever embark on this project.  I got the idea from someone else.

I also apologize for neglecting my poor blog.  The last class really drained me, but thankfully my hubby and I got a MUCH needed vacation afterward.  Now that I'm back, we'll see how much I can keep on top of the blog posts as I suffer through my very last class.  Aaaahhhmazing.  


Supplies
  • 2 pieces of black construction paper
  • Googly eyes (or white construction paper)
  • Tape
Directions
  1. Tape two pieces of construction paper together so you have one nice loooong piece.  I did need to tape two pieces of paper to make the design long enough to wrap around the right side of the toilet and onto the back.  Otherwise, the chopped off look is just weird.
  2. Use a straight edge to draw a diagonal line on your construction paper.  Draw out fingers next to the line.  Cut out along line/fingers.
  3. Erase any pencil lines, or just flip design over so clean side is showing.  Glue on googly eyes and let dry.
  4. Remove lid from the toilet tank so you can line the paper monster up without any gap showing at the top.  Tape design in place, with the small part of the triangle just over the toilet handle.  Wrap construction paper around side of toilet and tape to back.  Put lid back and admire the view.
  5. Bonus: everyone is now encouraged to put the toilet seats down.

September 10, 2013

Candy Corn Wreath

I'm officially a wreath convert.  I watched my friends make wreaths at our previous Pinterest parties, nodded, and went about my mixture of pin wins and pinstrosities without excessive crafting envy.  Granted, Sarah makes a MEAN wreath, but in pretty much all things crafty she puts me to shame so I don't kid myself that I could pull of one of her wreaths.  This time, however, I found one that was that perfect fit of awesome looking and yet at my skill level.  Thanks to The House of Smiths for this keeper!

I did need more fabric than the post called for (maybe because I used broadcloth, not canvas fabric?), so a quick JoAnne's Fabric run later and I was back in business.  I also tried to give some pics to show how I fluffed out my fabric, manipulating it a bit differently from the original post as well.

Look how nice!

Supplies

  • 13-inch foam wreath
  • 1/2 yard of plain muslin, cut into 3-inch wide strips
  • 1 1/2 yards white broadcloth, cut into 4-inch squares
  • 1 1/2 yards yellow broadcloth, cut into 4-inch squares
  • 1 1/2 yards orange broadcloth, cut into 4-inch squares
  • Pack of ~800 small straight pins (like these)
  • Black ribbon
Directions
(pictures follow)
  1. Wrap muslin strips closely around foam wreath, pinning into place at the beginning and end of each strip.  This will provide a uniform background for your fabric squares.
  2. Cut your fabric into 4" squares.  They don't all have to be perfectly 4" so don't make yourself crazy with exact measurements here.  It's also okay if your fabric frays a bit on the edges- this craft is all about the rumpled/wavy look.
  3. Portion off your wreath before you get a bit too "can't see the forest for the trees", trying to evenly divide the top, middle, and bottom portions for your different colors.  Maybe colored string would help?  Chalk?  I ended up pulling pins and rearranging at the later stages to get my colors more even.
  4. Fold each colored square in half, and then in half again.  Fan out slightly, and pin the folded corner to the wreath.  Fluff out the square a bit, and repeat times A LOT.  :)  Be prepared for a few hours of effort, here.  And use up that fabric!  Make it nice and full!
  5. When wreath is filled in, time to top it off!  Cut a long strip of black ribbon, and tie a neat bow.  Use a straight pin to attach to wreath (or hot glue).  I also cut a loop of fabric and used a few pins to attach it to the back of the wreath for hanging.  It's holding strong.
  6. Talk about how impressed you are with yourself until you get hoarse.  You've earned it.

And the helpful pics to walk you through this.

4" square.

Fold in half.

Fold in half again, and fan out.

Pin in the folded corner.  See that teeny tiny pin?

Pin to the wreath.

Put fingers into the curved/folded parts of your square, and fluff out.

Give it a nice wiggle and twist till you're happy.

Ta da!  Now I need to go fluff the other squares around it.  Sigh.  ;)

Mini Pumpkin Cheesecakes

Can we talk about some crazy good pumpkiny goodness?  I've been dying to make this recipe since October 13, 2013.  I can say that because it's from last year's Food Network page-a-day calendar.  This stupid recipe makes 18 mini cheesecakes, which is the exact wrong amount.  Too much to make just to have at home, and too little to make for the office.  SURE I could just double the recipe and take it to work, but my brain doesn't always work that way.  It has rules, like wanting the recipe to be just right as it is without having to double or halve things.  This is why it took me a year to make it.
Anyway, quantity issues aside, this is some seriously good stuff.  The gingersnap crust is so perfectly perfect I can't handle it, and don't let the sour cream topping scare you.  It's just right.  Enjoy.


Ingredients

  • 18 gingersnap cookies
  • 8-oz package cream cheese, room temperature
  • 2/3 cup granulated sugar
  • 1/3 cup firmly packed light brown sugar
  • 1/4 teaspoon fine salt
  • 2 large eggs, room temperature
  • 1/3 cup plus 1 1/4 cup sour cream
  • 1/3 cup heavy cream
  • 15-oz can pure pumpkin puree (Watch out- many canned "pumpkin" purees are actually butternut squash.  GASP.  This horror was shared at last weekend's Pinterest Party I made these for. The horror.  Check your label.)
  • 1 tablespoon pumpkin pie spice, plus more for dusting
Directions
  1. Preheat oven to 300°.  Line 18 muffin cups with paper liners.  Place 1 whole gingersnap in the bottom of each lined cup.  Set tins aside.
  2. In the bowl of a stand mixture set to medium-high and using the paddle attachment, beat the cream cheese, granulated sugar, brown sugar, and salt until smooth and creamy, 2-3 minutes.
  3. Scrape down the sides, reduce the speed to low, and beat in the eggs, one at a time, until combined.  Beat in 1/3 cup sour cream and the heavy cream.  Stir in the pumpkin puree and pumpkin pie spice by hand until the batter is smooth.
  4. Divide the batter evenly among the cookie-lined paper cups, filling almost to the top.
  5. Bake until the filling is just set, 40-50 minutes (mine took longer).  A sharp knife inserted into the center will come out moist, but clean.
  6. Top each cheesecake with about 1 tablespoon of the remaining sour cream, and gently spread with a spoon.  This can be a bit tricky when the sour cream is cold and the cheesecakes warm.  Just a heads up.
  7. Cool completely in tins on a wire rack.  Then refrigerate until cold, about 4 hours or overnight.  Top with a dusting of pumpkin pie spice.
Well hello, you handsome yummy devil.