November 12, 2013

Christmas Crafts!

Hello, Buddy the Elf, what's your favorite color?  Mine is SPARKLES!  Ok maybe I'm not that extreme, but I have no shame in getting started on Christmas things a bit earlier because 1. Momma has a busy schedule and 2. It was an excuse to have a few quiet hours with friends on a Saturday.

Fist up, a tasty but unfortunate looking pinstrosity in the form of an apple tart.  It had all things fall going for it, but with a phyllo dough crust it just didn't break up into squares well.  You know what would be fun and evil?  Putting out this beautiful dessert and letting your guests feel the guilt of massacring it.  Then you don't have to make any half-hearted attempts to say how pretty it was when it came out of the oven.

Before cutting.  Oooh, ahh, the beauty!

After cutting.  Why do you hate us?

Next up is the insanely simple and adorable batch of Christmas cards I made.  I found a pack of 50 blank cards at Michaels- already with a fold in place and envelops and everything!  I thought I was going to have to use raw card stock for these, and it was a happy surprise to find a kit all ready to go.  Drew on the cute lines and bows with thin sharpie, wrote Merry Christmas with a nice thick silver sharpie, and hot glued red and green ornaments all over the place.  Ta da- adorable and simple.

Last up was my wreath.  I made this wonderful candy corn wreath for Halloween, and really loved the technique.  I had a clear vision of a similar wreath, all in white, with these squares of shiny patterned snowflake fabric interspersed throughout.  A pretty red ribbon gives the idea of a candy cane without being precisely literal.  Now, I was only able to get about 1/3 of the squares pinned during the party.  The rest were done catching up on The Vampire Diaries, SNL, Big Bang Theory, and watching what was left of The Dark Knight Rises because I was too indifferent to channel surf much.  Anyway, end result is pretty adorbs.

And last up, this was a Sunday craft that I didn't get to during the Pinterest party.  Happy buttons hot glued over a foam ball, in a couple strategic layers to cover up the gaps.  That thing is heavy.  I could whack a burglar pretty hard and at least give him a black eye if he gets too close to my Christmas presents.  You know, once I have a tree and presents out.  Christmas ornament/mace: what every crafty mom needs.

Ok, time to put down the peppermint mocha.  This Christmas/winter-time post has gotten me too wound up!

November 3, 2013

Winter in a Jar

Ever since I made my creepy pumpkin diorama, I wanted to translate that idea to a wintry display.  I knew I wanted to use something with a lid, elevated (think cake stand), with fairy lights hiding in the lid to create a pretty glow.  I was momentarily tempted by this adorable idea involving scrapbook paper and kind of a pop up book arrangement, but didn't see any scrapbook paper that fit the bill.  Going back to my original idea, I didn't like any of the miniature figures I saw in the craft stores.  They looked plasticy and oddly painted and just not the feel I wanted.  I decided I wanted a cute cabin in the woods- simple and sweet.

I was all set on my plan, ordered the fairy lights from Amazon, and went to Michael's yesterday.  I couldn't find this dome on a stand thing I'd conjured in my head, and was starting to feel let down at the end of my excursion.  Then within about 5 minutes, it all started coming together.  I had to let go of the odd specifics I'd worked up in my head, and instead see possibilities in the materials I actually had at my disposal.  A footed jar with a dome could work, even if it didn't have a perfectly flat base.  A funny centerpiece with bottle brush trees could be cut down to size, as could a plain wooden bird house ornament to serve as my cabin.  Little Christmas light buttons could be glued to the cabin to look just right.  Yes- it was coming together!

Within a couple hours (to let things dry), and for less than $25, I ended up with this:

Success!  Also a 100% original creation, which impressed my husband and made me feel proud.  :)  I'm so excited to share it with everyone!  Please share pics if you make one.  I'd love to see what other people do with this idea.

Supplies

  • Medium or large lidded jar
  • Cotton stuffed animal stuffing
  • 3 bottle brush trees, painted green with white snow, various sizes
  • Small cabin ornament, 3-d sticker, or even a tiny bird house
  • 1 popsicle stick
  • Elmer's glue
  • 1 pack of Christmas light buttons.  Sequins or plain buttons could also give the same impression in a different style.
  • Hot glue gun and glue
  • 1 small strand of white fairy lights (like these)
  • Silver glitter
  • Glue
  • White paint or white spray paint
  • Paint brush
  • Small stick or velcro to secure fairy lights to lid
  • Optional: paint for cabin, if you buy a plain one (brown for walls; green or red for roof and windows)

Directions (pictures below)

  1. Tilt lid upside down, and paint the inside of the lid with glue.  I chose just to do a large splotch in the center, not the whole thing.  Pour on glitter and shake off excess.  Set aside to try.
  2. Break a popsicle stick in half, to be your cabin's chimney.  Place a little bit of cotton stuffing trailing past the top of one half, then glue the other half on top (wedging the stuffing in between but floating out the top of the sticks as the chimney's smoke).  Let dry.  Glue to back of cabin and let dry.
    • Alternative: paint a straw to be your chimney, add cotton "smoke," and glue to cabin.
  3. If necessary, paint cabin.  Set aside to dry.
  4. Paint rest of lid with white paint or spray with spray paint.  Set aside to dry.
  5. Hot glue the Christmas light buttons to the cabin.
  6. Twist the fairy lights inside the dried lid, taping in place as necessary so they won't pop down into your display (unless you want that!).  Secure the battery pack in place, switch still accessible, with a popsicle stick wedged in place or by affixing velcro to the lid and battery pack.
  7. Hot glue the cabin and trees to the bottom of the jar.  Place cotton snow around and under the pieces.
  8. Turn on your lights, put the lid on, and smile like a fool.  :)  Look what you did!
Glue and glitter on the lid.  This will look like happy snow when done!

Painted lid.  Spray paint may have been better, but I'm ok with this.  Wintry AND hiding the fairy lights: double win.

Cabin cut down to size, with popsicle stick chimney and cotton smoke, painted, and button lights glued in place.

Fairy lights twisted around so the whole lid is covered, and battery pack wedged in place.

Pieces hot glued to the jar and snow arranged around everything.  I even put some snow on the cabin.

Close up of the little happy scene.

This happy piece of winter looks great on the bookshelf, way out of reach of my 3-year-old.  :)

October 27, 2013

Crock Pot Pumpkin Spice Lattes

Ready for an extra special fall treat for yourself and/or your friends?  Pop some coffee, milk, and pumpkiny goodness in your crock pot and you're set.  The recipe really is delicious and hit the spot on a fall afternoon.  Thanks go to Crock-a-doodle-do for the recipe!


Ingredients
  • 4 cups strong brewed coffee
  • 6 cups milk
  • 6 tablespoons canned pumpkin
  • 6 tablespoons granulated sugar
  • 4 tablespoons vanilla
  • 1 1/2 teaspoons pumpkin pie spice
  • Whipped cream and cinnamon sugar for topping
Directions
  1. Pour coffee and milk into crock pot.  Whisk in pumpkin, sugar, vanilla, and pumpkin pie spice.  
  2. Cover and set on low for 4 hours, or high for 2.  
  3. Turn crock pot down to "keep warm" setting or just turn off 30 minutes before serving, unless you want coffee scorching hot.  Whisk before serving.
  4. Top with whipped cream and a sprinkle of cinnamon sugar to serve.

Grape Demon Eyes (filled with goat cheese and pistachios)

Continuing our trend of creepy and delicious original creations, here's a twist on one of my favorite appetizers: grapes rolled in goat cheese and crushed pistachios.  Same flavors, different display.  While this is a snack that scares off many people for multiple reasons, for those who enjoy it it hits the spot wonderfully.


Ingredients
  • 24 green grapes
  • 24 pistachios, shelled
  • 1-2 ounces goat cheese
Directions
  1. Cut a hole in the middle of each grape and fill with goat cheese.  Press in pistachio.
  2. Arrange in pairs on a plate or serving tray and chill until ready to serve.

Witches' Fingers (chocolate covered pretzels)

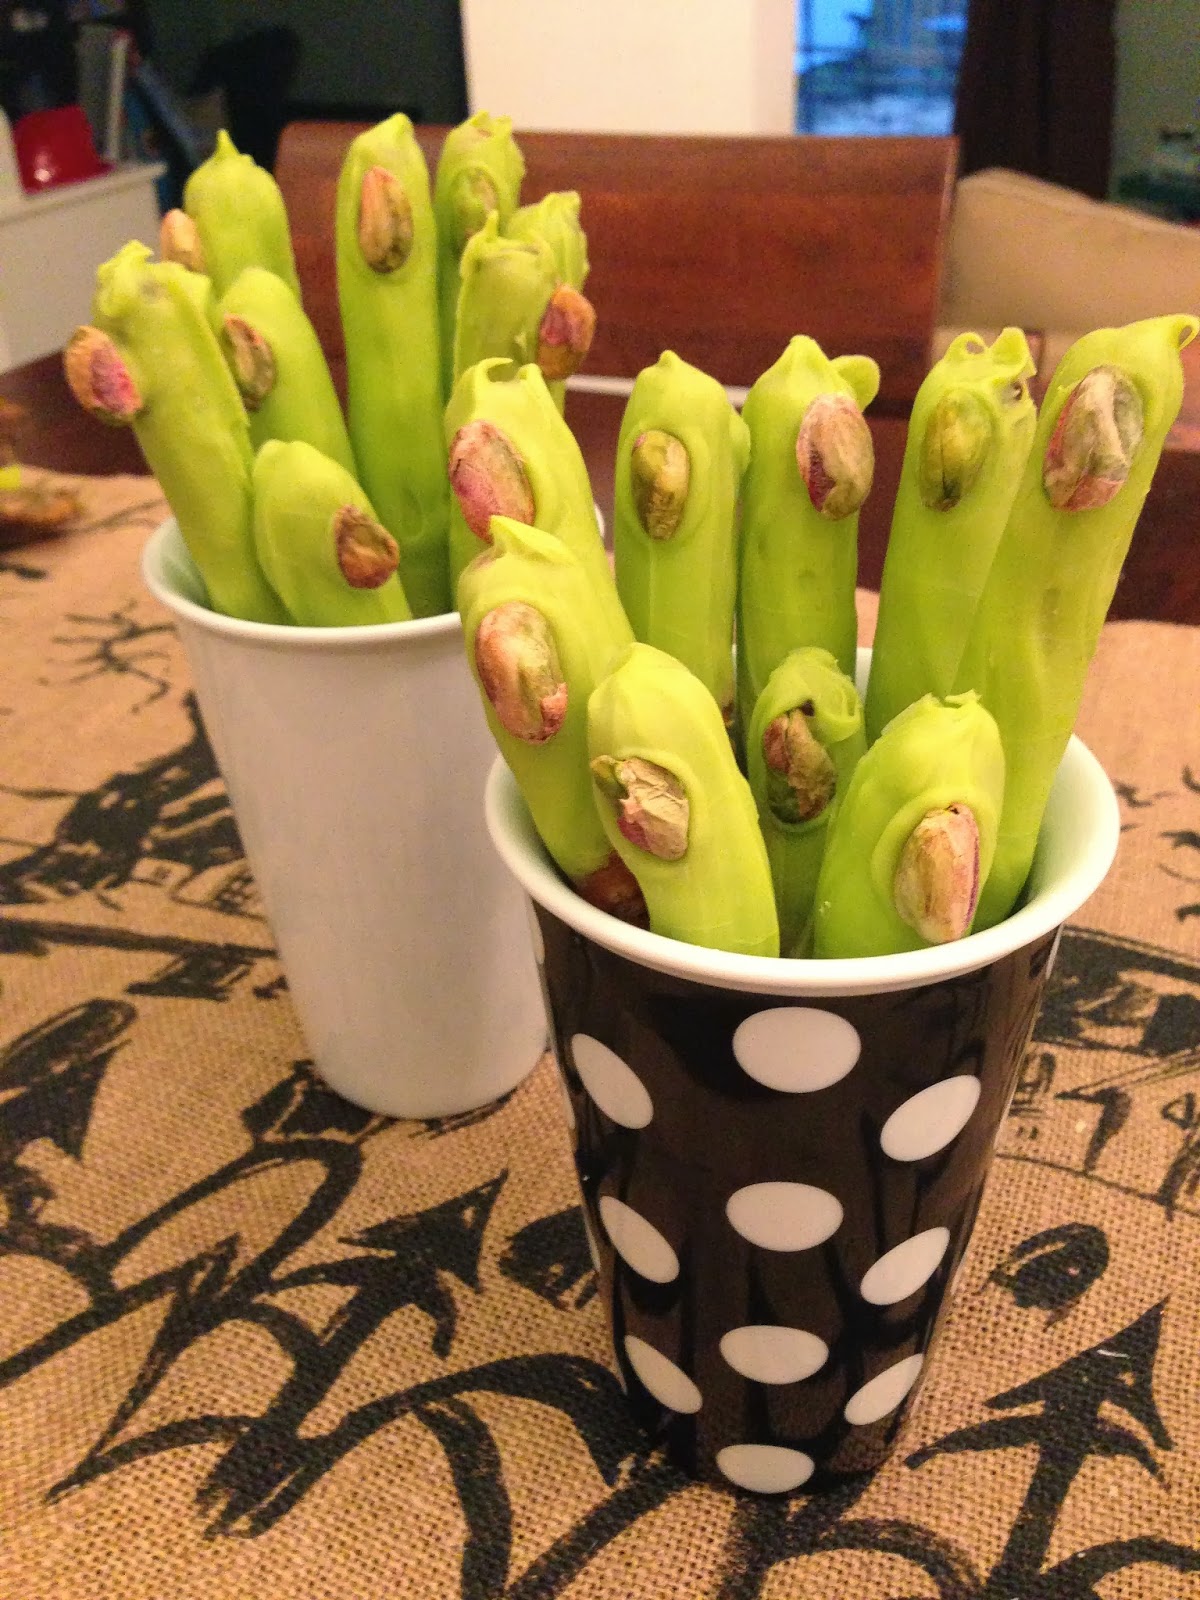
I was very proud of myself for the ORIGINAL Halloween creation (no Pinterest to steal my thunder here!), which was a huge hit all around.  Cover pretzel rods with green chocolate, add a creepy pistachio finger nail, and you're set.  Tasty and ghoulish = just right for Halloween.


Ingredients
  • 1 bag pretzel rods (about 20 rods)
  • 1 bag Wilton green colored chocolate discs
  • 1 tablespoon butter (optional)
  • About 24 pistachios, shelled
  • Witches' Fingers label (optional)
Directions (pictures below)
  1. Line a cookie sheet with parchment paper or Silpat sheet.
  2. Melt chocolate according to package directions.  Optional: mix in butter while melting to make a smoother consistency.
  3. Pour melted chocolate into a tall glass.  I came up with this technique because I'm a velociraptor (read: clever girl), and realized this would mean I could just dip the rods in the chocolate instead of trying any number of inefficient ways to cover the awkward shape in chocolate.
  4. Dip each rod into the glass of chocolate until covered at least 1/2 way.  Lay flat on prepared cookie sheet.  Repeat until all rods are covered with chocolate.
  5. Place a pistachio on the end of each chocolate covered part of the rod, to be the "fingernail".
  6. Suggested additional decorations: extra blobs of chocolate to look like warts; raisins to look like moles; cover parts of the pretzel with torn up marshmallow to make fingers lumpy or have large knuckles.
  7. Place cookie sheet in freezer for 5 minutes or until chocolate is set.
  8. Store in an airtight container at room temperature or in refrigerator if storing for several days.
  9. When serving, I recommend a cute printable like the one I made just using Word.
 Fill the glass with chocolate.  So much easier to cover the pretzels by dipping!  Stir occasionally.

Aaaand dip!

So easy!  Even my 3-year-old was able to do some.

Line em up on your Slipat- or parchment paper-covered cookie sheet.  Also, photobombs by the family dog are welcome.  Add pistachio fingernails.

Freeze until set, then arrange for display.  I really like how perfect these to-go coffee mugs were because they hid the pretzel part, just showing the creepy fingers.


Labels make everything better, no?

October 20, 2013

Batty Goody Bags

I really have tried to keep the crafting mayhem in check, but I was determined to find a cute way to do the goody bags for the Halloween party.  A quick Pinterest scour and I was set.  Even better: all I needed to buy were the black bags.  I already had the other supplies at home!


Supplies (for 4 bags)

  • 1 5x7 sheet of white foam 
  • 1 5x7 sheet of black foam
  • Scissors
  • 4 paper bags
  • 8 googly eyes, preferably different sizes
  • Hot glue gun and glue
Directions
  1. Fill bags with treats and glue or tape closed.
  2. Cut out smiles with fangs from the white foam.
  3. Cut out bat wings and ears from the black foam.
  4. Glue all pieces, as well as googly eyes, to bags.

Pumpkin Hunt Treats

Next weekend is our first ever kids Halloween party.  Yay!  One of the activities I have in mind is to do an Easter egg hunt with pumpkins.  I saw this super cute idea from Martha Stewart to have tear open treat pouches shaped like pumpkins.  I thought it would be great to use those for a little pumpkin hunt.


I just filled them with a piece of candy and a sticker, nothing too crazy because the kids will have goodie bags, too.

Supplies

  • Orange tissue paper
  • Green masking tape or florist tape (they had the green masking tape in the school supply aisle at Target)
  • Candy, stickers, or small toys to wrap up in pumpkins
Directions
  1. Cut the tissue paper into 4 pieces, or whatever size necessary to wrap up around your goodies.
  2. Pull up the corners and twist around the top to form a stem and close up the tissue paper.
  3. Wrap tape around the top, and then twist excess to form the vine.  Fold a larger square at the end to be a leaf.
Very simple, and I like that it's more the impression of a pumpkin than these perfect pumpkin shapes like crazy Martha made.  ;)