October 30, 2012

Cookie Cutter Pumpkin Carving

I'm happy to share that another Pinterest project payed off!  I thought the idea of using cookie cutters to "carve" a pumpkin was pretty genius, but iffy on whether or not it would work.  I will say that for the plastic cookie cutters, I didn't even try thwacking them with a hammer.  The metal ones went like gangbusters, though, so I'm happy to report this pin win: verified!


Now what you're seeing is the result of two metal cookie cutters (the house and candy), and tracing a plastic bat cookie cutter.  To the left of the house, I traced a ghost cookie cutter, too.  With the metal ones, I just kept hammering away trying to evenly push the cookie cutter in, and it went really well.  The candy piece got a little mangled on the left side, but that was the only downside to this approach.

I thought the house looked a little odd just floating in with the other shapes so I added the little walkway/river/moat/whatever you want to call it.  For experiments with my 2-year-old's pumpkin, I still call it a success.  I laid out the Halloween cookie cutters for him to choose from and did them in the order he wanted, so I was able to find a pretty good way to include him.  He was most excited over the massive piles of guts I scraped from the pumpkins first.  That came as no surprise.  He was napping when I took this pic so he hasn't seen the final product of our handiwork.  I can't wait to show him the lit pumpkins tomorrow night!

Lemon Butter Shrimp

This delicious main dish comes courtesy of one of those Pinterest pins with details in the caption, because the  link doesn't actually go anywhere with a real recipe.  So I ran with the notes from the pin, modified a bit to suit my family, and before I knew it I had a new favorite way to make shrimp that got enthusiastic votes from the peanut gallery.  Hooray!


Ingredients
  • 30-50 pre-cooked, peeled shrimp, tails removed
  • 1/2 stick of butter (4 tablespoons)
  • 1 lemon, thinly sliced
  • 2 tsp Italian seasoning


Directions
  1. Preheat oven to 350 degrees.
  2. Melt the butter in the microwave.
  3. Line a rimmed baking sheet with aluminum foil.  Pour on the melted butter and evenly coat the baking sheet.
  4. Lay the lemon slices in a single layer on the buttered baking sheet.
  5. Arrange the shrimp on top of the lemon and butter so that each shrimp is at least covering a bit of lemon slice.
  6. Sprinkle generously with Italian seasoning.  I'm guesstimating that I used about 2 teaspoons.
  7. Bake for 15 minutes.
There you go.  Insanely easy, and super delicious.  I served mine with rice and a salad and it was great!  Enjoy.

October 21, 2012

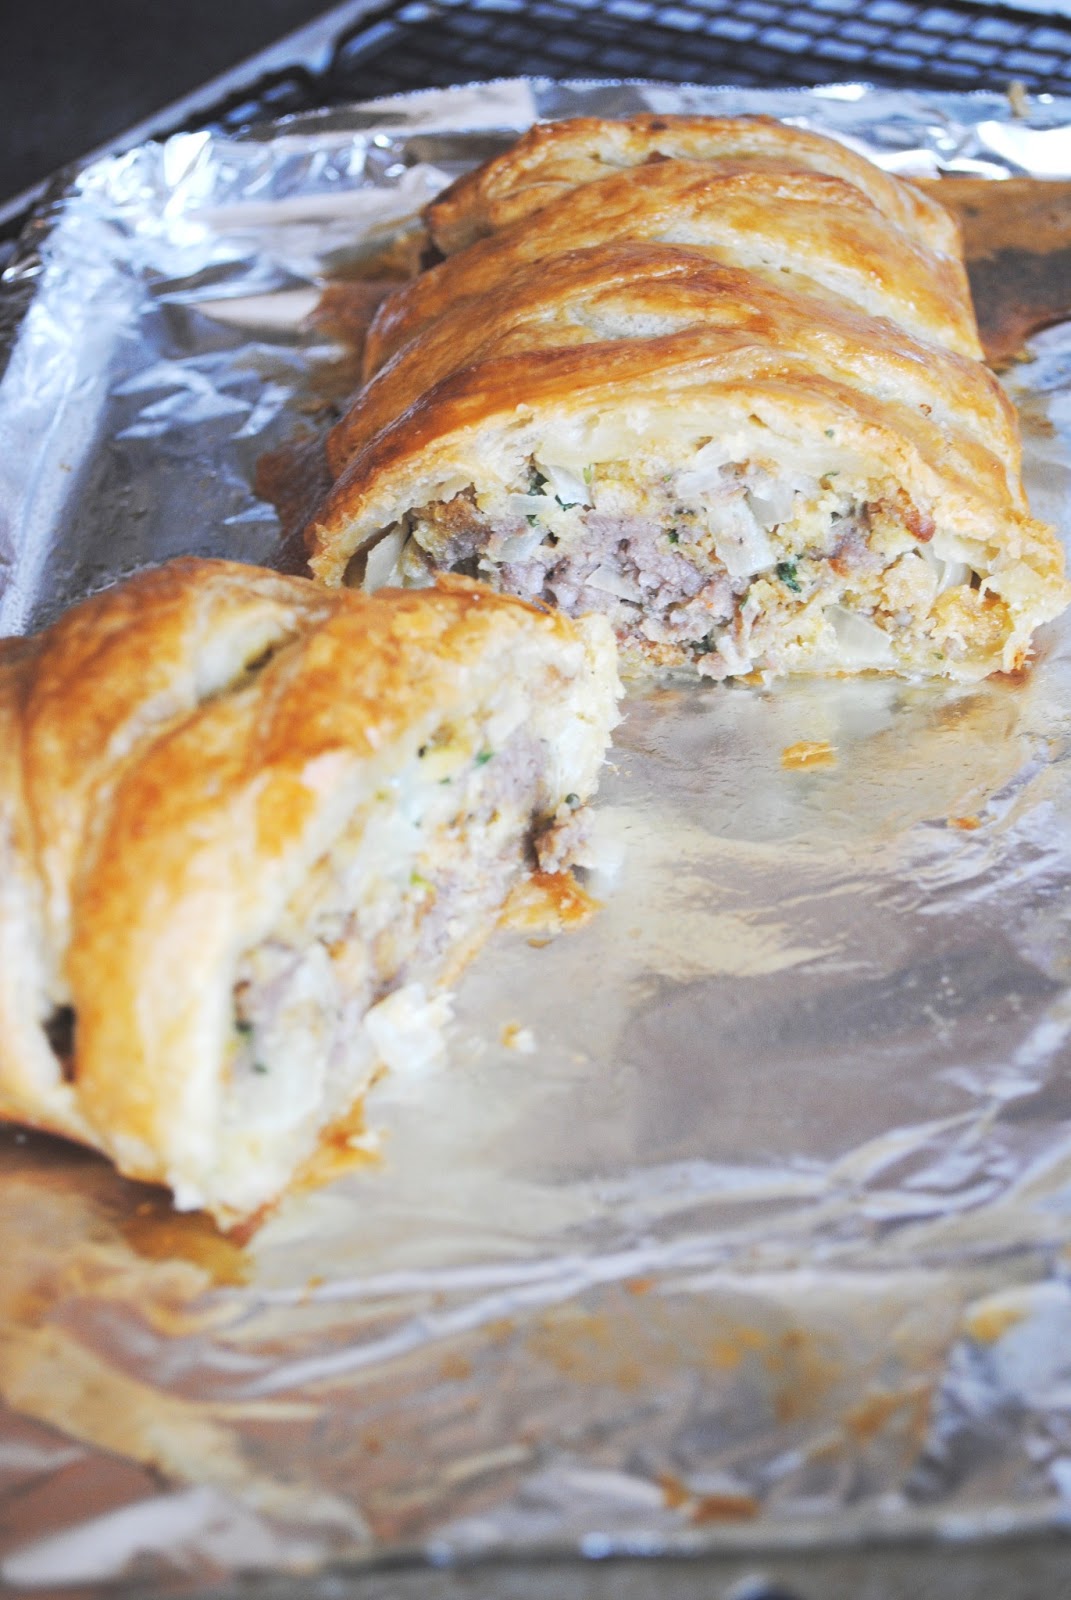
Sausage and Stuffing Criss-Cross Pastry

I got this recipe from a coworker, who found it on a blog, reposted from Pepperidge Farm.  I definitely modified this from the original, and I tend to use it as a weekend brunch.  It's touted as a good holiday side, and it certainly was a hit when I made it with Thanksgiving and Christmas dinners in the past, but there's no reason to restrict this to holiday fare!  It's really very similar to a sausage pastie, which is recognized (smartly so) as an anytime food.


Ingredients

  • 1/2 of a 17.3-oz pkg. Pepperidge Farm Puff Pastry Sheets (1 sheet), thawed*
  • 2 eggs
  • 1 tablespoon water
  • 1 tablespoon chopped fresh parsley (or 1 teaspoon dried)
  • 1/4 cup grated Parmesan cheese
  • 1/2 lb bulk pork sausage
  • 1 cup Pepperidge Farm Herb Seasoned Stuffing
  • 1 small onion, chopped (about 1/4 cup)
  • 1 tablespoon garlic butter (to make your own, stir a couple shakes of garlic powder into 1 1/2 tablespoons of melted butter)
*It is very easy to double this recipe, making two at once so that you use both pastry sheets and the full 1 lb tube of sausage.  You can make the second one (just skip the egg wash and putting in the oven), wrap in wax paper and aluminum foil, and freeze in a gallon freezer bag.  Just thaw out and bake at a later date.

Directions

  1. Heat the oven to 375 degrees.  Beat 1 egg and the water in a small bowl with a fork or whisk and set aside.
  2. Mix the sausage, cheese, parsley, stuffing, remaining egg, and onion in a large bowl.
  3. Unfold the pastry sheet on a lightly floured surface.  Cut slits 1 inch apart from the outer edge to the fold mark on each side of the pastry sheet.
  4. Spoon the sausage mixture down the center of the pastry and shape to evenly fill.
  5. Starting at one end, fold the pastry strips over the sausage mixture, alternating sides, to cover the mixture completely.
  6. Cover a rimmed baking sheet with aluminum foil and spray with nonstick cooking spray.
  7. Place the pastry on the prepared baking sheet, and brush with the egg wash.
  8. Bake for 35 minutes or until the pastry is golden brown and the sausage is cooked through.
  9. Brush with garlic butter and let the pastry cool on the baking sheet on a wire rack for 10 minutes.

Happy Halloween Banner

I really fell in love with some of Pottery Barn's new Halloween decorations this year.  In particular, their Happy Halloween Banner and a burlap table runner.  Now the runner was definitely beyond my skill level, so I bought that one, but I was convinced I could make a decent banner myself.  Sure enough, I did.  I'm pretty proud of myself for this one.  I think it cost less than $15 and took me about 2 hours.


Supplies (for 15-foot banner as shown in pictures)

  • 2 yards of burlap (will be plenty)
  • 8 1/2" x 11" paper to use as guide
  • 8 yards of hemp cord (found in the necklace/bead aisle in a craft store)
  • Scissors
  • Black craft paint
  • Brown craft paint (the one I used was slightly metallic, which really worked out well)
  • Foam brush
  • Small paint brush (you could use a variety of sizes for the different letters and details you add)
  • Newspaper
  • Cardboard
  • 2 nails or hooks


Directions

Lay out burlap, but don't completely unfold.  This will help minimize the time spent cutting squares.

Using a piece of paper as a guide, cut one long strip of burlap.  It is ok to have variation in the length and width of the panels, as long as they are roughly the same size.

Fold it over, and cut at the folds to get 4 panels for your banner.  Again, neatness is not the key here.


Repeat until you have at least 14 panels.  I cut a couple extra for insurance.  Mix up the panels so you don't have the exact same size pieces next to each other in the final banner.

Lay a panel of burlap on your cardboard (believe me, the paint is going to transfer through the burlap and newspaper will just become mush underneath; you want cardboard or an empty cereal box to protect your work surface).  Using the foam brush, paint brown smudges around the border of the panel, leaving an oval for the letter in the center.  Use uneven strokes and dapple some corners more than others to get a relaxed look to the banner.  You aren't trying for perfect edges here.


Using the small paint brush, paint black letter in center of panel either using a stencil or free handing.  I didn't see any stencils I liked, and I found that the PB style was actually fairly easy to mimic.

Paint spiders, cobwebs, and paint splotches on random bits of the panels (though not on every single one) as you go.

Repeat until you have Happy Halloween spelled out.  Lay panels on newspaper to dry.

It could also be fun to paint an extra panel at each end with a pumpkin, ghost, haunted house, or crow silhouette!

Once panels are dry, thread the hemp cord along the top of each panel.  The cord was too thick to thread through any needles I had, but I did use a needle to stretch out a hole in the burlap to run the cord through.  I just ran the cord over two stretches at the top of each panel- I didn't weave it in and out throughout all of the burlap.  You will need to trim the frayed edge of the cord as you go.  Without a needle, it will begin to split apart and be impossible to thread after a few minutes.  You'll have plenty of excess, so don't worry about these little trims.

Tie ends of the cord to nails or hooks to hang your banner.  Trim excess.  Marvel in your success!

October 17, 2012

Nutella Chocolate Chip Cookies

I have been better about digging through old pins on Pinterest and finally making them.  This is one such mission.  The idea of Nutella chocolate chip cookies sounded so good, and while I never really had a specific idea of how they would taste, I have to say I'm happy with how they turned out.  They still taste like chocolate chip cookies, but with this slightly different flavor that makes them special.  I would love to make these during the holidays as a bit of a surprise treat.  They're also a tad addictive.  I'm pretty sure I've already eaten 4 "test" cookies while they were still cooling!


Ingredients
  • 1 1/3 cups all-purpose flour
  • 1/2 teaspoon baking powder
  • 1/2 teaspoon baking soda
  • 1/4 teaspoon sea salt
  • 1/2 cup butter, softened
  • 1/2 cup Nutella
  • 1/3 cup granulated sugar
  • 1/2 cup light brown sugar
  • 1 egg
  • 1 teaspoon vanilla extract
  • 1 cup milk chocolate chips

Directions
  1. Preheat oven to 375 degrees.  Line cookie sheet with parchment paper.
  2. In a medium bowl, whisk together the flour, baking powder, baking soda, and salt. Set aside.
  3. In the bowl of a stand mixer fitted with the paddle attachment, or in a large bowl with a hand mixer, beat butter, Nutella, sugar, and brown sugar on medium speed until light and fluffy (3-4 minutes).  Trust me, it will get light and fluffy!
  4. Add egg, scraping down the sides of the bowl as needed.  Add vanilla extract and beat until combined.
  5. Reduce speed to low and add flour mixture slowly until combined.
  6. Add chocolate chips and mix until fully incorporated.
  7. Drop by rounded tablespoons onto prepared baking sheet.
  8. Bake for 10-12 minutes.  Let cool 2 minutes before transferring to wire racks.
  9. Store in an airtight container with a slice of bread to keep the cookies soft.  The cookies absorb the moisture from the bread!  Swap out bread with another slice when it turns dry and hard.

October 14, 2012

Creamy Penne and Fall Vegetable Casserole

I have a great Food Network daily calendar on my desk, which has a different recipe or cooking tip each day.  I tend to save recipes from the calendar and forget about them, but this one I had to try right away.  I stayed pretty close to the Baked Penne with Fall Vegetables recipe, with just a few modifications based on family preferences and ingredients I had on hand and only made half the recipe (to make 3 servings instead of 6).


Ingredients

  • 1/4 cup freshly grated Parmesan cheese
  • 2 tablespoons dried parsley (or 1/8 cup fresh)
  • 3 tablespoons butter
  • 2 cups thickly sliced leeks (white and tender green parts), thoroughly washed*
  • 3 cups large diced butternut squash
  • 1/6 cup all-purpose flour
  • 1 teaspoon minced fresh sage
  • 1/2 teaspoon nutmeg
  • 1 1/2 cups chicken broth
  • 1/2 cup milk
  • Salt and freshly ground pepper
  • 8 oz of penne (1/2 box)
  • 1 cup shredded mozzarella cheese

*Leeks can have a lot of dirt on them, especially in the green leafy part.  Wash by soaking in a large bowl of cold water, straining, and repeating a couple times until the water is clear (no grit floating around).

Directions

[Note: For this recipe, you definitely need to chop and measure everything out before hand. There is a good deal of stirring for the sauce, so you can't count on that time to prepare the ingredients while you cook.]

  1. Set a large pot of salted water to boil for the pasta.
  2. Preheat the oven to 450 degrees.  Pulse the Parmesan and parsley in a food processor until well combined.  Set aside.
  3. Cook the pasta according to the package instructions.  While it is cooking (probably 10-12 minutes), prepare the vegetables and sauce.
  4. Melt the butter in a Dutch oven over medium-high heat, add the leeks and squash and cook, covered, stirring occasionally, until just tender (5-7 minutes).
  5. Uncover the pot and stir in the flour, sage, and nutmeg.
  6. Reduce the heat to medium and gradually stir in the broth and milk.
  7. Simmer, stirring, until thickened (5-7 minutes).
  8. Season with salt and pepper.
  9. When cooked, drain the pasta.  Then add pasta to the vegetable sauce, along with the mozzarella.
  10. Stir the pasta, cheese, and vegetable sauce until pasta is thoroughly coated.
  11. Spray a 9 x 13-inch casserole dish with nonstick spray.  Pour the pasta mixture into the dish and sprinkle with the Parmesan-parsley topping.
  12. Bake until the top is golden, about 15-20 minutes.  Let rest for several minutes before serving.


Golden, bubbly, melty goodness!

Breakfast Panini with Strawberries

Well I've been in love with these blueberry paninis I posted last month, and today decided to try using minced strawberries instead of blueberries.  The blueberries aren't in season anymore, so rather than spend $5 for a small container, I spent $2.50 for a bin of strawberries.  One of my favorite guilty pleasures is a strawberry cream cheese danish, so I knew the flavors would work!  Sure enough, they did, even if this recipe is definitely messier than the blueberry one.  Fair warning. ;-)


Ingredients (for each panini)
  • 1 oz of cream cheese
  • 2 teaspoons of powdered sugar
  • 2 large strawberries, minced
  • 2 slices of bread
  • Butter


Directions
  1. Heat panini press or large pan.
  2. Microwave cream cheese for 10 seconds to soften.
  3. In a medium bowl, stir together cream cheese, sugar, and strawberries.
  4. Butter outside of both slices of bread.
  5. Spoon strawberry filling into sandwich.
  6. Grill on panini press or in a pan for 3-5 minutes or until golden brown.