I went with grey, purple, teal, and yellow for my colors. During the party, the Mardi Gras-ness of this palatte was mentioned, but I stuck with it.
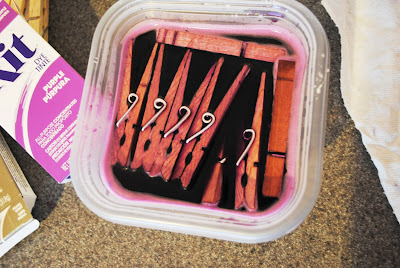
Fizzing hot water and dye- in go the clothespins. This was the grey batch.
Looking pretty!
Laid out to dry. Looking like a good color right now! Warning- when completely dry, they actually darkened. This was my "lighter" batch of purple. The first batch was nearly black because I used so much dye and let them sit so long. Like I said- lessons learned.
Grey batch number two. The first ones were super dark, so I dyed another batch for just a minute and got this nice variation.
Finished product! I painted a particleboard circle white, clipped the clothespins in place, and I was in good shape. You can see the super dark purples and greys in here, along with my batches of lighter ones. If I'd kept the darker versions, instead of Mardi Gras I would've been left with a Notre Dame wreath. My friend Diana would've loved that, but it wouldn't make much sense in *my* house. ;)
Supplies
- Particleboard circle to be the base for your wreath. I found mine at Michael's for just a few dollars.
- Paint and brush
- Enough clothespins to cover your circle. I think I had about 50 for my medium size wreath. Alternative: get clothespins in different sizes to create a more defined sunburst look.
- Rit powder dye
- Tupperware containers (I used four medium square ones)
- Rubber gloves
Directions
- Snap on those rubber gloves. Prepare dye according to package directions. Of course, your proportions are going to be different than dyeing clothes. I poured a tablespoon or so of dye into each Tupperware container, then added about 1 1/2 cups of hot water (heated in the microwave 2 minutes). I stirred gently with a helper clothespin, then added the clothespins.
- Soak clothespins in dye until they reach desired shade. For dark, saturated shades, dye 3-5 minutes. For lightest shades, dye just 30 seconds. My lighter purple and grey clothespins were in the dye just about a minute.
- Drain dye and lay out clothespins to dry on a paper towel. It took several hours for them to dry completely.
- Paint particleboard circle desired color (I used white) on one side and on the inner edge. Set aside to dry.
- Pin clothespins to painted circle, alternating colors and position so that some are closer to the middle and some are closer to the outer edge, creating some variation and a bit of a sunburst effect.
- Hang with a nail- this puppy is too heavy for a command hook, I think.


No comments:
Post a Comment
You want to comment? Awesome! Have at it, rock star.