May 27, 2013

Grilled Spiced Pork Chops with Amazing Peach Salsa

I absolutely *love* this dish courtesy of my Food Network calendar from 2012, especially the grilled peach salsa.  Amazing, I kid you not.  The pork chops are super tasty, too!  Om nom nom nom.


Ingredients
For the pork
  • Vegetable oil, for the grill grate (or grill pan, as I used tonight)
  • Kosher salt (though I didn't use any)
  • 1 tablespoon chili powder
  • 1 tablespoon firmly packed light brown sugar
  • 1 teaspoon ground cinnamon
  • 4 bone-in pork loin chops (I actually prefer boneless)
For the salsa
  • 2 large ripe peaches, quartered and pitted
  • 1 tablespoon vegetable oil
  • 1/2 cup cherry tomatoes, halved
  • 1/4 cup diced red onion
  • 1/4 teaspoon finely grated lime zest
  • 1 tablespoon plus 1 teaspoon lime juice
  • 1 tablespoon chopped fresh herbs, such as chives, parsley, or mint (I used chives and parsley flakes, but I think this would be awesome with cilantro!)
  • Kosher salt and freshly ground pepper (I didn't use any)
Directions
For the pork
  1. Prepare an outdoor grill for direct grilling on a medium-high fire and indirect grilling (or heat a grill pan to medium-high heat).  Lightly brush the grill grate/pan with the oil.
  2. Mix 2 teaspoons salt, the chili powder, brown sugar, and cinnamon in a small bowl.  Divide the mixture evenly among the chops and rub all over.  Should coat generously.
  3. Place the chops on the hot grate directly over the flame and grill until marked.  Rotate 90 degrees to get professional-looking grill marks, and cook halfway through, about 5 more minutes.  Flip the chops and move to a cooler area of the grill.  Rotate after a couple minutes to get the same grill mark effect on both sides.  Cover and cook until an instant-read thermometer inserted in the thicket part of the chop registers 140° (about 5-10 minutes).  Transfer the chops to a cutting board and let rest for 5 minutes.  Can return to heat for 1-2 minutes to warm up before serving.
For the salsa
  1. Toss the peaches with the oil and grill until marked and softened, 2-3 minutes.  Roughly chop the peaches into bite-size pieces and place in a medium bowl with the tomatoes and onion.  Add the lime zest, lime juice, and herbs, and season with salt and pepper to taste.  Serve on top of the cooked pork chops.  Applaud yourself for making an excellent meal.

May 19, 2013

Mini Green Onion Biscuits

Tonight's dinner was so tasty!  Grilled steaks, baby red potatoes roasted in foil on the grill (extra crispy- the way I love them), salad, and these new biscuits.  They smelled awesome while I made them, and made me think of sour cream and onion potato chips.  Now I really want to try them with sour cream...


Ingredients
  • 2 cups all-purpose flour
  • 1 tablespoon baking powder
  • 1/2 teaspoon baking soda
  • 1 teaspoon salt
  • 1/4 cup freshly chopped green onions
  • 4 tablespoons cold unsalted butter, cut into pieces
  • 1/2 cup cold whipped cream cheese
  • 3/4 cup buttermilk
Directions
  1. Preheat oven to 450°.
  2. In a large bowl, combine the flour, baking powder, baking soda, and green onions.  Using your hands or a pastry blender, add the butter and mix until coarse crumbles form.  Your hands really are the best bet for this step, even if it's messy.
  3. Add the cream cheese in dollops.  Using your hands or a pastry blender, again mix until larger crumbles form.  Stir in the buttermilk until just combined- do not over mix.
  4. Sprinkle work surface with flour, turn out dough, and sprinkle top of dough with flour.  Pat out dough until 1 inch thick.  Coat a small biscuit cutter or the clean top of a spice container (I used the lid of my onion salt- similar flavor I figured!) in flour, and cut the dough into small 1" rounds.  Re-use scraps, being careful not to over work the dough, and continue until all biscuits are cut out.
  5. Place biscuits on nonstick baking sheets, about 1" apart, and bake 6-8 minutes, until slightly golden.  Best served warm!

May 4, 2013

String State Outline

I've seen this idea on Pinterest for such a long time now, and completely forgot that I'd planned to make it for a friend's wedding last year.  Cue the recent Pinterest party and I finally got my belated butt on that project.  Because it was an unrequested gift, I opted to go smaller and made an outline on a little plaque from Michaels (about 5x7 in size?), using one of her wedding colors for the string color.  She was married in Seattle, and absolutely loves Washington state, so using that as the basis for the outline was a no brainer. 


Supplies
  • Wooden board, plaque, or other sturdy surface to serve as the base
  • Finishing nails (will vary depending on size of surface and state to be outlined; I used a few dozen here)
  • Hammer
  • Thin string (I recommend string on a sewing bobbin)
  • Printout of state to use as guide
Directions
  1. Center state outline on base, preferably with a small piece of tape on the back to keep it in place.  Hammer finishing nails along the edge, against the paper outline (but not nailing into the paper).  Make sure to hammer in deep enough that the nails won't wobble or come out of place while you work with them later.  Space closely and evenly.
  2. Carefully remove paper outline once nails are in place, and nail a heart pattern over the city of choice (state capitol, where a couple was married, hometown, etc.).
  3. Tie one end of string around a nail, below the head so it will stay in place.  Extend string out in a sunburst pattern to the outer edges, twisting around each nail so the string stays in place.  Move on to the next nail in the heart when things start to get a bit crowded.  When you reach the final nail, tie the string to the last nail to secure in place.  
[Note: You'll see some extra clumpy parts in mine.  I didn't use string from a bobbin- I used embroidery thread that I had cut into long pieces, so I had to tie off those pieces several times before the outline was done.  I recommend the bobbin because you don't have to try to guess any length and separate out one thread from a bunch like I did with the embroidery thread.  You'll just have a nice, continuous length.]


Chubby Hubby Cookies

I've mentioned before that How Sweet It Is is taking over my cooking world, and I should point out my baking as well.  This amazing recipe is thanks to her, and I'll be more than happy to work it into my cookie rotation.


Ingredients
  • 2 cups + 2 tablespoons all-purpose flour
  • 1/2 teaspoon baking soda
  • 1/4 teaspoon salt
  • 8 tablespoons (1 stick) unsalted butter, melted and cooled
  • 1/2 cup creamy peanut butter, melted and cooled (really!)
  • 1 cup loosely packed light brown sugar
  • 1/2 cup granulated sugar
  • 1 large egg + 1 large egg yolk
  • 2 teaspoons vanilla extract
  • 2 cups pretzel sticks, crushed (seriously- make sure they're crushed or you get a big pretzel javelin like the one you see in my top cookie!)
  • 1 cup milk chocolate chips
Directions
  1. Preheat oven to 350°.  Line a cookie sheet with parchment paper and set aside.
  2. Mix the flour, baking soda, and salt in a large bowl and set aside.
  3. In a stand mixer, mix the butter, peanut butter, and sugars until combined.  Add the egg, egg yolk, and vanilla and mix until combined.  Gradually add flour mixture until dough forms (it will be crumbly at first, but will come together).  Fold in the crushed pretzels and chocolate chips.  
  4. Shape dough into 1-inch balls and place about 2 inches apart on cookie sheet.
  5. Bake 8-10 minutes or until slightly golden and set.  Let sit for 2 minutes, and then transfer to wire rack to cool completely.

 Om nom nom nom.

Moving Day Kit

One of my favorite people recently moved away, and I was tasked with coordinating her office goodbye party.  Everyone chipped in for a Home Depot gift card, and I wanted to put together a cute housewarming gift I'd seen on Pinterest.  As I poked around Marshall's and Target, though, the gift evolved more into a moving day survival kit.  This idea was a hit, so I thought I'd share my version.

From the original pin, I nabbed a bright dish rag and sponge to help clean things up while getting settled in.  And of course we needed some toys for her cat.  A little bottle of Aleve and a first aid kit would cover moving aches and pains, while a Tide to go pen and Downy wrinkle release help manage the inevitable stains and rumpled "omg I just moved" factor.  


With some determination, I managed to fit all the goodies in this super cute glass container with a chalkboard front.

Springtime Clothespin Wreath

Whoa have I fallen behind in my posts!  I made this craft a few weeks ago at the latest Pinterest party.  I knew I wanted to do something with dyed clothespins.  The pins I saw were so vibrant and interesting.  I decided to combine that brightness with this neat wreath idea.  A few batches of Rit and some lessons learned, and I was in business.  Simplicity level high; time involved moderate.

I went with grey, purple, teal, and yellow for my colors.  During the party, the Mardi Gras-ness of this palatte was mentioned, but I stuck with it.

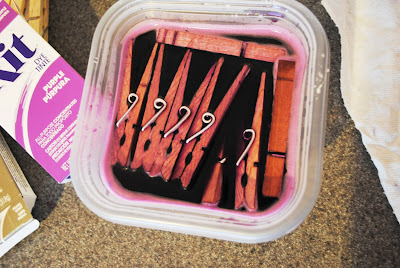
Fizzing hot water and dye- in go the clothespins.  This was the grey batch.

Looking pretty!

Laid out to dry.  Looking like a good color right now!  Warning- when completely dry, they actually darkened.  This was my "lighter" batch of purple.  The first batch was nearly black because I used so much dye and let them sit so long.  Like I said- lessons learned.

Grey batch number two.  The first ones were super dark, so I dyed another batch for just a minute and got this nice variation.
 Finished product!  I painted a particleboard circle white, clipped the clothespins in place, and I was in good shape.  You can see the super dark purples and greys in here, along with my batches of lighter ones.  If I'd kept the darker versions, instead of Mardi Gras I would've been left with a Notre Dame wreath.  My friend Diana would've loved that, but it wouldn't make much sense in *my* house.  ;)

Supplies
  • Particleboard circle to be the base for your wreath.  I found mine at Michael's for just a few dollars.
  • Paint and brush
  • Enough clothespins to cover your circle.  I think I had about 50 for my medium size wreath.  Alternative: get clothespins in different sizes to create a more defined sunburst look.
  • Rit powder dye
  • Tupperware containers (I used four medium square ones)
  • Rubber gloves
Directions
  1. Snap on those rubber gloves.  Prepare dye according to package directions.  Of course, your proportions are going to be different than dyeing clothes.  I poured a tablespoon or so of dye into each Tupperware container, then added about 1 1/2 cups of hot water (heated in the microwave 2 minutes).  I stirred gently with a helper clothespin, then added the clothespins.
  2. Soak clothespins in dye until they reach desired shade.  For dark, saturated shades, dye 3-5 minutes. For lightest shades, dye just 30 seconds.  My lighter purple and grey clothespins were in the dye just about a minute.
  3. Drain dye and lay out clothespins to dry on a paper towel.  It took several hours for them to dry completely.
  4. Paint particleboard circle  desired color (I used white) on one side and on the inner edge.  Set aside to dry.
  5. Pin clothespins to painted circle, alternating colors and position so that some are closer to the middle and some are closer to the outer edge, creating some variation and a bit of a sunburst effect.
  6. Hang with a nail- this puppy is too heavy for a command hook, I think.