Showing posts with label recipes. Show all posts

July 31, 2016

Chocolate Mousse Cake


Several years ago, my husband and I were on vacation in Rome, when he had his favorite dessert ever.  It was called Dios Mio Cake, or Oh My God Cake.  It was a delicious chocolate mousse, and I remember it having a cake layer at the bottom but my husband insists it was all mousse.  Regardless, despite not having the recipe I did try to recreate this heavenly dessert.  Here's what I've come up with, the mousse credited to a portion from Food Network's recipe.
[Tip: A 1 Quart container of heavy cream will be enough for both the Mousse and Ganache.  I hate it when recipes measure in cups or ounces but then the heavy cream containers say mL!]

Chocolate Mousse Cake
Serves 8-10
Prep time: 3 hours (with 2 hours to chill in fridge)

Ingredients
Cake

  • 1 box chocolate cake mix; likely requires egg(s), vegetable oil, and milk to prepare

Mousse

  • 8 oz semisweet chocolate (I use chips, but you could break apart a chocolate bar into 1/2-oz or smaller pieces)
  • 2 1/2 cups (20 oz) heavy cream
  • 2 Tablespoons granulated sugar

Ganache

  • 1 1/2 cups (12 oz) heavy cream
  • 2 Tablespoons unsalted butter
  • 18 oz semisweet chocolate (chips or bar broken into smaller pieces)
Directions
  1. Place metal bowl from a stand mixer and balloon whisk attachment in refrigerator to cool.
  2. Prepare the chocolate cake according to package directions, using a 9" cake pan.  I prefer pouring the batter in just one pan and trimming off the rounded, funny looking top.  This takes 10-15 minutes longer to bake than the box directions.  You could easily prepare two small round cakes, and layer with the mousse.  I simply prefer one large cake layer at the bottom with just one large mousse layer on top.  Whichever approach you take, rub shortening on the cake pan and coat lightly with flour; tap out excess flour.  Mix cake batter, pour into pan(s), and bake according to package instructions (adding time as needed if using just one 9" pan).  Allow cake to cool, then remove from pan by inverting on a wire rack.  Let cool completely.
  3. Begin the mousse by first melting the chocolate in a double boiler (or by placing chocolate in a bowl set over a pot with about 1" of boiling water.  Turn the heat down to medium, cover the bowl with plastic wrap, and let sit over the simmering water for 8-10 minutes.  Remove bowl from heat and stir chocolate until smooth.  Set aside.
  4. In the well chilled mixing bowl, pour in the milk and sugar for the mousse.  Whisk using the chilled balloon whisk attachment, whisking for 1 1/2 to 2 minutes or until stiff peaks form.
  5. Scoop 1/4 of the whipped cream mixture into the melted chocolate.  Use a hand whisk to gently incorporate until chocolate/whipped cream mixture is smooth and consistent.  Pour the mixture into the remaining whipped cream, and fold gently with a spatula until mousse is silky and uniform, without streaks of whipped cream or chocolate. 
  6. Lightly rub the ring of a springform pan with butter or spray with nonstick spray.  Assemble the pan, then place the cake into the bottom of the springform pan. Gently scoop mousse on top.  Smooth out mousse layer, filling springform pan to the edges.  Cover with foil, careful not to touch the top of the mousse, and chill in refrigerator at least 2 hours.
  7. After placing mousse cake in refrigerator to chill, make dark chocolate ganache.  Heat heavy cream and butter in a medium saucepan set to medium-high heat.  Place chocolate in a large mixing bowl.  Once cream comes to a boil, pour over the chocolate and let sit 5-10 minutes.  Gently stir the chocolate and cream mixture until smooth, preferably using a whisk.  If any clumps remain, try heating over a double boiler and stirring constantly, or microwaving at 50% power for 20-second intervals, stirring after each, until smooth.  This is very important because you will be piping some of the ganache, and if you leave any lumps the piping will not go well.
  8. Once ganache is complete, reserve 1 cup and chill in refrigerator until ready to assemble mousse.  Leave remaining ganache sitting out at room temperature, covered with plastic wrap.
  9. Take mousse cake out of fridge, and gently remove springform ring.  Some mousse may cling, which is ok, but if large amounts come off I like to scrape those off and smooth them back onto the cake as best I can.  Clear a large work surface, which is about to get very messy.  Pour the room temperature ganache onto the center of the mousse.  Using an offset spatula or very long, smooth knife, gently spread the ganache from the center toward the edges, allowing ganache to pour over edges.  Then smooth the edge of the cake with your spatula.  This will likely make the OCD part of you freak out.  Embrace the mess.
  10. Place a star tip in a pastry bag, and scoop the chilled ganache into the bag.  Pipe on stars or other design as desired into the top and/or sides of the assembled mousse cake.  I've made a Christmas tree and monogram on different occasions.  This is why it's so important to have a lump-free ganache!
  11. Very carefully slide a large flat or offset spatula under the cake, gently separating from springform pan base, and transfer cake to a serving plate or cake stand.
  12. Place toothpicks at intervals on the top of the mousse, and cover with aluminum foil. The toothpicks keep the foil from touching your piped on masterpiece and that ooey gooey ganache! Refrigerate until ready to serve. 

This dessert is seriously so good, and I think well worth the effort.  It also helps that I love baking, and find this kind of prep work to be a lot of fun.  Also- be forgiving with yourself!  This thing tastes great regardless of how pretty (or sloppy) it turns out, so just roll with the punches along the way.  ENJOY!


December 6, 2015

Cranberry and Brie Pastry Bites


Today's update is to share a really easy, quick appetizer recipe I made over Thanksgiving.  I've been wanting to make this for ages, but in my household cranberries and brie just aren't appetizing for some reason.  So instead, I made this as an appetizer Thanksgiving day, which was happily gobbled up by my in-laws, and again that same week for a family game night.  Trust me- tuck this away for future reference when you need a nice, impressive snack with minimal effort!  The original recipe comes courtesy of Yummy Mummy Kitchen's blog, and she has plenty of other good things to check out as well.

Cranberry and Brie Pastry Bites
Makes 16

Ingredients

  • 1 puff pastry sheet, thawed (I use Pepperidge Farm)
  • 1 4-oz wedge Brie cheese, or 1 container of snack-size Brie wedges, opened and divided into 16 portions
  • 1/3 cup homemade or store bought cranberry sauce (whole berry; not jelly)
Directions
  1. Preheat oven to 400.  Spray a mini muffin tin with nonstick spray.
  2. On a lightly floured surface, roll out puff pastry rectangle.  Using a pizza cutter, cut into 16 small squares.
  3. Place pastry squares into muffin tin, pressing down gently in each opening.  Bake 8 minutes or until pastry begins to turn golden brown.
  4. Remove muffin tin from oven and use the back of a spoon to gently press down in the center of each pastry square to create room for filling.
  5. Place a portion of brie onto each pastry square.  Top with about 1/2 to 1 teaspoon of cranberry sauce.
  6. Place muffin tin back into oven for 5-7 minutes or until cheese is soft and pastry is golden brown.
  7. Remove from oven, gently remove from muffin tins and cool on a wire rack.
  8. Serve warm or at room temperature.
Optional: Top with toasted pecans and/or sugared cranberries.

October 14, 2015

Apple Cream Cheese Danishes


After a recent outing to an apple orchard, I found myself with an abundance of apples.  I plan to make a pie, but in the meantime I've been enjoying a modified version of these apple dumplings found on Southern Bite.  I was suspicious of the Sprite used in the recipe, but after searching similar recipes found some used Mt. Dew, others used Sprite, etc., so clearly the carbonation was doing... something... to help with these.  I shrugged and ran with it, and have no regrets.  What I DID change was to sneak some cream cheese and cinnamon sugar inside these ooey gooey dumplings, which I am re-branding as danishes.

Apple Cream Cheese Danishes
Makes 8

Ingredients

  • 1 apple, peeled, cored, and sliced into 8 slices
  • 1 tube crescent rolls (8 count)
  • 2 ounces cream cheese
  • 2 tablespoons cinnamon sugar (mixture of ~1 1/2 tablespoons sugar and 1/2 tablespoon cinnamon)
  • 1 stick butter, melted
  • 3/4 cup granulated sugar
  • 1/2 teaspoon cinnamon
  • 1 1/2 tablespoons flour
  • 6 oz Sprite
Directions
  1. Preheat oven to 350.  Spray a square baking dish with nonstick spray and set aside.
  2. Unroll the crescent rolls and separate into triangles.  Spread a bit of cream cheese along the bottom of each triangle.  Place an apple slice on top.  Sprinkle with a little cinnamon sugar.  Roll up in crescent roll dough and pinch seams closed.
  3. Place danishes in prepared baking dish, evenly spaced.
  4. Mix melted butter, sugar, cinnamon, and flour in a medium bowl until well combined.  Pour over danishes.
  5. Pour Sprite down center and sides of baking dish (not over the danishes themselves).
  6. Bake at 350 for 35-40 minutes or until tops are golden and danishes are baked all the way through.
I wish you could smell these!

Just your basic white girl, wearing a scarf, loving fall, and baking all things apple and pumpkin.

October 11, 2015

Rustic Pumpkin Apple Bites


These little guys have been lurking on my Pinterest desserts page for a LONG time, and I finally made them last weekend.  Perfect for fall, with a nice oatmeal crust, these are not too sweet and not too heavy.  They make a nice little treat, and would be perfect for a Halloween party or even packed along for a picnic.  I did adapt my recipe a bit from Zestful Lou's, but appreciate the idea she planted!

Pumpkin Apple Bites

Makes 12 bites


Ingredients

For the crust

  • 1 cup oats
  • 1/4 chopped walnuts
  • 2 tablespoons brown sugar
  • 1/2 teaspoon cinnamon
  • 2 1/2 tablespoons butter, melted
  • 1 tablespoon milk
For the filling
  • 3 tablespoons pureed pumpkin
  • 2 tablespoons apple butter (I used caramel apple butter- YUM)
  • 2 tablespoons brown sugar
  • 1 egg white
  • 1/2 tablespoon corn starch
  • 1/4 teaspoon pumpkin pie spice
Directions
  1. Preheat oven to 350.  Spray a mini muffin tin with nonstick spray.
  2. In a large bowl, whisk together filling ingredients.
  3. Place dry crust ingredients in a food processor and pulse until combined.  Then, with food processor running, slowly pour in melted butter and then milk.  Process until combined.
  4. Scoop a tablespoon of crust dough and press into mini muffin tin.  Press down and up sides of the tin.  Repeat in each spot on the muffin tin.  You will have a bit of crust mixture left over- reserve.
  5. Scoop 1-2 teaspoons of filling into each crust.  Sprinkle a little of the remaining crust mixture over each bite.
  6. Bake 12-15 minutes or until filling is set.  The filling will be puffed up when you take the bites out of the oven, but will settle as everything cools.
  7. Place muffin tin on a drying rack, and allow bites to cool completely before gently removing from tin.
Crust ingredients.  They smell amazing together!

All mixed with the butter and milk.

So rustic and delicious.


August 24, 2015

Lemon Surprise Cookies


I tried a new cookie recipe yesterday and am very glad to share this success with others.  It's a chewy, sweet but tart, light cookie that's perfect for summer (or the tail end of summer, as everyone is feeling heading up to labor day).  It reminds me a bit of my chocolate peanut butter surprise cookies as far as technique goes, so I made a batch of those as well for my lucky coworkers.
The recipe comes courtesy of SewLicious Home Decor.  I've only made a few edits to make the instructions a bit easier for me to follow.  Enjoy!

Lemon Surprise Cookies
Yields approx. 2 dozen cookies
Prep time: 1-2 hours (filling needs to freeze before baking)
Bake time: 10 minutes

Ingredients

Cookie

  • 1 box supreme white cake mix (just using the powder mix; you do not prepare it as directed on the box)
  • 2 eggs
  • 1/2 cup vegetable oil (not butter)
  • 3.4-oz box lemon Jello instant pudding mix
Cheesecake Filling
  • 4 oz cream cheese, softened
  • 2 tablespoons unsalted butter, room temperature
  • 1/2 teaspoon lemon juice
  • 2 cups powdered sugar
Instructions
  1. Line a large cookie sheet with parchment paper and set aside.
  2. Prepare cheesecake filling, mixing together all ingredients until creamy.  Spoon teaspoon-size dollops onto prepared baking sheet.  Place in freezer 1 hour or more until set.
  3. In a mixing bowl, combine the cookie ingredients (cake mix, eggs, oil, and pudding mix).  Turn dough out onto saran wrap and refrigerate until cheesecake filling is set.
  4. When filling is firm, preheat oven to 350° and assemble cookies.  Scoop 1-2 tablespoons of cookie dough and flatten into a circle in your palm.  Place a frozen dollop of cheesecake filling into center, and roll cookie dough around the filling, being careful to close up all seams.  Roll into a ball.
  5. Place balls of dough with filling centers on baking sheet about 2 inches apart.
  6. Bake 8-12 minutes or until set.  The tops won't brown, but the bottoms will.
  7. Remove from oven and gently press down each cookie with a spatula or the bottom of a cup to flatten slightly.  Let sit on baking sheet 2 minutes, then transfer to wire rack.
  8. Serve warm, or cool completely before storing.
Aaa!  They just look so summery and yummy!  I wish I could give you smell-o-vision, too.

Mmm- delicious filling.

June 18, 2015

Summer Squash and Herb Gratin

This delicious zucchini and squash dish comes courtesy of a cookbook my brother and sister-in-law got me for Christmas, The New Southern Table.  Summery and cheesy with amazing crispy breadcrumbs on top!  It's really similar to my cheesy baked zucchini but with a richer taste and texture because it is sauteed first, and of course because of the gratin.  Mmmm.


Summer Squash and Herb Gratin
Serves 2-3 as a side dish

Ingredients

  • 1 large zucchini, cut into slices and then quartered
  • 1 large squash, cut into slices and then quartered
  • 1-2 teaspoons kosher salt, plus more to taste
  • 2 tablespoons unsalted butter, divided
  • 1/4 cup panko bread crumbs
  • 3/4 cup freshly grated Parmesan, divided
  • 1 tablespoon olive oil
  • 2 cloves garlic, sliced
  • 1/4 teaspoon red pepper flakes
  • 1/2 teaspoon dried marjoram
  • 1/4 teaspoon dried rosemary
  • 1/2 teaspoon dried parsley
  • Freshly ground black pepper
Directions
  1. Place the squash quarters in a colander and generously season with the salt.  Let sit 20 minutes, rinse with cold water, then thoroughly dry with a kitchen towel.
  2. Preheat the oven to 400°.
  3. Heat 1 tablespoon of the butter in a medium-size skillet over medium heat.  When the butter melts, swirl the pan for 2-4 minutes, or until the butter is lightly browned.  Add the bread crumbs and cook, stirring constantly, 2-4 minutes or until the bread crumbs are browned.  Transfer to a bowl, and stir in 1/4 cup of the Parmesan.
  4. Heat the olive oil and remaining tablespoon of butter in the same saucepan over medium-high heat.  Add the squash first, then the garlic, and cook.  Stir often and cook 6-8 minutes, or until the squash is tender and brown in spots.  Remove the pan from the heat and stir in the remaining 1/2 cup of Parmesan, seasonings, and pepper to taste.
  5. Transfer the squash to a shallow, oven-proof dish, such as a pie dish or casserole dish.  Top with the Parmesan and bread crumb mixture and bake 20-30 minutes, or until hot and bubbly.

February 8, 2015

One Pot Chicken and Rice


Oh little blog, how neglected you are!  I've been cooking and crafting away since the holidays, but not taking time to enter the fun details here.  This recipe is the perfect example.  I made it for the first time December 10th (according to the date stamp on the photo) and have easily made it a half dozen times since then.  Each time I have to go to the pin, rather than using my own tweaked notes!  Crazysauce.  So let's try to remedy that, shall we?

The original recipe comes courtesy of Natasha's Kitchen, and kudos to her for finding such a flavorful way to pull these common ingredients together.  I've tried other chicken and rice casseroles that included broccoli and cheese but somehow failed to come together as well as this one does.  I'm also happy to share that after just a couple times making this recipe, I was able to find the tweaks I needed to get it just right in my eyes.  One of those involves knife skills.  Fun!

One Pot Chicken and Rice

Prep time: 15 minutes  Cook time: 30 min
Serves: 4-6

Ingredients
  • 1/4 cup extra virgin olive oil
  • 4 tablespoons unsalted butter, divided
  • 1/2 cup yellow onion, diced
  • 2 large carrots, cut into matchsticks (skinny sticks, ~2" long; see tutorial here), though I prefer julienne
  • 2 teaspoons sea salt, divided
  • 2 large boneless, skinless chicken breasts cut into bite-size pieces
  • 1/4 teaspoon freshly ground black pepper
  • 2 dried bay leaves
  • 1 cup white wine, such as Chardonnay (or 1/2 cup water:1/2 cup chicken broth mixture)
  • 5 cups hot chicken broth (I usually warm it up in a separate pot, which makes this a two-pot meal, but you can microwave it, too)
  • 2 cups Jasmine rice
  • 1 head garlic, top and some of the peel cut off but leaving root in tact (see here)
  • 1/3 cup fresh curly parsley (not flat leaf), chopped
  • 1/2 cup grated Parmesan cheese, plus more for topping
Directions
  1. You definitely need to prep all of your ingredients beforehand!  Have them nicely laid out in the order you'll need them.
  2. Heat oil and 2 tablespoons of the butter in a dutch oven (large, heavy pot with a tight-fitting lid) on medium/high heat.  Stir in onion, carrots, and 1 teaspoon of the salt and turn heat down to medium.  Sautee until soft and golden, 8-10 minutes.  If onion begins to brown too quickly, turn heat down to medium/low.
  3. Add chicken, the other teaspoon of salt, pepper, and bay leaves.  Saute until chicken is golden all over, 5 minutes.
  4. Turn the heat up to high and add the white wine.  Boil down the wine, scraping the bottom, until most of the wine has evaporated (3-5 minutes).
  5. Add the hot chicken broth, then stir in the rice.
  6. Nestle the cut and partially peeled head of garlic into the center of the pot.  Bring to a rolling boil, reduce heat to low, cover, and simmer 15-20 minutes or until rice is fully cooked.
  7. Turn off the heat, scoop out the garlic head and discard, and stir in the remaining 2 tablespoons of butter until melted and incorporated.  Then stir in the parsley and 1/2 cup of Parmesan cheese.  Serve with a small sprinkle of Parmesan on top.
Looks so great as it all cooks up!  I can taste it now.  Gaah!

October 4, 2014

Lasagna Roll Ups


Lately I've been seeing more and more pins of lasagna rolls on Pinterest.  This piqued my interest, because it seemed like a much easier way to approach lasagna than the rickety, slippery layers we all know and fight with when it comes time to serve up that delicious pasta.  I was frustrated when I went searching for one to make, though.  So many with bacon!  I just wanted a regular lasagna recipe that happened to be rolled, with proven cooking times so I didn't have to monitor my stove like a nut trying my own approach.  I finally found a keeper from My Joy Filled Life, and share it here with modifications to just make half of her giant serving.

Ingredients
  • 1 lb ground beef
  • 1 clove minced garlic
  • 1/2 teaspoon onion powder (or 1/2 cup diced onions)
  • 1/2 tablespoon Italian seasoning
  • Salt and pepper to taste
  • 1 1/2 jars pasta sauce, divided
  • 12 uncooked lasagna noodles
  • Drizzle of olive oil
  • 7.5 oz-container ricotta cheese
  • 1/2 egg (sorry- I know this is awkward!)
  • 1 1/2 cups shredded mozzarella cheese, divided
  • 3/4 cups grated Parmesan cheese
  • 1/8 teaspoon salt
  • 1/8 teaspoon pepper
  • 1 tablespoon parsley flakes
Directions
  1. Preheat oven to 375°.
  2. Bring a large pot of salted water with a drizzle of olive oil to boil.  Set out a cookie sheet covered with wax paper, to lay out your lasagna once it's cooked.  Add lasagna noodles to boiling water and cook according to package directions (likely ~10 minutes).
  3. While your water comes to a boil and your lasagna cooks, brown your beef with the garlic, onion powder, Italian seasoning, salt, and pepper.  Drain and return to pan.  Add 1 jar of pasta sauce and heat through.  Set aside once sauce is heated.
  4. In a large bowl, mix the ricotta cheese, 1/2 egg, parsley, 1 cup of the mozzarella cheese, 1/2 cup of the Parmesan cheese, and 1/8 teaspoon each of salt and pepper.
  5. Drain cooked lasagna noodles and rinse with cool water, to stop cooking and make them easier to handle.  Lay noodles out on cookie sheet covered with waxed paper.
  6. Spread 1/4 cup of jarred pasta sauce in bottom of a 13x9 baking dish.
  7. Spread the cheese mixture evenly down the center of each noodle.  Top with meat sauce in an even layer.  Roll up noodle and place seam side down in baking dish.  Repeat with remaining noodles.  You may not use all 12 because some tear while cooking or you run out of filling.
  8. Once all noodles are rolled up and placed in pan, spread remaining pasta sauce (jarred and/or meat sauce) over top of noodles.  Sprinkle with remaining mozzarella and Parmesan cheeses and 1 tablespoon of parsley flakes.
  9. Tent baking dish loosely with aluminum foil; make sure it isn't touching the pasta and cheese at all.  Bake at 375° for 35 minutes or until heated through.
  10. Let sit for 5 minutes before serving.
Mmmmm.  Lasagna-y goodness!

August 21, 2014

Make Your Own Starbucks Caramel Frappuccino


I am craaaazy crazy about Starbucks, but need to watch my coffee budget more closely these days.  I've been craving my beloved Caramel Frappuccinos but can't stomach the cost for a daily dose of that sweet, caffeinated bliss.  I experimented at home today and sure enough, for the cost of 2 of these drinks, I can easily make 6-8 at home.

Starbucks: $4.25 for one tall
Home: $4.99 Vanilla Latte, $1.99 Caramel syrup, $1.49 whipped cream, ice = $8.47 for at least 6 talls

And I promise you, the taste is spot on because I used the premade Starbucks iced vanilla latte (sold at most grocery stores).  You could easily make yours completely from scratch with brewed espresso (you can buy tins of espresso instant coffee) and milk, but then your flavor will be different.

Anyway, here's the simple recipe!  Let the savings and cravings commence.  :D

Supplies

  • 4 to 8 oz Starbucks vanilla latte drink (vary depending on desired size and consistency)
  • 5-6 ice cubes
  • Drizzle of caramel syrup (I like the Hershey's bottled kind)
  • Whipped cream
Directions
  1. Blend latte, ice cubes, and a drizzle of caramel syrup in blender.  I first used the ice chop setting for about 20 seconds, then the liquefy setting for 45 seconds until the drink reached the right consistency.
  2. Drizzle caramel syrup in glass (or better yet- reusable Starbucks cold cup!), pour in blended drink, top with whipped cream, and drizzle with additional caramel syrup.
My tips: 
If the drink is too liquid, resembling a slightly more frozen version of the latte drink, add more ice.  
If the drink is separating into ice and liquid layers, you need fewer ice cubes and/or to blend for a shorter period of time.

July 26, 2014

5-Ingredient Brownie in a Mug

A few days ago, my husband and I had an especially trying day between the kids, spit up, a crazy vet bill, and Lego mayhem.  By the end of the day, I was begging for wine or chocolate.  Short on wine, I made myself a brownie in a mug.  I've always been wary of these recipes on Pinterest, but I'm happy to report that this one works and tastes great.  It definitely hits the brownie texture instead of just being a cake in a mug, which is a common problem with other recipes.  I also like that this uses butter instead of oil.  End result: delicious.  Treat yourself and enjoy!


Ingredients

  • 1/4 cup all-purpose flour
  • 1/4 cup light brown sugar
  • 2 tablespoons unsweetened cocoa powder
  • 2 tablespoons unsalted butter, melted
  • 1/4 cup milk
  • Optional: mix ins and toppings, such as peanut butter, nutella, chocolate chips, powdered sugar, nuts, etc.
Directions
  1. Mix flour, sugar, and cocoa powder in a large mug.  Break up clumps.
  2. Add melted butter and milk.  Mix until well incorporated and texture is consistent- few to no lumps.
  3. Microwave 1 minute, and then in 10-second intervals until liquid on top is gone.  If you tilt your mug, nothing should move.  Microwave 10 seconds more after the no-liquid point, and let sit to cool at least 2-3 minutes.
  4. Optional: top with crazy yummy toppings and eat straight from mug.

June 23, 2014

One-Pot Pasta with Shrimp

I should probably just sign up for a daily Martha Stewart recipe or something by now, because I seriously love pretty much every recipe I've tried from this woman's domestic machine.  The most recent of these is a one-pan pasta dish, which I only modified a bit.

What an appetizing bowl of pasta to serve up for the family!

Ingredients

  • 12 ounces linguine
  • 12 ounces cherry or grape tomatoes, halved or quartered if large
  • 1 onion, thinly sliced (about 2 cups' worth)
  • 4 cloves garlic, thinly sliced
  • 1/2 teaspoon red pepper flakes (I used a little less because I worry about heat, but could have easily done the full 1/2 teaspoon or more)
  • 2 sprigs basil, plus torn leaves for topping
  • 2 teaspoons coarse salt, plus more to taste
  • 1/4 teaspoon freshly ground pepper, plus more to taste
  • 4 1/2 cups water
  • 1/2 to 1 pound shrimp, peeled and tails removed (I actually used pre-cooked shrimp)
  • Drizzle of olive oil
  • Freshly grated Parmesan cheese, for serving (I actually skipped this, and liked it better just with olive oil)
Directions
  1. Place all ingredients except for shrimp and Parmesan cheese in a large straight-sided skillet or pot.  I used a pot because I was not confident that all of this would fit in my largest pan.  Bring to a boil and toss with tongs occasionally.  Boil 9 minutes, or until pasta is al dente and water is almost all evaporated.  Add shrimp to pot the last minute of cooking time and cook until just pink and beginning to curl.  Do not overcook.
  2. Season to taste with salt and pepper.  Garnish with torn basil, drizzle of olive oil, and Parmesan cheese.
Seriously, how easy is that?!?  Some chopping and 15 minutes to boil/cook everything, and you have a pretty impressive dinner to dish out.  Perfect for a weeknight meal.

Everything all situated in my stock pot.

Bubble bubble!  This is the last minute when I tossed in my shrimp.

June 22, 2014

Mini Key Lime Cakes

The blessing and curse of Tastefully Simple is that you know just how good the food tastes, and you want to make all of these special treats, and just have to wait patiently for the right occasion to make them.  This was true of the key lime cheese ball mix I'd bought nearly a year ago.  One of the recommended ways to make it was to use it as a topping on Tastefully Simple's almond pound cake, which sounded delicious.  I wanted to make that little treat for a retirement party for one of my employees, but I didn't want to spend an hour prepping individual servings.  My edit was to serve up the different components and let everyone build their own little key lime cake, which worked out wonderfully.

Ingredients
  • Key Lime Cheese Ball mix from Tastefully Simple
  • Almond Pound Cake mix from Tastefully Simple
  • 2 cups or more strawberries, sliced

Directions

  1. Prepare cheese ball and cake according to package directions.  Place cheese ball in center of serving platter.
  2. Cut cake into cubes, size depending on number of servings you want to have--bigger cubes for a dozen people; bite-size cubes to serve 40 as I did.  Arrange on platter.
  3. Slice strawberries and serve with other ingredients.
I recommend writing up a little set of instructions to go with your components so you aren't forever explaining to your guests how they can serve themselves, and what the ingredients are.  A little chalkboard would be perfect for this!  I didn't think of it until I was at work, so I just printed out a little sign that I placed next to the serving platter.

All prepped!  Pound cake in 3 of the serving dishes and strawberries in the fourth, with the cheese ball in the middle.

End of the buffet line!

June 15, 2014

Ham and Cheese Pretzel Pinwheels

This recipe is SO easy and super tasty- the perfect thing for a quick snack, low effort meal, or impressive appetizer when your friends stop by.  I got the recipe from Tablespoon, and my only change was in the dipping sauce.  Rather than use the cheese sauce, I mixed up some honey dijon mustard with mayo for a milder flavor for me, and my husband doused his in yellow mustard.  I say mustard is 100% the way to go with these!
Make them.  Now.  :)


Ingredients
(Serves 4)
  • 1 can Pillsbury refrigerated pizza dough (I like the classic one; Tablespoon used the thin crust)
  • 8 slices of cheddar cheese
  • 8 slices deli ham
  • 1 egg, beaten
  • Coarse sea salt
  • 1 tablespoon butter, melted
  • 1/3 cup honey dijon mustard
  • 1/3 cup mayonaise
Directions
(Pictures follow)
  1. Preheat oven to 425°.  Cover a baking sheet with aluminum foil and spray with nonstick spray.
  2. Unroll pizza dough onto a cutting board.  Top evenly with cheese slices and then with ham slices.
  3. Tightly roll up dough length-wise.  Pinch seams to seal.  This is important!
  4. Slice log into 16 equal slices.  Be careful to cut with a sawing motion, not just by squishing.  Set each slice on the prepared baking sheet.
  5. Brush slices with beaten egg, then sprinkle sides and tops with coarse sea salt.
  6. Bake 15-20 minutes until golden brown and cheese is melted and bubbly.  Note: My cheese always browns.  I'm not sure if a lower temp over a longer time would alleviate that.  I just peel away the darker bits, so no sweat there.  Just a warning/idea.
  7. Remove from oven and brush with melted butter.  Sprinkle with more salt.
  8. Mix mustard and mayo until well combined and serve in prep cups with the pinwheels, or in a bowl in the middle of your pretzel platter.
Dough rolled out and topped with cheese.  I know I said to do this on a cutting board, and here I am showing you that step on the baking sheet.  Trust me, I was happier when I did this on a cutting board.  My bites also turned out better when I didn't jam cheese onto every square inch, and instead used just 8 slices.

Top with ham.  Overlapping is good in my opinion!

Log all rolled up and seam pinched.

Cut into even slices, each about 1-2" thick.

All baked.  See what I mean about some of the cheese getting really dark?  I just used a fork to grab the darker bits and peel off before serving.

May 26, 2014

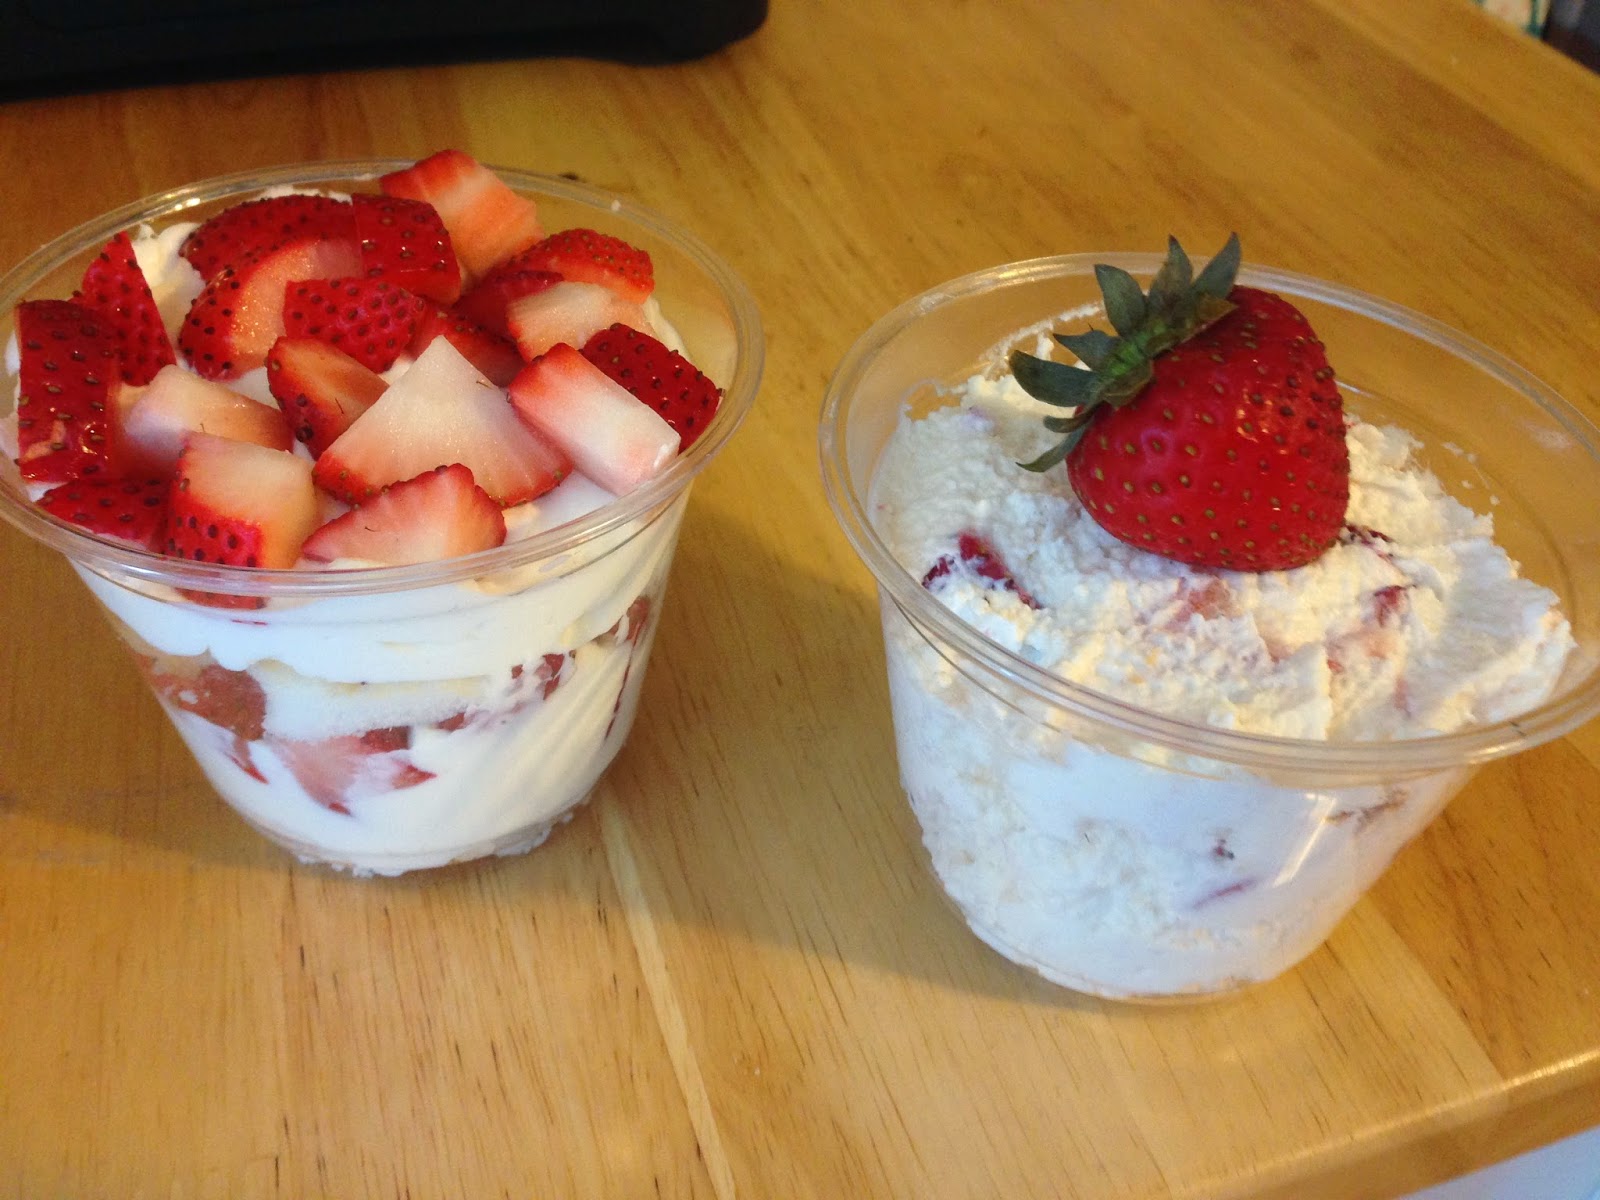
Strawberry Shortcake Trifle- Two Ways

I've been seeing this tasty looking Strawberry Lemon Cheesecake Parfait pin crop up recently, and decided to give it a try this weekend.  While the flavors all seemed spot on, it didn't really look like an appealing dessert.  I decided to try two approaches- a traditional trifle with the components layered, and the mashed up style of the original recipe.  The "pudding" style (as I've dubbed it) does have the benefit of fixing the one thing I don't like about trifles- that you have to get a perfect spoonful through all the layers to get the flavors together.  After having tried both, I have to say that I like the pudding better!  I'll leave it to you to judge for yourself.  :)

The Odd Couple: The Neat and Tidy Trifle and the Wonderful Mess Pudding

[Note: The ingredients are the same for both approaches; the only difference is in whether you layer these ingredients or mix em all up.]

Ingredients

  • 2 cups heavy whipping cream
  • 1/2 cup powdered sugar
  • 1 teaspoon vanilla extract
  • 8 ounces mascarpone cheese
  • 1/2 cup lemon curd (or lemon pudding, or lemon meringue pie filling if you can't find/don't want to make lemon curd; the trade off is that these have milder flavors)
  • 1 pound or more strawberries, chopped
  • 1 whole angel food cake (store bought is JUST FINE here), cut into bite-size pieces
Directions
  1. Whip the whipping cream on high speed ~1 minute, using a stand mixer with the whisk attachment or a hand mixer.  Reduce speed to medium and gradually add powdered sugar, then vanilla.  Return speed to high and beat another minute or more until whipped cream is fluffy and reaches appropriate consistency.  Turn off mixer.  If using a stand mixer, switch to beater attachment.
  2. Add mascarpone cheese to whipped cream, and mix on medium speed until incorporated.
  3. Fold in lemon curd by hand.
  4. For the Trifle: Layer a large bowl or trifle dish first with angel food cake pieces, then whipped cream mixture, then strawberries.  Repeat layers, finishing with strawberries on top.
  5. For the Pudding: Fold strawberries and angel food cake into the whipped cream mixture.  Serve in small cups and top with strawberry garnish.

May 25, 2014

Caprese Pasta

I recently decided to delve into my older pins that I still haven't made, and had great success with this recipe from How Sweet It Is.  I did make some alterations, like just browning the ground beef instead of making mini meatballs, but in the end my recipe is pretty identical.  Served with a simple salad, this was an excellent meal all around.  My guests loved it, and my family will definitely be seeing more of this dish.  :)


Ingredients
(Serves 4-6)
For the beef
  • 1 pound ground beef
  • 1/3 cup freshly grated Romano cheese
  • 2 garlic cloves, minced
  • 1 teaspoon dried basil
  • 1 teaspoon dried parsley
  • 1/2 teaspoon salt
  • 1/2 teaspoon pepper
For the pasta
  • 1 pound pasta shells
  • 1 tablespoon olive oil
  • 2 garlic cloves, minced
  • 14-ounce can diced tomatoes
  • 1 pint grape tomatoes, halved
  • 10 fresh basil leaves, chopped
  • 8 ounces mozzarella, diced (or 8 oz mini mozzarella balls)
  • 1/3 cup pasta water, reserved
  • Freshly grated Parmesan cheese
Directions
  1. Set a large pot of generously salted water to boil.  Add pasta and cook according to package directions.  Reserve 1/3 cup of pasta water before draining.
  2. While pasta cooks, add all beef ingredients to a large pan and cook until browned.  Set aside.
  3. At the same time you are browning the beef, heat olive oil in a separate large pan set to medium heat.  Sautee garlic about 1 minute.  Add diced and grape tomatoes and basil.  Stir to coat in pan oil and juices.  Mix in up to 1/3 cup of the reserved pasta water to make sauce desired consistency (I didn't use much).  Cook just 2-3 minutes more until grape tomatoes are tender.  Set aside.
  4. In a large bowl mix the cooked pasta, beef, and tomato sauce.  Add the mozzarella and stir gently to combine.  Serve with freshly grated Parmesan cheese and basil garnish, as desired.
Extreme cheesy closeup!

May 3, 2014

Honey Lemon Chicken with Herbs

I recently came across this tasty looking pin on Pinterest, but it was one of those convoluted goose chases.  The link goes to an image, which goes to a web page in another language.  At least Chrome translated well enough for me, and the original pin had the basics covered in the description.  Cue some adaptations and winging it and I came out with a really flavorful way to make chicken!  I can't WAIT to give this a go on the grill.


Ingredients

  • 2 boneless chicken breasts; recommended to make with skin on, though I didn't
  • 1 clove of garlic, minced
  • Zest of 1/2 lemon
  • Juice of 1/2 lemon
    • Optional- reserve the used lemon to cut slices as garnish
  • 1/2 tablespoon honey
  • 1/2 tablespoon olive oil
  • 1/2 teaspoon Herbs de Provence (I used Penzey's Parisien Bonnes Herbes)
Directions
  1. Preheat oven to 375°.  Line a rimmed baking sheet with aluminum foil and spray with nonstick spray.
  2. Mix garlic, lemon juice and zest, honey, olive oil, and herbs in a small bowl.  Arrange chicken on prepared baking dish, and brush with honey lemon mixture on both sides.
  3. Bake 25-30 minutes, flipping halfway through, until fully cooked.  If using lemon slices as garnish, place on chicken during the last 10 minutes.
I recommend making this with my cheesy zucchini bake, which is what I did last night.  YUM.  Each dish had a lot of flavor, but they complimented each other rather than overwhelmed.  Definite keeper.  And like I said, I can't wait to try this chicken recipe on the grill.  I'm sure it'll be amazing.

Update:  Grilling is just as yummy!  My husband really liked that approach.  Just placing the chicken directly on the grill, though, I lost the herbs so it left a stronger lemon flavor without as much of the herb flavor.  Perhaps using a grill tray or something else would help keep more of the herbs in tact!  I also have no idea why one piece came out all grillified looking and the other looks the same as when I made these in the oven.  *shrug*

April 29, 2014

Spinach Artichoke Pasta with Peas and Chicken

This is one of the recipes I've put together using my Tastefully Simple purchases!  Using their Artichoke & Spinach Warm Dip Mix with some typical pasta dish components adds a ton of flavor and makes this more of a special meal than "I tossed things in a pan."  I'm not getting anything from Tastefully Simple for this, just sharing a yummy recipe idea for one of their products.  Enjoy!


Ingredients

  • 1 prepared packet's worth Artichoke & Spinach Warm Dip Mix from Tastefully Simple, along with required ingredients
    • I always use Swiss cheese when I prepare mine
  • 1 chicken breast
  • 1/2 pound (1/2 box) short pasta
  • 1/2 cup frozen peas
  • Salt and pepper to taste
Directions
  1. Preheat oven to 375°.  Season chicken with salt and pepper and bake for 25-30 minutes, until cooked through.
  2. Bring a pot of generously salted water to a boil.  Add pasta and cook according to package directions.
  3. While pasta is cooking, prepare dip according to package directions.  Set aside.
  4. Heat frozen peas according to package directions
  5. Remove chicken from oven and dice into bite-size pieces.
  6. Drain pasta when done cooking and return to pot.  Stir in dip and chicken, and mix until well combined.  Gently stir in peas.

April 27, 2014

Mochaccino Brownies

I really love all things coffee, and definitely low brownies, so when I saw this recipe from The Curvy Carrot years ago I pinned it without thinking twice... and then forgot it.  I finally made these brownies yesterday, with a couple modifications to make the frosting work, and omg were they good.  I also can't wait to find more uses for the espresso buttercream, because it comes straight from Heaven.


Ingredients
For the Brownie Layer
  • 1/2 cup (1 stick) unsalted butter
  • 3 ounces unsweetened chocolate, broken into pieces
  • 1 cup granulated sugar
  • 2 eggs
  • 1 teaspoon vanilla
  • 2/3 cup all-purpose flour
  • 1/4 teaspoon baking soda
  • 2 ounces (1/4 cup) bittersweet chocolate chips
For the Espresso Buttercream Frosting
  • 1 teaspoon espresso powder (you can buy it in cans in the coffee aisle)
  • 2 tablespoons heavy cream
  • 1 1/2 cups powdered sugar
  • 4 tablespoons unsalted butter, room temperature (yes, I promise that's all you need)
For the Chocolate Ganache
  • 1 cup bittersweet chocolate chips
  • 1/3 cup heavy cream
Optional Garnish
  • Chocolate-covered espresso beans

Directions
  1. Preheat the oven to 350°.  Grease an 8 x 8" baking pan with butter or cooking spray.  Set aside.
  2. In a large pot over low heat, melt the butter and the unsweetened chocolate pieces until smooth, stirring frequently.  Remove from heat and let cool slightly.
  3. Stir sugar into chocolate mixture until well incorporated.  Add the eggs one at a time, mixing well after each addition.  Stir in the vanilla.
  4. In a small bowl, mix the flour and baking soda.  Add to the chocolate mixture and stir until just combined.  Stir in the bittersweet chocolate chips.
  5. Pour brownie batter into prepared baking pan and spread evenly.  Bake about 30 minutes, until a tester inserted in the center comes out clean.  Let cool completely.
  6. For the chocolate ganache, heat the cream and chocolate chips in a small pot over low heat, stirring frequently, until smooth and thickened.  Set aside to cool to room temperature.
  7. For the frosting, first dissolve the espresso powder in the cream and set aside.
  8. In the bowl of a stand mixer fitted with the paddle attachment, beat the butter on medium speed 2 minutes until pale and fluffy.  Turn down speed to low and add the powdered sugar, 1/2 cup at a time.  After all sugar is incorporated, mix at high speed for 10 seconds to aerate the frosting and make it fluffy.  Turn speed back down to low.
  9. Pour in the espresso and cream mixture and mix on low until incorporated and smooth, adding more cream if necessary for desired consistency.
  10. Spread frosting evenly over cooled brownies.  Spread room-temperature chocolate ganache on top.  If desired, sprinkle chocolate-covered espresso beans on top for garnish.  Let brownie layers set at least 10-15 minutes.
  11. Cut into bars and serve at room temperature.
What a nice looking treat to bring with you for any gathering.  I mean, in addition to your great smile and winning personality.

Brownie extreme close up!!!

April 26, 2014

Baked Cheesy Pasta with Prosciutto

Once again, Giada delivers on her promises of tasty recipes that, with just a little bit of something extra, take normal pasta dishes into something amazing.  She called her recipe Baked Rigatoni with Bechamel Sauce, and I just have to say that it's a disservice when she doesn't mention the prosciutto!  Talk about burying the lead.  Anyway, you can have this great dish all wrapped up and ready to serve within 45 minutes.  Add garlic bread and a salad, and you've got a killer weeknight meal here.

Saucy hammy goodness right there.

I usually halve these recipes because I only need 2-3 servings, but here's the full size which will easily serve 4-5.

Ingredients
  • 1 stick unsalted butter
  • 1/2 cup and 2 tablespoons all-purpose flour
  • 1 quart (4 cups/32 ounces) whole milk, room temperature
  • Pinch ground nutmeg
  • Sea salt and white pepper to taste (I cheated and used black pepper)
  • 1 cup grated Fontina cheese
  • 1/2 pound thinly sliced prosciutto, julienned
  • 1 pound (box) dry rigatoni or other short pasta.
  • 3 tablespoons unsalted butter, diced
Directions
  1. Preheat oven to 425°.  Grease a 9" x 13" baking dish and set aside.
  2. Set a large pot of generously salted water to boil.  While waiting for water to boil, make the cheese sauce.
  3. In a large pot, melt the butter over medium heat.  Whisk in the flour until smooth and cook until golden, about 2 minutes.  Stir continually and slowly add the milk, whisking until smooth and creamy.  Simmer until thick enough to coat the back of a spoon, about 7-10 minutes.  Remove from heat and stir in the nutmeg, 1/2 cup of the fontina, the prosciutto, and salt and pepper to taste.  Set aside.
  4. Your water should be boiling by now.  Add your pasta and cook just 5 minutes.  Because you're baking the pasta, it will cook the rest of the way in the sauce in the oven.  Drain the pasta and transfer pasta to the pot with the cheese sauce.  Stir until the pasta is generously coated.
  5. Pour the pasta and cheese mixture into the prepared baking dish.  Sprinkle with the remaining fontina, then dot with the diced butter.  Bake at 425° for 25 minutes or until golden and bubbly.

April 20, 2014

Ham and Cheese Sliders

YUM.  A friend made these for our last Pinterest party, and I knew immediately that my husband would love them.  The warm gooey cheesy ham middle with the mustard sauce is just awesome.  This is the recipe she used, and I adapted it just by halving everything because I was making it as a quick dinner to use some of our Easter ham, not as an appetizer for a party.  Easy, quick, and super tasty, this recipe is all around win.


Ingredients (makes 12 sliders; enough to serve 3-4)
  • 12 dinner rolls (I used mini kaiser rolls)
  • 12 pieces honey ham
  • 12 small slices Swiss cheese
  • Mayonnaise (about 1/3 cup will be enough for all 12 sandwiches)
Poppy seed sauce
  • 1/2 tablespoon poppy seeds
  • 3/4 tablespoons yellow mustard
  • 1/4 cup (4 tablespoons) butter, melted
  • 1/2 tablespoon minced onion
  • 1/4 teaspoon Worcestershire sauce
Directions
  1. Preheat oven to 350°.
  2. Spread mayonnaise onto the inside of both halves of each roll.  Assemble sandwiches with a slice of ham and cheese on each roll.  Place snugly in a baking dish or rimmed cookie sheet (I used a 9x13 baking dish).
  3. In a medium bowl, whisk together the poppy seed sauce ingredients.  Pour evenly over all of the sandwiches.  Set aside 10 minutes or until butter sets slightly.  Cover with aluminum foil and bake at 350° 12-15 minutes until cheese is melted.  Uncover and cook 2 additional minutes until tops are slightly brown and crispy.  Serve warm.