Showing posts with label kid party. Show all posts

April 20, 2014

Super Easy Rainbow Cake

I'm sure we've all seen the rainbow cake/cheesecake pins all over Pinterest, which often don't actually link to a recipe.  After investigating a few and some Google searching, I realized the "recipe" is really all about the technique of laying your dyed batter so you get the rainbow look in the end product.  That lesson learned, you can do this with any cake recipe, including simple boxed cake mix!  Keep it simple with white (premade) frosting and sprinkles, and this cake can lead you to crazy impressive results for minimal effort.  BINGO.

Look at that beauty!  Full on double rainbow across the plate.


So the trick here is that you mix your cake batter, separate out into 6 equal portions in bowls, mugs, whatever you have on hand, and dye each portion a different color.  You layer the batter by pouring into the center of your cake pan, and then pour the following colors in the center one by one.  This approach spreads out the layers below evenly.

See?

What's fun is deciding how to layer or change up your rainbow.  My cake is kind of reversed/upside down.  I poured in the purple first, then did the rainbow in reverse.  This gave me the fun red center spreading out to a thin purple edge, but had I started with red as the first color and flipped my cakes upside down, you can see how I'd have perfect Rainbow Brite style rainbows going on.  Bottom line?  Be creative, don't overthink it, and just have fun with the colorful result.

Ingredients

  • 1 box yellow cake mix and required ingredients (likely eggs and vegetable oil)
  • 1 container frosting
  • Food coloring (at least red, yellow, and blue)
  • Sprinkles

Directions
  1. Prepare cake batter according to package directions.  Divide equally into 6 different mugs/containers- probably ~2/3 cups in each.
  2. Dye each portion a different color of the rainbow.
  3. Prepare cake pan(s).  I used two 9" round nonstick pans, which I coated with butter.  Pour half of your first batter color into the center of one pan, and the other half into the center of the other, to have identical cakes.  Pour half of the second color slowly and evenly into the center of your 1st batter color in pan 1; repeat in pan 2.  This should slowly spread out the first color, with the 2nd color making a circle in the middle.  Repeat with remaining colors.  When done, wiggle and/or tap your batter if it isn't filling the pan fully or is lopsided.  I did, and it wiggled the whole mixture well without making the colors bleed.
  4. Bake according to package directions.  Cool completely.
  5. Optional- trim the rounded top off of each cake to get a more professional look, not the rounded look I have.  In my opinion, though, rounded makes sense for a rainbow cake!
  6. Frost the top of one cake, layer on the 2nd, and cover the entire cake in frosting.  Add sprinkles and you're done!  

October 27, 2013

Witches' Fingers (chocolate covered pretzels)

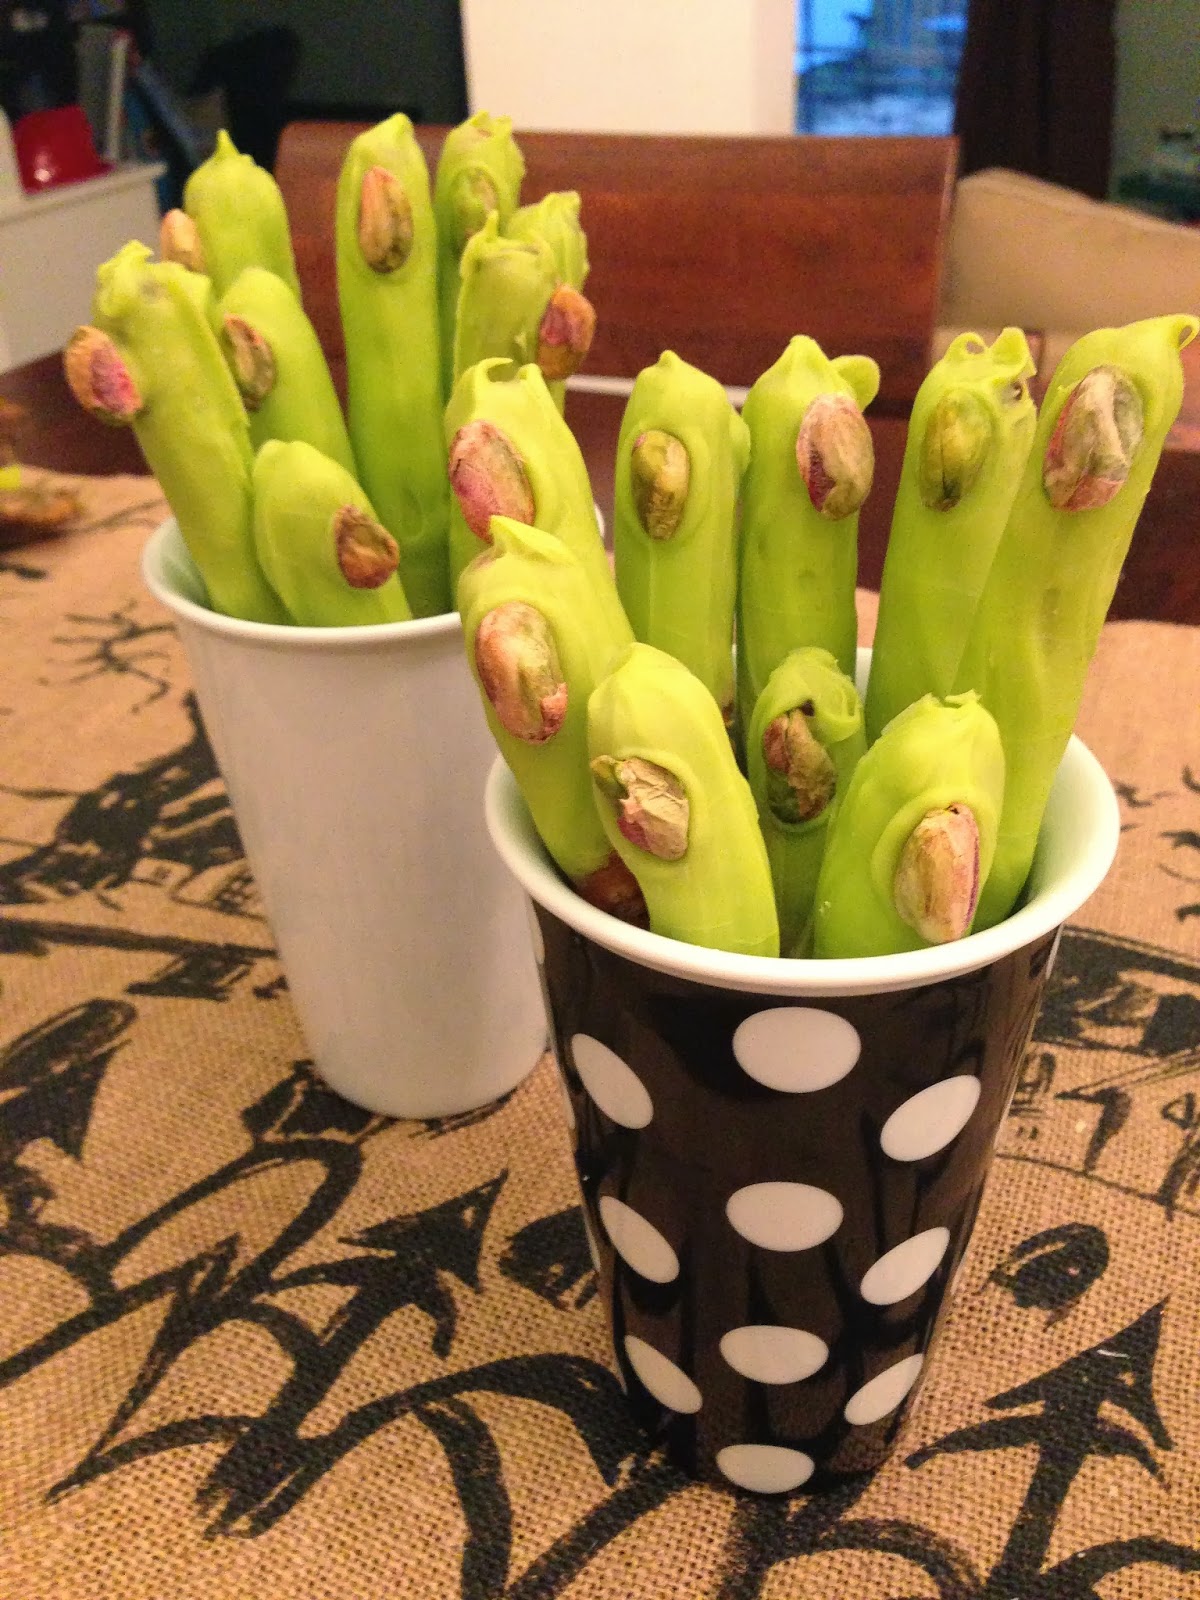
I was very proud of myself for the ORIGINAL Halloween creation (no Pinterest to steal my thunder here!), which was a huge hit all around.  Cover pretzel rods with green chocolate, add a creepy pistachio finger nail, and you're set.  Tasty and ghoulish = just right for Halloween.


Ingredients
  • 1 bag pretzel rods (about 20 rods)
  • 1 bag Wilton green colored chocolate discs
  • 1 tablespoon butter (optional)
  • About 24 pistachios, shelled
  • Witches' Fingers label (optional)
Directions (pictures below)
  1. Line a cookie sheet with parchment paper or Silpat sheet.
  2. Melt chocolate according to package directions.  Optional: mix in butter while melting to make a smoother consistency.
  3. Pour melted chocolate into a tall glass.  I came up with this technique because I'm a velociraptor (read: clever girl), and realized this would mean I could just dip the rods in the chocolate instead of trying any number of inefficient ways to cover the awkward shape in chocolate.
  4. Dip each rod into the glass of chocolate until covered at least 1/2 way.  Lay flat on prepared cookie sheet.  Repeat until all rods are covered with chocolate.
  5. Place a pistachio on the end of each chocolate covered part of the rod, to be the "fingernail".
  6. Suggested additional decorations: extra blobs of chocolate to look like warts; raisins to look like moles; cover parts of the pretzel with torn up marshmallow to make fingers lumpy or have large knuckles.
  7. Place cookie sheet in freezer for 5 minutes or until chocolate is set.
  8. Store in an airtight container at room temperature or in refrigerator if storing for several days.
  9. When serving, I recommend a cute printable like the one I made just using Word.
 Fill the glass with chocolate.  So much easier to cover the pretzels by dipping!  Stir occasionally.

Aaaand dip!

So easy!  Even my 3-year-old was able to do some.

Line em up on your Slipat- or parchment paper-covered cookie sheet.  Also, photobombs by the family dog are welcome.  Add pistachio fingernails.

Freeze until set, then arrange for display.  I really like how perfect these to-go coffee mugs were because they hid the pretzel part, just showing the creepy fingers.


Labels make everything better, no?

October 20, 2013

Batty Goody Bags

I really have tried to keep the crafting mayhem in check, but I was determined to find a cute way to do the goody bags for the Halloween party.  A quick Pinterest scour and I was set.  Even better: all I needed to buy were the black bags.  I already had the other supplies at home!


Supplies (for 4 bags)

  • 1 5x7 sheet of white foam 
  • 1 5x7 sheet of black foam
  • Scissors
  • 4 paper bags
  • 8 googly eyes, preferably different sizes
  • Hot glue gun and glue
Directions
  1. Fill bags with treats and glue or tape closed.
  2. Cut out smiles with fangs from the white foam.
  3. Cut out bat wings and ears from the black foam.
  4. Glue all pieces, as well as googly eyes, to bags.

Pumpkin Hunt Treats

Next weekend is our first ever kids Halloween party.  Yay!  One of the activities I have in mind is to do an Easter egg hunt with pumpkins.  I saw this super cute idea from Martha Stewart to have tear open treat pouches shaped like pumpkins.  I thought it would be great to use those for a little pumpkin hunt.


I just filled them with a piece of candy and a sticker, nothing too crazy because the kids will have goodie bags, too.

Supplies

  • Orange tissue paper
  • Green masking tape or florist tape (they had the green masking tape in the school supply aisle at Target)
  • Candy, stickers, or small toys to wrap up in pumpkins
Directions
  1. Cut the tissue paper into 4 pieces, or whatever size necessary to wrap up around your goodies.
  2. Pull up the corners and twist around the top to form a stem and close up the tissue paper.
  3. Wrap tape around the top, and then twist excess to form the vine.  Fold a larger square at the end to be a leaf.
Very simple, and I like that it's more the impression of a pumpkin than these perfect pumpkin shapes like crazy Martha made.  ;)


February 15, 2013

DIY Barrettes

Last weekend I was down to the wire on some Valentine's Day crafts, when a friend pinned this perfectly-timed craft.  I already had everything that I needed!  Well... most everything...  I didn't have the double-bar barrettes used in the tutorial, so I had to make some adaptations.  I didn't get the cute braiding in the picture, but mine did still turn out nicely all the same!  And hey, for a 4-year-old niece, she'll either love them or hate them regardless of the level of effort I put it.  I'm being realistic here.  :)


Supplies

  • Barrettes
  • Varying kinds of ribbon/yarn
  • Hot glue gun and glue
Directions
  1. Cut about a yard of each piece of ribbon/yarn you'll use on the barrette (I just made a length from my finger tip to my shoulder).  Place the barrette over the middle of the length of ribbon, and then alternate your ribbon colors back and forth over the barrette.
  2. Tie at end with a knot or bow to secure.  I then hot glued each end in place to hold it, and trimmed excess as desired.
[Alternatively, you can just wrap the ribbon around the barrette without any alternating action.  The middle one just has braided yarn wrapped tightly over the bar of the barrette.  Easy enough!]

August 23, 2012

Backlog Part 5: Toddler Train Birthday Party

Time to document the super fun train birthday party we threw for my son this year!
I used a Wilton cake pan for the train-shaped cake, decked out with oreo wheels, sugar cone smoke stack and marshmallow smoke (thanks for the idea!).  The marshmallows were a BIG hit- even moreso than the cake for the bday boy.

A few pieces of poster board and craft foam... paper?... made for a train that ran along the back of the couch.

With white balloons for steam.  I was pretty proud of that bit. ;-)

I got the idea for the Happy Birthday banner from Etsy.  Just construction paper, printed out letters, and a couple train pictures strung on ribbon.


The idea to put down black tape as train tracks leading to the house is courtesy of Pinterest.  They make duct tape in a bunch of colors!  Perfect.


My son got a kick out of it and really, it was a manageable, affordable effort.  I did the poster board trains one night, the birthday banner over a couple days, cake the night before, and set up the train tracks the day of.  Hope you enjoyed!