Showing posts with label reuse. Show all posts

October 25, 2014

Side Table Makeover: $5 Flea Market Flip!


Well the last couple weeks have been very busy, but I promise I've still been cooking, quilting, and DIY-ing.  Today's adventure was to make over a happy little side table I got at the Harper's Ferry Flea Market.  Remember in my post about the copycat Pottery Barn candle holders, when I showed off the batch of goodies my husband and I got for $25?  Well this is the side table from that haul.


I liked the shape, and it's a great little size to sit next to the couch and hold a drink while I'm watching TV.  It was wobbly and just needed to be reassembled with some wood glue, really.  I also wanted to sand it down and give it a nice coat of navy blue paint so it could be a happy, well adjusted member of my living room furniture family.

See?  What a nice size.

Our before shot.

Disassembled.

Sanded!

Primed.  I used the Zinsser primer again- the one I used on the dresser makeover.

Painted!

The after picture.  Ooo. Aaa.

Just used basic craft paint for the table, and wood glue in each joint when I reassembled.

Fin!

September 27, 2014

Copycat Pottery Barn Candle Holders: My First Flea Market Flip!


I recently discovered and fell in love with an HGTV show called Flea Market Flip.  It's basically rewarding people for their Pinteresty reinvention skills of an artist.  Now, my husband has always tried to convince me how rewarding a flea market scavenge can be, but after my first experience with an indoor flea market at a rundown strip mall near Pittsburgh, wherein people were selling all sorts of guns and ammo and more knives than I knew existed, I begged off.  It was an ongoing joke to take me to flea markets as a form of torture.  This show gave me a new perspective and willingness to try, though, so we found ourselves at the Harper's Ferry Flea Market in West Virginia last weekend.  We didn't have any specific projects in mind and just meandered, looking for things to catch our eyes.  There was one very cool trunk that I didn't investigate when we walked by, and later regretted because it was gone on our way out.  Lesson learned.  What we did walk away with was this little stash:


2 lanterns: $8
Side table: $5
Pillar candle holders: $2
Magazine caddie: $10

I can't even imagine where else $25 would get me so far.

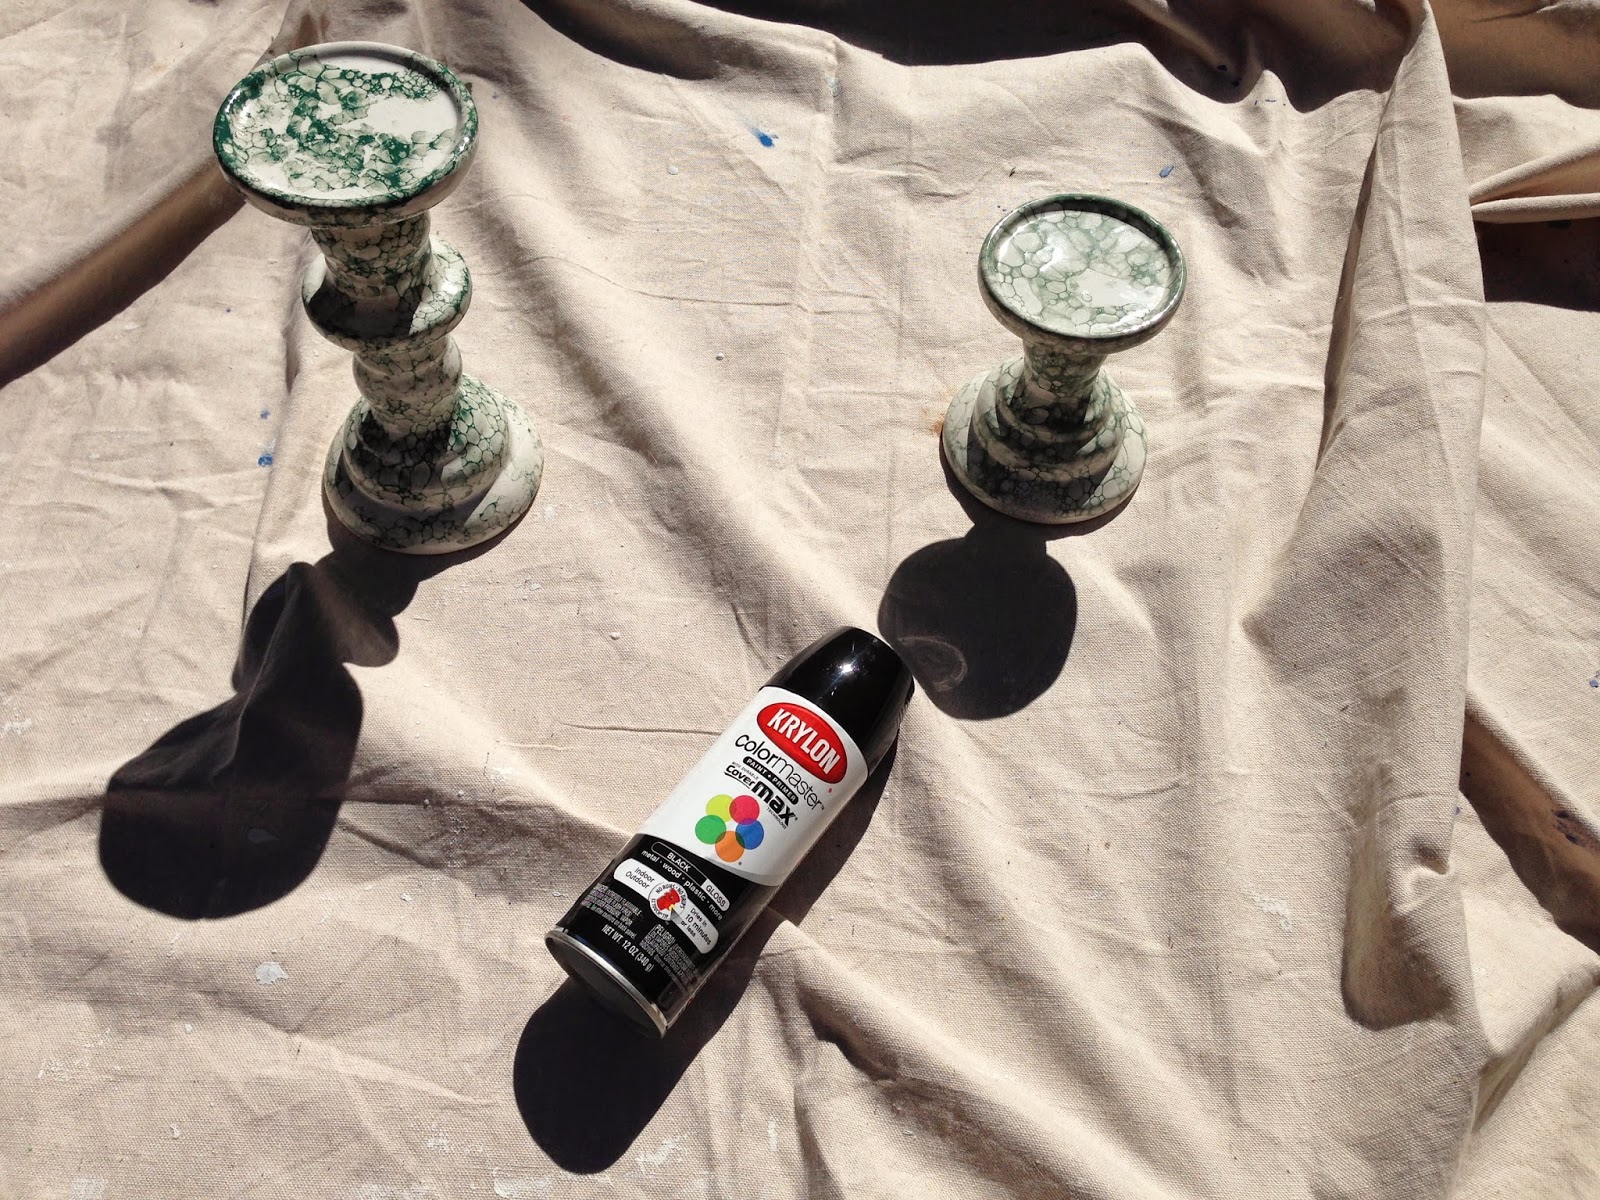
So the first find was that pair of candle holders.  We were walking down a row and I immediately locked eyes with those.  I hated the bubbled green treatment on them, but they had great shape.  The #1 rule I hear from Flea Market Flip and every other makeover/DIY show I've watched is to look for good bones, and sure enough the underlying shape of those cheap ceramic candle holders was one I liked a lot.  I knew that with a coat of glossy black spray paint, they'd look Pottery Barn worthy.  Turns out I was spot on.  Check out this set I could have spent $70 on instead of my $2.


Oooo I love the feeling of a good deal!  Muahahahaha.

So first things first- cleaning up these holders.  They had old wax drips on them and a layer of dust/grime.  Because they're ceramic, I used a plastic child's spoon to scrape off the wax without damaging the base.


You've gotta go, gunk.

Once the wax was scraped off and I gave them a nice scrub with my Mister Clean Magic Eraser (really- it's magic), it was time to spray paint.

I used Krylon shiny black spray paint and checked the back of the can to make sure it would adhere to glass and ceramic.  The candle holders are made out of ceramic but the coating on them was glassy, and I wanted to be sure the spray paint would adhere well.  I'm happy to report that yes it did!

I sprayed on two coats.  The first one was as shown here, with the holders upright.


I let that dry, then flipped upside down and did coat #2 to catch everything from the opposite angle.  This was my first time spray painting in a LONG time, and I could have been more careful about making sure I did a good job at the base.  It was too sunny outside to really see where I was missing spots, and I only noticed that I didn't have a completely even coat until I was inside.  I am just being overly critical, though.  They look great- I'm just sharing advice on what I encountered. Anyway, when spray painting, remember- nice even spraying at a good distance, and be careful you don't overload with paint and cause drips.

End result: don't they look great?!  And I'm not talking just for Halloween, here.  They'll be wonderful all year long.

September 7, 2014

Tin Containers as Fridge Storage

I've seen this idea floated on Pinterest for a while now.  Allegedly, you could put a magnet inside a tin container and it would magnetize the whole thing to stick to your fridge.  Not true.  BOO.  Still, with a bulldog clip, you can still take advantage of your cute old tin (in this case, an old bank) for holding pens.  I have a Chiclets tin holding coupons as well, but in that case I don't have an open side to use the clips on.  I need to stick magnets to the back of that puppy for it to be functional.

August 24, 2014

Layered Circle Skirt

A little while back, I made a couple cute circle skirts for my baby girl.  She's getting bigger, and the newborn size skirt has started looking more like a tutu, so I decided to add a layer.  Easy peasy, and while I was at it, I ripped the old messy stitches on original skirt's the bias tape and re-stitched.  Things are nice and clean now, and extended the life of the skirt a couple more months!  I thought I'd share the easy steps so you can keep up with my sewing lessons learned.  :)

Supplies

  • 1/2 yard fabric- same as top layer, or coordinating color/pattern
  • Bias tape
  • Sewing notions
Directions
  1. Fold top layer of circle skirt into quarters.  Fold 1/2 yard fabric for bottom layer into quarters.  Lay folded top layer on folded bottom layer, as shown below.
  2. Trace curve out of corner of bottom layer, making a bigger opening than that of the top layer (~1" further down from corner).  Measure out at least 2-3" past hem of top layer and cut.
  3. Unfold the top and bottom layers, and place them on each other, right side up.  You should have two donuts, with fairly similar openings.
  4. Flip upside down, and pin the larger skirt layer to the smaller top layer, just past the elastic of the smaller layer's waist.  Pleat every inch or so to use up the excess fabric and create waves that mimic the ripples in the top layer.  Sew.
  5. When you flip the skirt right-side-up again, your layers should be nicely attached.
  6. Pin bias tape, right side against the right side of the fabric of the larger bottom layer, and sew in the fold of the bias tape.  Cheating and sewing as you go, instead of pinning in place, may result in a surprise shortage of tape when you reach the end.  Oops!  I decided this just determined where the back of this otherwise perfectly uniform skirt belongs.
  7. Fold over the raw edge of the skirt, and fold again.  Pin and sew.
  8. Done!

August 18, 2014

My First Quilt!

Last night, I finished my very first quilt.  BIG sense of accomplishment here!  I had been thinking about trying a quilt for my daughter's nursery, and within days of that thought was given some fabric for just that purpose.  That was all the nudge I needed!  A month and lots of lessons learned later, I have this gem to show off:


I used the great tutorials from Lella Botique as well as a few other Pinterest pins, the Googles, etc. with bits of advice I picked up over time.  "Stitch the ditch" for example is a choice phrase I loved before I even knew what it meant, let alone got to do it in practice, singing "stitch the ditch!" in my head as I worked.
I'm not going to walk through how I got all this done, as the tutorials do that quite well and I didn't take pics along the way, but I will share some things I learned from experience (and jot them down to jog my memory later).

So, I started this project after getting the pink toile fabric with the Mother Goose scenes and the white birds.  I decided to cut out my two favorite scenes and some of the bird border.  The scenes were great but more traditional than my usual decorating style.  This actually worked well for the nursery, where I've been blending mod design with feminine touches.  Think geometric bedding and a shabby chic lamp.  So continuing with that, I paired the toile with a mix of mod and classic fabrics.  I thought the yellow stripes, grey bunnies, and pink/white squares did the traditional trick nicely.  Chevrons, arrows, and black fabric with birds brought out the mod.  I loved the black fabric and used that for the backing on the quilt.

Lesson 1: editing.  You know I have no problem editing, and that certainly held true with quilting.  I actually bought a couple more kinds of fabric which didn't make the team in the end.  While I loved them in the store, when everything was laid out on the table they just weren't jiving with the rest.  At first I was fighting it, but as I removed those squares and rearranged I saw just how right it was to keep them out.  While the thrifty side of me didn't like "wasting" that fabric I had just paid for, my artsy side knew this was a good move.  I saved the other squares and will keep them on hand for future projects because like I said, I did like them.  I'm not sure how I could have done that editing job in the craft store prior to purchase, but c'est la vie.  This lead to...

Lesson 2: planning.  I quickly learned that in quilting, rough estimates don't do the job.  You really do need to effectively plan out your piece before you set foot in a fabric store.  This way you'll know just how much you need in total fabric, and with some good calculations you'll be able to make simple adjustments as you change the number of fabrics you fall in love with from say, 5 kinds to 7.  Don't forget the backing fabric or the binding to do the edges.  Actually figure out how much you'll need for that.  I lucked out that my thought of "1 yard will do the job for the backing" sufficed, but didn't leave me with much to spare.  My hunch that a fat quarter would give me enough fabric to do the binding was definitely not accurate.

Lesson 3: Be comfortable making adjustments.  The instructions I had followed were all for basic quilts with 6" squares, not making any kind of patterns with the blocks.  Just fine, but I had these two larger pieces.  How did I make those work?  Logical me thought that if I just added some fabric to the larger pieces to make them total up to 12" square all would be well.  I didn't realize/think through that when the surrounding squares were sewn together, they would not in fact be 12" wide or 12" tall because I was losing bits all over to the seams.  Oops.  I had to take apart some pieces, sew together again, take apart more, sew again, etc. until I got things appropriately cut down to size and situated properly.  This meant that the text at the bottom of the scenes (Hey Diddle Diddle and Little Bo Peep) got sucked into the bottom seams, but I made my peace with that because far be it for me to flip out over this lesson.

Lesson 4: Improvise.  Now, this is similar and yet different from lesson 3.  This isn't just about making do- it's about being creative as well, and making the project your own.  I think this is key to sewing for me, and makes these things mine and better than factory made.  I quilted Xs through the fabric squares, but didn't want a big X through each of the Mother Goose scenes.  How to quilt those pieces in place, then, and keep the batting from shifting around on the inside?  Improvise by back stitching incorporated into the scenes.  In Little Bo Peep, I stitched the outline of the barn and one of the sheep.  For Hey Diddle Diddle, I sewed in with the clouds which is all but invisible, and along the dog.  I was so happy with how that turned out!


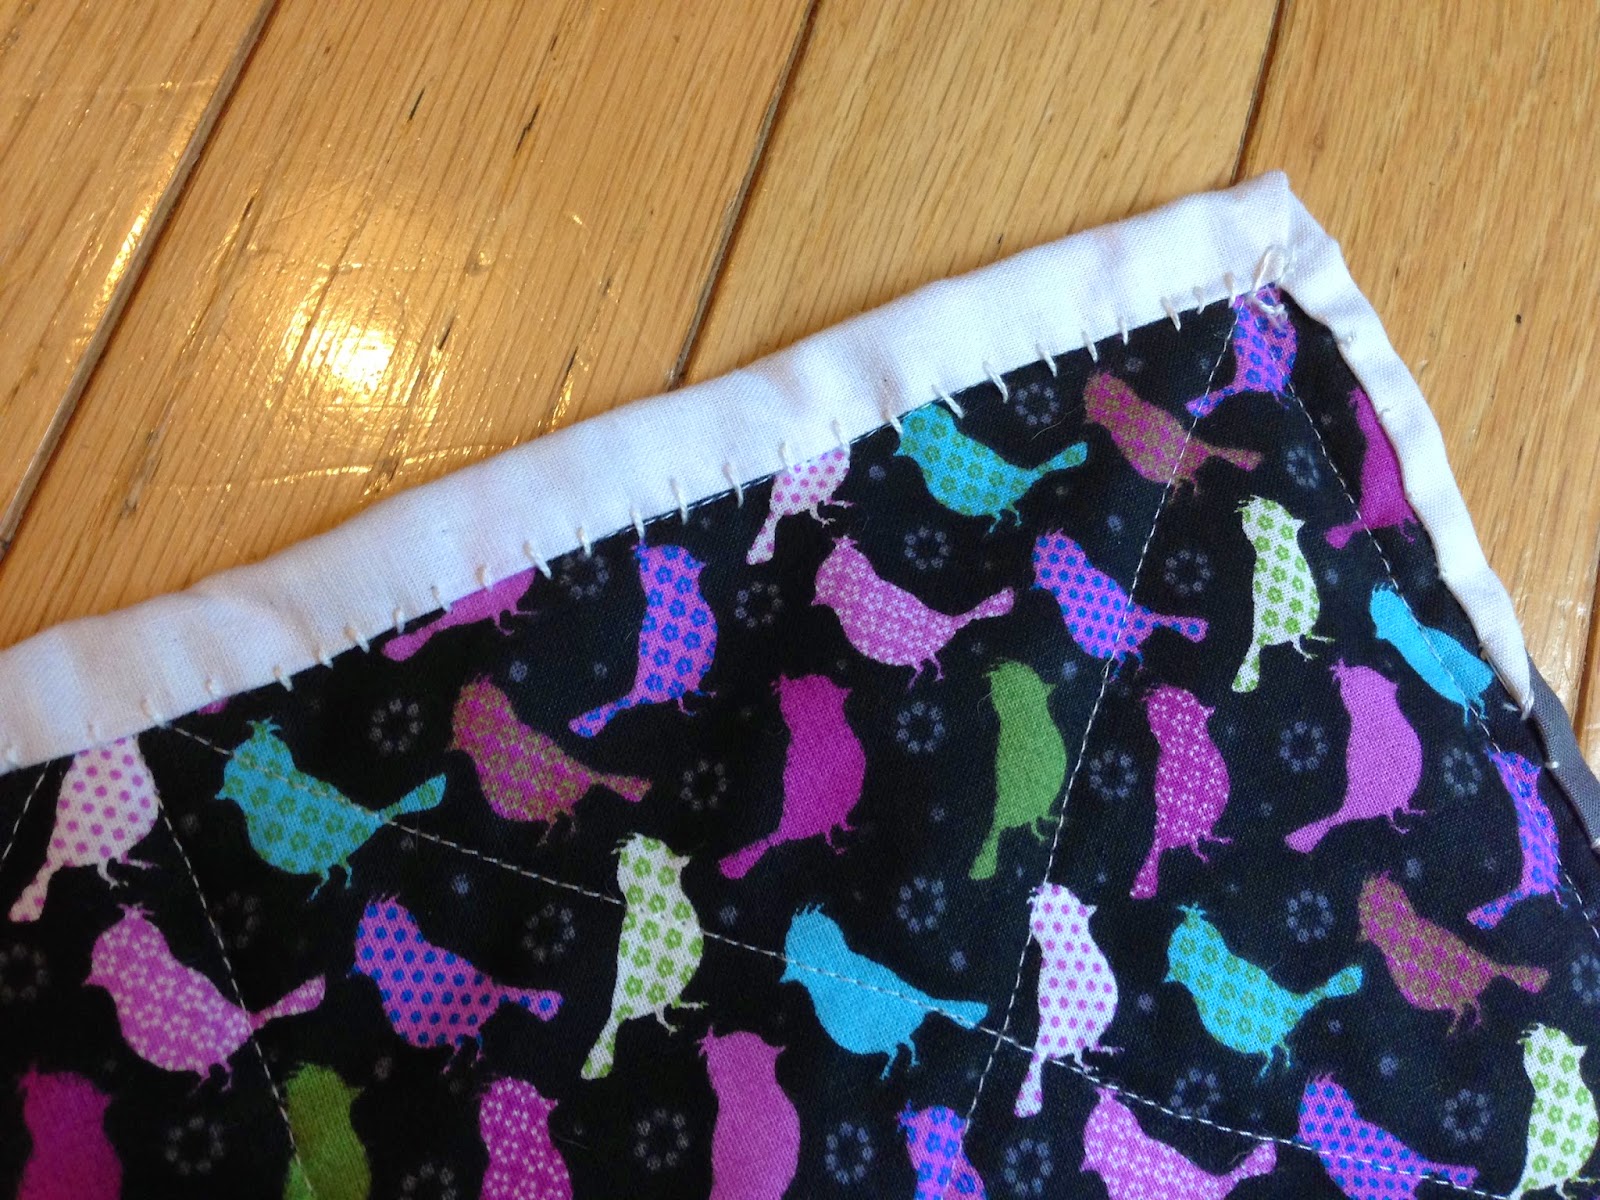
Lesson 5: Be patient and forgiving.  I needed some coaching from a friend when I was distraught over my imperfect lines, and avoided beating myself up for not getting things just right or having to redo portions.  This was my first try- these lessons are to be expected and in fact really good to go through.  As I stitched the binding on the back, I just had a mantra of "practice makes perfect" and kept at it, even though I felt like my initial stitches looked like the work of an earnest but clueless 5-year-old trying to sew.  By the end of the stitches, I was pretty proud of myself.  When I looked again this morning, things didn't look nearly as haggard as I had made them out to be in the moment.  So time, distance, and patience really are worthwhile here.

A bit Frankenstein-like?  Perhaps a bit clumsy, but honestly not SO bad.

Smaller stitches, more closely spaced.  Looking better now!

So there we have it.  :)  First one done, lots learned, and excited to do another!  I'm thinking of doing a herringbone quilt for the living room next.  Wish me luck!

July 26, 2014

Scrapbook Paper Globe and Bird Mobile

In the months leading up to my due date, I had my heart set on making a mobile for my daughter's nursery.  I knew I wanted to make it with scrapbook paper to get some patterns into the room, and incorporate twigs or branches in some way.  I perused Pinterest to get ideas, and really liked these globe mobiles that cropped up in my search.  I also thought that birds would be a great way to tie the mobile to the rest of the forest theme in the nursery, and if I suspended these from a great branch we'd be in business.  I started making the globes and had them set aside, ready to suspend from a perfect branch I nabbed in the nearby woods one day, and then baby girl's early arrival interrupted things for a while.  Once I resumed the mobile assembly, some of my globes were a bit wonky and more pumpkin-y than I'd intended, but in my new mindset to accept the imperfect, I let it go and in the end, I think it all worked out just fine.  :)


I basically followed the globe instructions from this site.  I made the birds up on my own.  Here are step-by-step pictures for both.

Supplies

  • Scrapbook paper (variety of sheets)
  • Brads (twice the number of globes you want, as each globe will use 2 brads)
  • Tape
  • String
  • Picture-hanging wire
  • Tree branch or bundle of twigs
  • Ceiling hook
Directions

The globes are really straightforward.  Cut 6-10 equal strips of scrapbook paper.  Hole punch each end.  Stack and run a brad through the hole at each end of the stack.  Fasten brad, then fan out scrapbook paper to form a globe.

I varied my scrapbook paper length and width.  This was one of my biggest globes, about 2/3 of a sheet of scrapbook paper cut into 1"-wide strips.  For others, I folded my scrapbook paper in half and made 1/2"-thin strips.  I think the variety is really important!

Hole punch each end.  My hole punch was weak sauce so I could only do a few strips at a time, then stacked them when all punched.

Put a brad through and fasten.  I was really happy to find these brads with the little jewels on them- perfect bit of sparkle to catch baby's attention amid all the patterns!

Now at this point, you can assemble your globe one of two ways.  

Way 1: Here, I fanned out the paper and then fastened, strip by strip, around the other brad.  After trying way 2 (below), I quickly abandoned this approach.  Still, I wanted to share.

Holding and slipping each strip over the brad.  Tedious.

Brad fastened.  The wrong way.  Gah!  Had to take it out and try to carefully slip it back through, sparkly-side-out.


Way 2:  Just put a brad through the punched holes at each end of the stack of paper strips.

Fan out strips to make a globe.  How easy is that!?

However you get to this stage where your globe is globe-y, you may end up with droopy deflated balloon-looking globes.  My secret is to tie a string from one brad to the other, shortening the gap between the top and bottom so you get a globe!


 The birds were fun to make, in my opinion.  They were also a nice way to make use of excess bits of paper.  :)

Start with two equal strips of paper, at least 1" wide.  Arrange with blank sides together.

Tape together at each end.  You actually want the papers nicely lined up- I just shifted them a bit here so you could see I was taping 2 pieces together.

Both ends taped together.

Next, insert a third piece in between your taped pieces- pattern facing up.  This piece will be the same width, but only about 3/4 the length of your other pieces.

Pinch the front of your bird, holding all 3 pieces of paper together.  Tape around the edges to hold at least an inch or so of paper in place where you were pinching.

Taped portion where I had pinched shown to the left.  My bird's beak!  Next, pinch the 3 pieces together at the other end.  Notice that you'll be curving the longer top and bottom pieces to make them meet the shorter middle piece.  This gets your bird shape started.

Tape small bit at opposite end to secure all pieces together.

This part is a little weird to explain.  Manipulate the excess paper so that your curve at the top is toward the front (left side) if your bird, making the head, and the bottom curve is toward the middle of the back, forming the bird's stomach.  Basically, this just means pinching the top 2 pieces of paper together at the middle.  Tape in place.

Side view when taped.

Next up- the wings.  Cut two hill shapes out of scrapbook paper the same width as the rest of your bird.

Arrange over center of bird's back and tape into place.

Fold down gently where wings extend past body.

Poke a small hole with a needle and thread with string to suspend from mobile branch.


When your globes and birds are complete, it's time to arrange on the branch!  For the globes, tie one end of string around top brad with a secure knot (or 2 or 5), then wrap other end of string around branch multiple times and knot in place.  Arrange at different heights.  Hang birds at random as well.

Wrap picture wire around one end of branch, extend to other end of branch and draw out a lot of excess.  Wrap other end of wire around other end of branch.  In the middle, twist wire and loop so it can go over ceiling hook.

Screw ceiling hook into ceiling.  Hang mobile!