Showing posts with label no-bake. Show all posts

August 28, 2014

Fruit Kabobs

My son and I were watching Daniel Tiger's Neighborhood a few days ago, and the little guy got excited when he saw Daniel and his parents making fruit kabobs for a snack.  He was determined to do the same himself, and thankfully we had all the right goodies on hand!  This super easy treat was perfect for my 4-year-old to do himself once I'd washed and cut the fruit for him, and he devoured every bit.
This is a great idea for serving fruit at a party or play date, too!

Ingredients (makes 5 kabobs- enough for 2 snack servings)

  • 1/2 cup strawberries, quartered
  • 12 grapes
  • 1 banana, sliced
  • Skewers
Directions
  1. Wash and cut fruit; place in a bowl for youngster to choose from
  2. Place fruit on skewer, alternating fruits
Variations 
  • Dip some fruit in chocolate and allow to cool before putting on skewers (like an Edible Arrangement)
  • Arrange skewers stuck in a firm base like a watermelon
  • Sneak in a marshmallow here and there as a special treat

July 26, 2014

5-Ingredient Brownie in a Mug

A few days ago, my husband and I had an especially trying day between the kids, spit up, a crazy vet bill, and Lego mayhem.  By the end of the day, I was begging for wine or chocolate.  Short on wine, I made myself a brownie in a mug.  I've always been wary of these recipes on Pinterest, but I'm happy to report that this one works and tastes great.  It definitely hits the brownie texture instead of just being a cake in a mug, which is a common problem with other recipes.  I also like that this uses butter instead of oil.  End result: delicious.  Treat yourself and enjoy!


Ingredients

  • 1/4 cup all-purpose flour
  • 1/4 cup light brown sugar
  • 2 tablespoons unsweetened cocoa powder
  • 2 tablespoons unsalted butter, melted
  • 1/4 cup milk
  • Optional: mix ins and toppings, such as peanut butter, nutella, chocolate chips, powdered sugar, nuts, etc.
Directions
  1. Mix flour, sugar, and cocoa powder in a large mug.  Break up clumps.
  2. Add melted butter and milk.  Mix until well incorporated and texture is consistent- few to no lumps.
  3. Microwave 1 minute, and then in 10-second intervals until liquid on top is gone.  If you tilt your mug, nothing should move.  Microwave 10 seconds more after the no-liquid point, and let sit to cool at least 2-3 minutes.
  4. Optional: top with crazy yummy toppings and eat straight from mug.

October 27, 2013

Grape Demon Eyes (filled with goat cheese and pistachios)

Continuing our trend of creepy and delicious original creations, here's a twist on one of my favorite appetizers: grapes rolled in goat cheese and crushed pistachios.  Same flavors, different display.  While this is a snack that scares off many people for multiple reasons, for those who enjoy it it hits the spot wonderfully.


Ingredients
  • 24 green grapes
  • 24 pistachios, shelled
  • 1-2 ounces goat cheese
Directions
  1. Cut a hole in the middle of each grape and fill with goat cheese.  Press in pistachio.
  2. Arrange in pairs on a plate or serving tray and chill until ready to serve.

Witches' Fingers (chocolate covered pretzels)

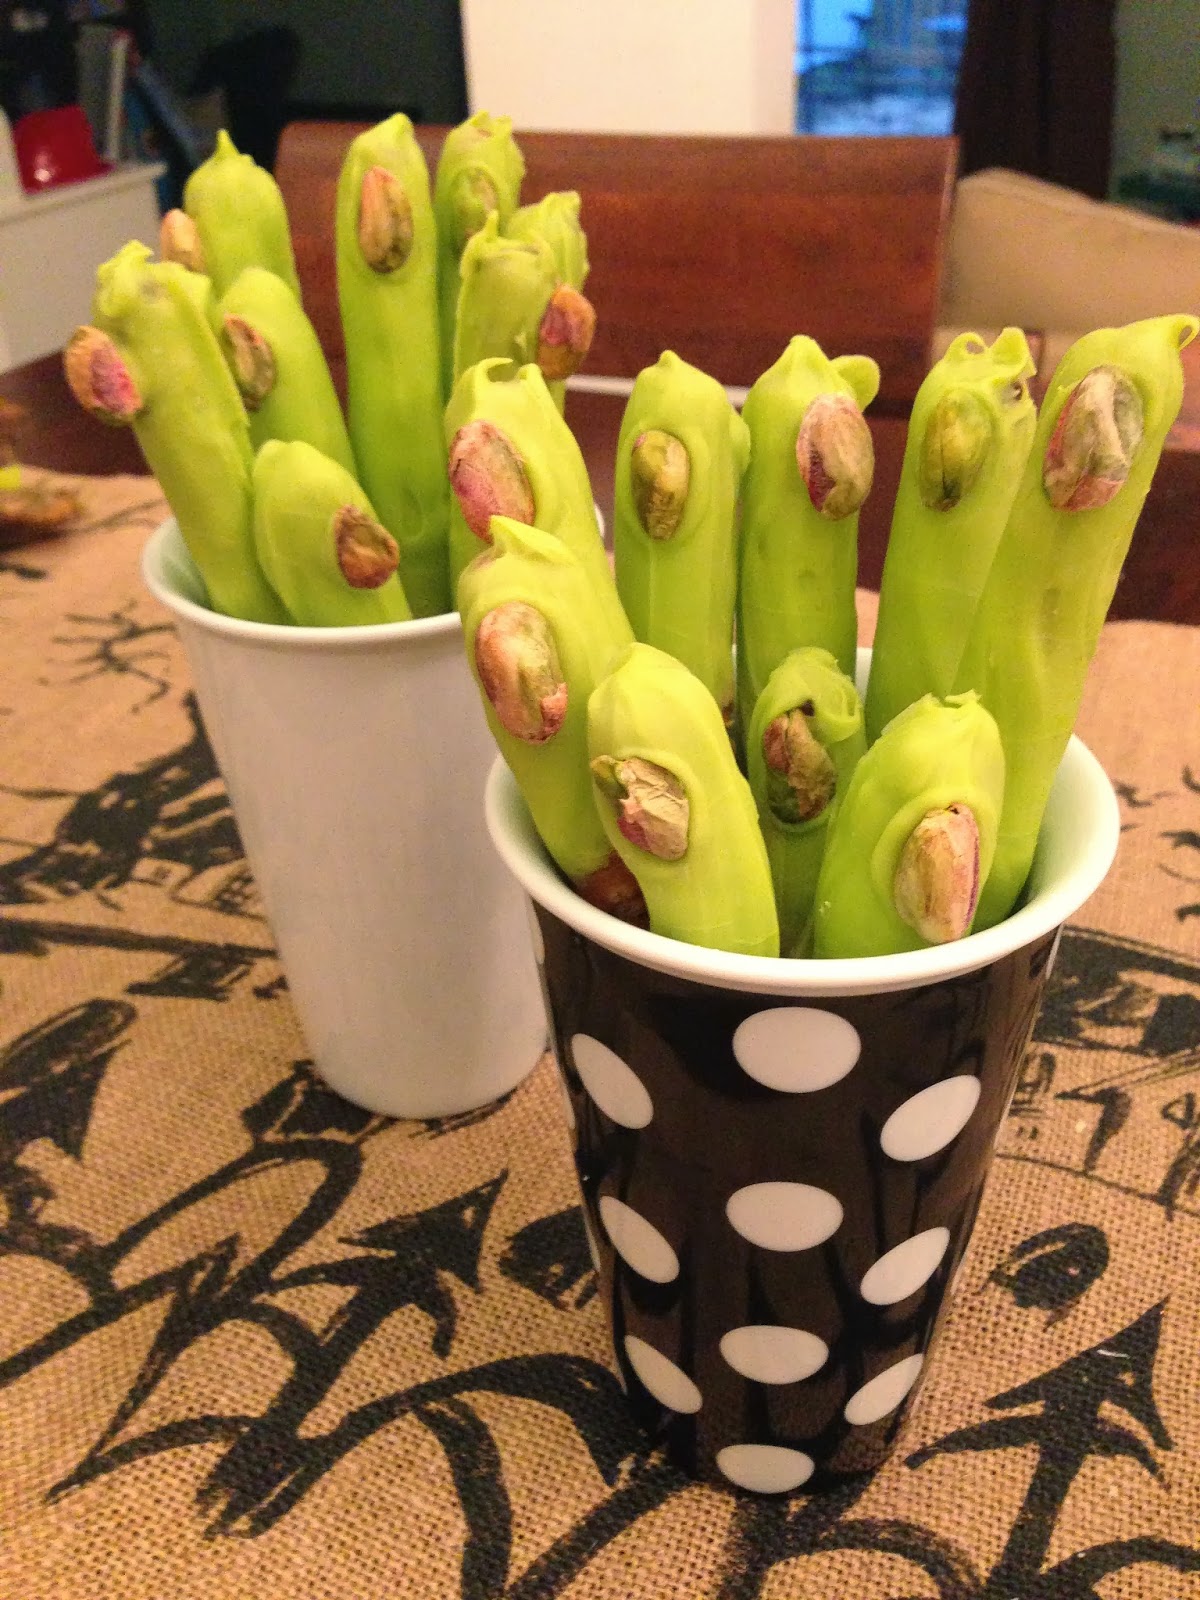
I was very proud of myself for the ORIGINAL Halloween creation (no Pinterest to steal my thunder here!), which was a huge hit all around.  Cover pretzel rods with green chocolate, add a creepy pistachio finger nail, and you're set.  Tasty and ghoulish = just right for Halloween.


Ingredients
  • 1 bag pretzel rods (about 20 rods)
  • 1 bag Wilton green colored chocolate discs
  • 1 tablespoon butter (optional)
  • About 24 pistachios, shelled
  • Witches' Fingers label (optional)
Directions (pictures below)
  1. Line a cookie sheet with parchment paper or Silpat sheet.
  2. Melt chocolate according to package directions.  Optional: mix in butter while melting to make a smoother consistency.
  3. Pour melted chocolate into a tall glass.  I came up with this technique because I'm a velociraptor (read: clever girl), and realized this would mean I could just dip the rods in the chocolate instead of trying any number of inefficient ways to cover the awkward shape in chocolate.
  4. Dip each rod into the glass of chocolate until covered at least 1/2 way.  Lay flat on prepared cookie sheet.  Repeat until all rods are covered with chocolate.
  5. Place a pistachio on the end of each chocolate covered part of the rod, to be the "fingernail".
  6. Suggested additional decorations: extra blobs of chocolate to look like warts; raisins to look like moles; cover parts of the pretzel with torn up marshmallow to make fingers lumpy or have large knuckles.
  7. Place cookie sheet in freezer for 5 minutes or until chocolate is set.
  8. Store in an airtight container at room temperature or in refrigerator if storing for several days.
  9. When serving, I recommend a cute printable like the one I made just using Word.
 Fill the glass with chocolate.  So much easier to cover the pretzels by dipping!  Stir occasionally.

Aaaand dip!

So easy!  Even my 3-year-old was able to do some.

Line em up on your Slipat- or parchment paper-covered cookie sheet.  Also, photobombs by the family dog are welcome.  Add pistachio fingernails.

Freeze until set, then arrange for display.  I really like how perfect these to-go coffee mugs were because they hid the pretzel part, just showing the creepy fingers.


Labels make everything better, no?

July 4, 2013

Ice Cream Sandwich with Strawberries

Sometimes, I'm a culinary genius.  And by "culinary" I mean "someone who cuts up food and puts it in a bowl", as in, no actual cooking required.  That's the most genius part of the whole thing.

I present to you this genius idea: cut up an ice cream sandwich, and add some strawberries.  Eat like a Sunday.  Your mind will be blown by the simple deliciosity.


Ingredients
  • 1 ice cream sandwich (or 2 if you've been extra good)
  • 1 cup strawberries
Directions
  1. Cut up the ice cream sandwich and strawberries into bite-size pieces and sprinkle into a bowl.  Devour.


April 13, 2013

Fruit Salad with Honey Lime Dressing

Let's talk about easy and tasty for a minute.  Now, fruit salad on its own is a tasty and simple mash up of fresh, good-for-you things, but add on just a bit of something extra and wow.  That's what the honey and lime do with this one!  So give it a try as the weather warms up, and see if you're not converted.


Ingredients
  • 1 1/2 bunches of grapes (about 2 cups)
  • 1 pint container of strawberries
  • 1 pint container of blueberries
  • 1/4 cup honey
  • Juice from 2 limes
Directions
  1. Rinse all of the fruit.  Place the grapes and blueberries in a mixing bowl.  Hull the strawberries (removing the white middle), cut into quarters (or even eighths if you have jumbo strawberries like I did), and add to the bowl.
  2. Spray a measuring cup with Pam, and measure out the honey.  The Pam will make the honey slide right off of the cup, rather than being uncooperative.  Pour honey onto the fruit.  Add the lime juice.
  3. Gently stir until the fruit is evenly coated with the honey lime dressing.  Refrigerate until ready to serve (preferably the same day).
Seriously- look how gorgeous this is!

March 6, 2013

Construction Birthday Party

One of my favorite things about this year's birthday party for my son is that he keeps talking about it.  From sharing details about the cake ("it had jellybean lights!  and cookie wheels!") to playing with our guests, to reminding me about the things we decorated together ("we put up streamers"), his over the top happiness over it made the work so worthwhile.

First up are the worms in dirt.  I kinda botched the recipe a bit, forgetting to stir milk into the pudding mix before I added my whipped cream.  Whoops.  Still edible, though!  I also like the idea of the Dig In sign which I stole from Pinterest.
 

I also had the idea to serve creamsicle punch.  I don't know why I stuck on that idea- maybe it was the thought of orange punch that made sense?- but I found a good recipe on Pinterest and it was a hit. The funny thing is, the pic and recipe I pinned are totally different from the ones the pin actually linked to.  Anyway, I'm happy with the one I used.

More Pinterest sign idea thievery- treating the drink area as a gas station.  Cute!  I like my sign more, too.

Now this one I can take total credit for.  What better way to serve lunch at a construction site than in lunch pails?!  Just a few bucks sent to Oriental Trading and I was in business. I forgot to nab a picture of it, but behind the lunch boxes I put up a picture of construction workers eating their lunches from pails on a steel beam as they built a skyscraper.  Extra bonus: with the lunches labeled, I didn't have to decode each sandwich for each guest like I did last year.

Lunch pails were packed the morning of the party, with sandwiches catered by The Corner Bakery (sooo good, and the ones with pretzel bread went the fastest), a handful of chips, and a napkin.

And the Best Supporting Actor of the party (second fiddle to our star, the birthday boy) is the dump truck cake!  Recipe here.  Like I say in that blog post, I couldn't find a cake pan worthy of this party, so I decided to get creative and craft my own.  Lots of oohs and ahhs and "what's that filling in the truck bed?" over this one.  (Answer: pieces of the cake from when I trimmed it, cut up Reese's pb cups, and crushed graham crackers.)

When I served the cake, I also doled out ice cream in no time flat.  I took this genius idea from the Pinterest gods, and scooped ice cream into cupcake liners before the party.  When it came time for cake and ice cream, I  just dished out a cupcake liner full of ice cream on the plate with the cake.  My friends were in love with this idea.  Nobody was left with mushy, last-scoop-from-the-container ice cream!


We can thank someone's bridal shower for this idea- stringing pictures from balloons.  My modifications: I used pics of my son from birth to just a month ago, put pictures on both sides so there was no white space, and as my mom and I learned during pre-party setup, those pictures weigh down the balloons.  I was prepared for that, so when my mom said "Well, it was a nice idea" I knew there was no "was" about it.  We just tied/wrapped the ribbon to my chandelier and voila- still worked.  A bit more subtle was the idea that the blue and white balloons were like a sky over our little tabletop construction site.

Here's a better view of the hanging pictures, as well as the little construction zone.  My husband is a city planner, so of course I put him to work laying out a black duct tape and masking tape road on the green table cloth.  I raided the play room for a bunch of construction toys and decorations, plunked down some construction worker duckies from Oriental Trading, and had one heck of a cute setup in place.  What was really sweet was watching my son investigate the pictures.  Some of them he remembered, like playing in the snow over Christmas, going to a park, Halloween, and visiting the train yard.  Others he didn't realize were of him, so he said things like "Look at the baby in the bathtub!  Baby in a blanket!"

Other side of the pictures.

Here we spy my traffic sign lollipops- another original idea, thank you!  I was disappointed that I couldn't find sign stickers to use, so I was left with printing out clip art signs I found online.  I cut those out and taped them to lollipops- easy peasy but very popular with the birthday boy and some guests.  :)

One of my son's favorite snacks is pretzels, and I thought they would be great stand ins as timber on our site.  I filled up some of his toys with them, and stacked them in a couple spots on the table, too.


In the week leading up to the party, I started asking my son these 20 questions I found on Pinterest.  He was a bit squirmy and funny answering some of these, but eventually my husband and I got answers to all 20.  I put out the album on the dining room table for our friends to look over.  The idea is that we'll add to the album with his answers each year and see how his answers change over time.  The moms and moms-to-be all thought this was a super sweet idea, and I definitely agree.

Ok this project makes me laugh, because I had it all planned out in my head as a very simple set up to use orange electrical tape to make a construction crane on the pillar and wall between our dining room and living room.  I told my husband he was going to make this for the party, and he must have been browsing the internet when I first told him because when I set out the supplies the night before the party, he was aghast at my evil plans.  He also critiqued the materials, because unbeknownst to me, electrical tape contracts.  Hence some of the off-kilter bits.  Still, our son spotted the construction crane right away and could tell what it was supposed to be, so in the end: mission accomplished.

The last bit of fun from our party: dump truck bean bag toss, another Pinterest idea.  How in the world did people plan kids' parties before Pinterest?  So many great and creative ideas out there, both to adapt or straight out steal, and to generate some ideas of your own.  Like I said, this was a great party that my son and our guests loved.  Some of the ideas will be keepers for years to come (like the ice cream scooping trick, and pre-portioned, labeled meals) and who knows- maybe some will be requested again by the special little guy.  Either way, I can tell that we're setting up some very fun memories for him, which just makes me grin ear to ear.  :)

December 8, 2012

Reindeer Food

A coworker shared this treat last year, and I couldn't wait to break it out again for the holidays.  Easy, so tasty to munch on with a handful here and there, and it makes a nice little gift when visiting people for Christmas parties or just stopping in to say hi.  Go ahead and make it.  Right now!


Ingredients (yay for 3 ingredient treats!)
  • 6 cups Rice Chex or Chocolate Chex cereal
  • 12 oz (1 bag) white chocolate chips
  • 1/3 cup coarsely crushed peppermint candy canes (3 regular size, unwrapped)


Directions
  1. Lay out a piece of wax paper on counter or cookie sheet.
  2. Place cereal in a large bowl.  Crush candy canes.  I like to put mine in a ziplock bag and use the bottom of a glass to break them up.
  3. In a microwaveable bowl, microwave white chocolate uncovered on high at 30 second intervals, stirring in between, until chocolate is smooth and creamy.  Stir in half the crushed candy canes.
  4. Pour chocolate mixture over the cereal and toss evenly to coat.  
  5. Spread mix in a single layer on wax paper.  Immediately sprinkle with remaining candy cane pieces while mixture is still warm.
  6. Let stand until set, about 20 minutes.  Resist eating warm stragglers.  I dare you.  Gently break up mix and store in an airtight container.  I like to set mine in wax paper in holiday tins when I give it as a gift.