Showing posts with label dessert. Show all posts

July 31, 2016

Chocolate Mousse Cake


Several years ago, my husband and I were on vacation in Rome, when he had his favorite dessert ever.  It was called Dios Mio Cake, or Oh My God Cake.  It was a delicious chocolate mousse, and I remember it having a cake layer at the bottom but my husband insists it was all mousse.  Regardless, despite not having the recipe I did try to recreate this heavenly dessert.  Here's what I've come up with, the mousse credited to a portion from Food Network's recipe.
[Tip: A 1 Quart container of heavy cream will be enough for both the Mousse and Ganache.  I hate it when recipes measure in cups or ounces but then the heavy cream containers say mL!]

Chocolate Mousse Cake
Serves 8-10
Prep time: 3 hours (with 2 hours to chill in fridge)

Ingredients
Cake

  • 1 box chocolate cake mix; likely requires egg(s), vegetable oil, and milk to prepare

Mousse

  • 8 oz semisweet chocolate (I use chips, but you could break apart a chocolate bar into 1/2-oz or smaller pieces)
  • 2 1/2 cups (20 oz) heavy cream
  • 2 Tablespoons granulated sugar

Ganache

  • 1 1/2 cups (12 oz) heavy cream
  • 2 Tablespoons unsalted butter
  • 18 oz semisweet chocolate (chips or bar broken into smaller pieces)
Directions
  1. Place metal bowl from a stand mixer and balloon whisk attachment in refrigerator to cool.
  2. Prepare the chocolate cake according to package directions, using a 9" cake pan.  I prefer pouring the batter in just one pan and trimming off the rounded, funny looking top.  This takes 10-15 minutes longer to bake than the box directions.  You could easily prepare two small round cakes, and layer with the mousse.  I simply prefer one large cake layer at the bottom with just one large mousse layer on top.  Whichever approach you take, rub shortening on the cake pan and coat lightly with flour; tap out excess flour.  Mix cake batter, pour into pan(s), and bake according to package instructions (adding time as needed if using just one 9" pan).  Allow cake to cool, then remove from pan by inverting on a wire rack.  Let cool completely.
  3. Begin the mousse by first melting the chocolate in a double boiler (or by placing chocolate in a bowl set over a pot with about 1" of boiling water.  Turn the heat down to medium, cover the bowl with plastic wrap, and let sit over the simmering water for 8-10 minutes.  Remove bowl from heat and stir chocolate until smooth.  Set aside.
  4. In the well chilled mixing bowl, pour in the milk and sugar for the mousse.  Whisk using the chilled balloon whisk attachment, whisking for 1 1/2 to 2 minutes or until stiff peaks form.
  5. Scoop 1/4 of the whipped cream mixture into the melted chocolate.  Use a hand whisk to gently incorporate until chocolate/whipped cream mixture is smooth and consistent.  Pour the mixture into the remaining whipped cream, and fold gently with a spatula until mousse is silky and uniform, without streaks of whipped cream or chocolate. 
  6. Lightly rub the ring of a springform pan with butter or spray with nonstick spray.  Assemble the pan, then place the cake into the bottom of the springform pan. Gently scoop mousse on top.  Smooth out mousse layer, filling springform pan to the edges.  Cover with foil, careful not to touch the top of the mousse, and chill in refrigerator at least 2 hours.
  7. After placing mousse cake in refrigerator to chill, make dark chocolate ganache.  Heat heavy cream and butter in a medium saucepan set to medium-high heat.  Place chocolate in a large mixing bowl.  Once cream comes to a boil, pour over the chocolate and let sit 5-10 minutes.  Gently stir the chocolate and cream mixture until smooth, preferably using a whisk.  If any clumps remain, try heating over a double boiler and stirring constantly, or microwaving at 50% power for 20-second intervals, stirring after each, until smooth.  This is very important because you will be piping some of the ganache, and if you leave any lumps the piping will not go well.
  8. Once ganache is complete, reserve 1 cup and chill in refrigerator until ready to assemble mousse.  Leave remaining ganache sitting out at room temperature, covered with plastic wrap.
  9. Take mousse cake out of fridge, and gently remove springform ring.  Some mousse may cling, which is ok, but if large amounts come off I like to scrape those off and smooth them back onto the cake as best I can.  Clear a large work surface, which is about to get very messy.  Pour the room temperature ganache onto the center of the mousse.  Using an offset spatula or very long, smooth knife, gently spread the ganache from the center toward the edges, allowing ganache to pour over edges.  Then smooth the edge of the cake with your spatula.  This will likely make the OCD part of you freak out.  Embrace the mess.
  10. Place a star tip in a pastry bag, and scoop the chilled ganache into the bag.  Pipe on stars or other design as desired into the top and/or sides of the assembled mousse cake.  I've made a Christmas tree and monogram on different occasions.  This is why it's so important to have a lump-free ganache!
  11. Very carefully slide a large flat or offset spatula under the cake, gently separating from springform pan base, and transfer cake to a serving plate or cake stand.
  12. Place toothpicks at intervals on the top of the mousse, and cover with aluminum foil. The toothpicks keep the foil from touching your piped on masterpiece and that ooey gooey ganache! Refrigerate until ready to serve. 

This dessert is seriously so good, and I think well worth the effort.  It also helps that I love baking, and find this kind of prep work to be a lot of fun.  Also- be forgiving with yourself!  This thing tastes great regardless of how pretty (or sloppy) it turns out, so just roll with the punches along the way.  ENJOY!


October 14, 2015

Apple Cream Cheese Danishes


After a recent outing to an apple orchard, I found myself with an abundance of apples.  I plan to make a pie, but in the meantime I've been enjoying a modified version of these apple dumplings found on Southern Bite.  I was suspicious of the Sprite used in the recipe, but after searching similar recipes found some used Mt. Dew, others used Sprite, etc., so clearly the carbonation was doing... something... to help with these.  I shrugged and ran with it, and have no regrets.  What I DID change was to sneak some cream cheese and cinnamon sugar inside these ooey gooey dumplings, which I am re-branding as danishes.

Apple Cream Cheese Danishes
Makes 8

Ingredients

  • 1 apple, peeled, cored, and sliced into 8 slices
  • 1 tube crescent rolls (8 count)
  • 2 ounces cream cheese
  • 2 tablespoons cinnamon sugar (mixture of ~1 1/2 tablespoons sugar and 1/2 tablespoon cinnamon)
  • 1 stick butter, melted
  • 3/4 cup granulated sugar
  • 1/2 teaspoon cinnamon
  • 1 1/2 tablespoons flour
  • 6 oz Sprite
Directions
  1. Preheat oven to 350.  Spray a square baking dish with nonstick spray and set aside.
  2. Unroll the crescent rolls and separate into triangles.  Spread a bit of cream cheese along the bottom of each triangle.  Place an apple slice on top.  Sprinkle with a little cinnamon sugar.  Roll up in crescent roll dough and pinch seams closed.
  3. Place danishes in prepared baking dish, evenly spaced.
  4. Mix melted butter, sugar, cinnamon, and flour in a medium bowl until well combined.  Pour over danishes.
  5. Pour Sprite down center and sides of baking dish (not over the danishes themselves).
  6. Bake at 350 for 35-40 minutes or until tops are golden and danishes are baked all the way through.
I wish you could smell these!

Just your basic white girl, wearing a scarf, loving fall, and baking all things apple and pumpkin.

October 11, 2015

Rustic Pumpkin Apple Bites


These little guys have been lurking on my Pinterest desserts page for a LONG time, and I finally made them last weekend.  Perfect for fall, with a nice oatmeal crust, these are not too sweet and not too heavy.  They make a nice little treat, and would be perfect for a Halloween party or even packed along for a picnic.  I did adapt my recipe a bit from Zestful Lou's, but appreciate the idea she planted!

Pumpkin Apple Bites

Makes 12 bites


Ingredients

For the crust

  • 1 cup oats
  • 1/4 chopped walnuts
  • 2 tablespoons brown sugar
  • 1/2 teaspoon cinnamon
  • 2 1/2 tablespoons butter, melted
  • 1 tablespoon milk
For the filling
  • 3 tablespoons pureed pumpkin
  • 2 tablespoons apple butter (I used caramel apple butter- YUM)
  • 2 tablespoons brown sugar
  • 1 egg white
  • 1/2 tablespoon corn starch
  • 1/4 teaspoon pumpkin pie spice
Directions
  1. Preheat oven to 350.  Spray a mini muffin tin with nonstick spray.
  2. In a large bowl, whisk together filling ingredients.
  3. Place dry crust ingredients in a food processor and pulse until combined.  Then, with food processor running, slowly pour in melted butter and then milk.  Process until combined.
  4. Scoop a tablespoon of crust dough and press into mini muffin tin.  Press down and up sides of the tin.  Repeat in each spot on the muffin tin.  You will have a bit of crust mixture left over- reserve.
  5. Scoop 1-2 teaspoons of filling into each crust.  Sprinkle a little of the remaining crust mixture over each bite.
  6. Bake 12-15 minutes or until filling is set.  The filling will be puffed up when you take the bites out of the oven, but will settle as everything cools.
  7. Place muffin tin on a drying rack, and allow bites to cool completely before gently removing from tin.
Crust ingredients.  They smell amazing together!

All mixed with the butter and milk.

So rustic and delicious.


August 24, 2015

Lemon Surprise Cookies


I tried a new cookie recipe yesterday and am very glad to share this success with others.  It's a chewy, sweet but tart, light cookie that's perfect for summer (or the tail end of summer, as everyone is feeling heading up to labor day).  It reminds me a bit of my chocolate peanut butter surprise cookies as far as technique goes, so I made a batch of those as well for my lucky coworkers.
The recipe comes courtesy of SewLicious Home Decor.  I've only made a few edits to make the instructions a bit easier for me to follow.  Enjoy!

Lemon Surprise Cookies
Yields approx. 2 dozen cookies
Prep time: 1-2 hours (filling needs to freeze before baking)
Bake time: 10 minutes

Ingredients

Cookie

  • 1 box supreme white cake mix (just using the powder mix; you do not prepare it as directed on the box)
  • 2 eggs
  • 1/2 cup vegetable oil (not butter)
  • 3.4-oz box lemon Jello instant pudding mix
Cheesecake Filling
  • 4 oz cream cheese, softened
  • 2 tablespoons unsalted butter, room temperature
  • 1/2 teaspoon lemon juice
  • 2 cups powdered sugar
Instructions
  1. Line a large cookie sheet with parchment paper and set aside.
  2. Prepare cheesecake filling, mixing together all ingredients until creamy.  Spoon teaspoon-size dollops onto prepared baking sheet.  Place in freezer 1 hour or more until set.
  3. In a mixing bowl, combine the cookie ingredients (cake mix, eggs, oil, and pudding mix).  Turn dough out onto saran wrap and refrigerate until cheesecake filling is set.
  4. When filling is firm, preheat oven to 350° and assemble cookies.  Scoop 1-2 tablespoons of cookie dough and flatten into a circle in your palm.  Place a frozen dollop of cheesecake filling into center, and roll cookie dough around the filling, being careful to close up all seams.  Roll into a ball.
  5. Place balls of dough with filling centers on baking sheet about 2 inches apart.
  6. Bake 8-12 minutes or until set.  The tops won't brown, but the bottoms will.
  7. Remove from oven and gently press down each cookie with a spatula or the bottom of a cup to flatten slightly.  Let sit on baking sheet 2 minutes, then transfer to wire rack.
  8. Serve warm, or cool completely before storing.
Aaa!  They just look so summery and yummy!  I wish I could give you smell-o-vision, too.

Mmm- delicious filling.

July 26, 2014

5-Ingredient Brownie in a Mug

A few days ago, my husband and I had an especially trying day between the kids, spit up, a crazy vet bill, and Lego mayhem.  By the end of the day, I was begging for wine or chocolate.  Short on wine, I made myself a brownie in a mug.  I've always been wary of these recipes on Pinterest, but I'm happy to report that this one works and tastes great.  It definitely hits the brownie texture instead of just being a cake in a mug, which is a common problem with other recipes.  I also like that this uses butter instead of oil.  End result: delicious.  Treat yourself and enjoy!


Ingredients

  • 1/4 cup all-purpose flour
  • 1/4 cup light brown sugar
  • 2 tablespoons unsweetened cocoa powder
  • 2 tablespoons unsalted butter, melted
  • 1/4 cup milk
  • Optional: mix ins and toppings, such as peanut butter, nutella, chocolate chips, powdered sugar, nuts, etc.
Directions
  1. Mix flour, sugar, and cocoa powder in a large mug.  Break up clumps.
  2. Add melted butter and milk.  Mix until well incorporated and texture is consistent- few to no lumps.
  3. Microwave 1 minute, and then in 10-second intervals until liquid on top is gone.  If you tilt your mug, nothing should move.  Microwave 10 seconds more after the no-liquid point, and let sit to cool at least 2-3 minutes.
  4. Optional: top with crazy yummy toppings and eat straight from mug.

June 22, 2014

Mini Key Lime Cakes

The blessing and curse of Tastefully Simple is that you know just how good the food tastes, and you want to make all of these special treats, and just have to wait patiently for the right occasion to make them.  This was true of the key lime cheese ball mix I'd bought nearly a year ago.  One of the recommended ways to make it was to use it as a topping on Tastefully Simple's almond pound cake, which sounded delicious.  I wanted to make that little treat for a retirement party for one of my employees, but I didn't want to spend an hour prepping individual servings.  My edit was to serve up the different components and let everyone build their own little key lime cake, which worked out wonderfully.

Ingredients
  • Key Lime Cheese Ball mix from Tastefully Simple
  • Almond Pound Cake mix from Tastefully Simple
  • 2 cups or more strawberries, sliced

Directions

  1. Prepare cheese ball and cake according to package directions.  Place cheese ball in center of serving platter.
  2. Cut cake into cubes, size depending on number of servings you want to have--bigger cubes for a dozen people; bite-size cubes to serve 40 as I did.  Arrange on platter.
  3. Slice strawberries and serve with other ingredients.
I recommend writing up a little set of instructions to go with your components so you aren't forever explaining to your guests how they can serve themselves, and what the ingredients are.  A little chalkboard would be perfect for this!  I didn't think of it until I was at work, so I just printed out a little sign that I placed next to the serving platter.

All prepped!  Pound cake in 3 of the serving dishes and strawberries in the fourth, with the cheese ball in the middle.

End of the buffet line!

May 26, 2014

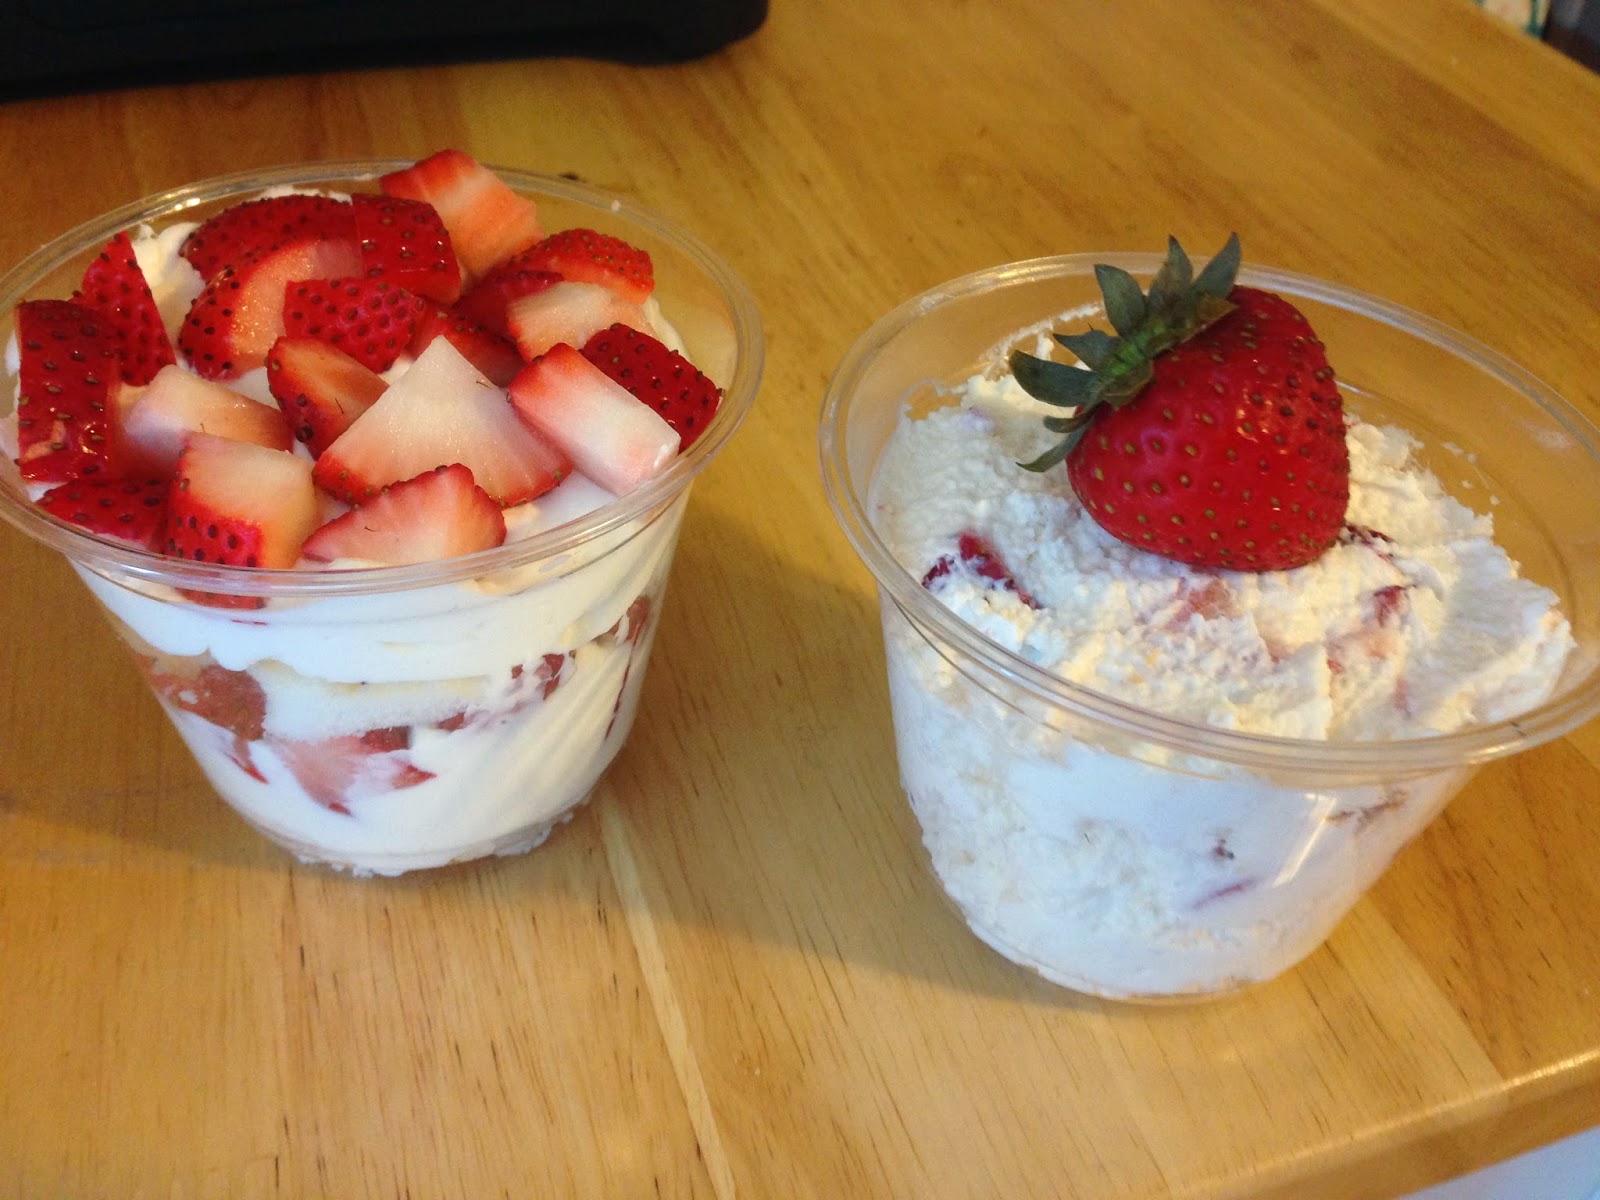
Strawberry Shortcake Trifle- Two Ways

I've been seeing this tasty looking Strawberry Lemon Cheesecake Parfait pin crop up recently, and decided to give it a try this weekend.  While the flavors all seemed spot on, it didn't really look like an appealing dessert.  I decided to try two approaches- a traditional trifle with the components layered, and the mashed up style of the original recipe.  The "pudding" style (as I've dubbed it) does have the benefit of fixing the one thing I don't like about trifles- that you have to get a perfect spoonful through all the layers to get the flavors together.  After having tried both, I have to say that I like the pudding better!  I'll leave it to you to judge for yourself.  :)

The Odd Couple: The Neat and Tidy Trifle and the Wonderful Mess Pudding

[Note: The ingredients are the same for both approaches; the only difference is in whether you layer these ingredients or mix em all up.]

Ingredients

  • 2 cups heavy whipping cream
  • 1/2 cup powdered sugar
  • 1 teaspoon vanilla extract
  • 8 ounces mascarpone cheese
  • 1/2 cup lemon curd (or lemon pudding, or lemon meringue pie filling if you can't find/don't want to make lemon curd; the trade off is that these have milder flavors)
  • 1 pound or more strawberries, chopped
  • 1 whole angel food cake (store bought is JUST FINE here), cut into bite-size pieces
Directions
  1. Whip the whipping cream on high speed ~1 minute, using a stand mixer with the whisk attachment or a hand mixer.  Reduce speed to medium and gradually add powdered sugar, then vanilla.  Return speed to high and beat another minute or more until whipped cream is fluffy and reaches appropriate consistency.  Turn off mixer.  If using a stand mixer, switch to beater attachment.
  2. Add mascarpone cheese to whipped cream, and mix on medium speed until incorporated.
  3. Fold in lemon curd by hand.
  4. For the Trifle: Layer a large bowl or trifle dish first with angel food cake pieces, then whipped cream mixture, then strawberries.  Repeat layers, finishing with strawberries on top.
  5. For the Pudding: Fold strawberries and angel food cake into the whipped cream mixture.  Serve in small cups and top with strawberry garnish.

April 27, 2014

Mochaccino Brownies

I really love all things coffee, and definitely low brownies, so when I saw this recipe from The Curvy Carrot years ago I pinned it without thinking twice... and then forgot it.  I finally made these brownies yesterday, with a couple modifications to make the frosting work, and omg were they good.  I also can't wait to find more uses for the espresso buttercream, because it comes straight from Heaven.


Ingredients
For the Brownie Layer
  • 1/2 cup (1 stick) unsalted butter
  • 3 ounces unsweetened chocolate, broken into pieces
  • 1 cup granulated sugar
  • 2 eggs
  • 1 teaspoon vanilla
  • 2/3 cup all-purpose flour
  • 1/4 teaspoon baking soda
  • 2 ounces (1/4 cup) bittersweet chocolate chips
For the Espresso Buttercream Frosting
  • 1 teaspoon espresso powder (you can buy it in cans in the coffee aisle)
  • 2 tablespoons heavy cream
  • 1 1/2 cups powdered sugar
  • 4 tablespoons unsalted butter, room temperature (yes, I promise that's all you need)
For the Chocolate Ganache
  • 1 cup bittersweet chocolate chips
  • 1/3 cup heavy cream
Optional Garnish
  • Chocolate-covered espresso beans

Directions
  1. Preheat the oven to 350°.  Grease an 8 x 8" baking pan with butter or cooking spray.  Set aside.
  2. In a large pot over low heat, melt the butter and the unsweetened chocolate pieces until smooth, stirring frequently.  Remove from heat and let cool slightly.
  3. Stir sugar into chocolate mixture until well incorporated.  Add the eggs one at a time, mixing well after each addition.  Stir in the vanilla.
  4. In a small bowl, mix the flour and baking soda.  Add to the chocolate mixture and stir until just combined.  Stir in the bittersweet chocolate chips.
  5. Pour brownie batter into prepared baking pan and spread evenly.  Bake about 30 minutes, until a tester inserted in the center comes out clean.  Let cool completely.
  6. For the chocolate ganache, heat the cream and chocolate chips in a small pot over low heat, stirring frequently, until smooth and thickened.  Set aside to cool to room temperature.
  7. For the frosting, first dissolve the espresso powder in the cream and set aside.
  8. In the bowl of a stand mixer fitted with the paddle attachment, beat the butter on medium speed 2 minutes until pale and fluffy.  Turn down speed to low and add the powdered sugar, 1/2 cup at a time.  After all sugar is incorporated, mix at high speed for 10 seconds to aerate the frosting and make it fluffy.  Turn speed back down to low.
  9. Pour in the espresso and cream mixture and mix on low until incorporated and smooth, adding more cream if necessary for desired consistency.
  10. Spread frosting evenly over cooled brownies.  Spread room-temperature chocolate ganache on top.  If desired, sprinkle chocolate-covered espresso beans on top for garnish.  Let brownie layers set at least 10-15 minutes.
  11. Cut into bars and serve at room temperature.
What a nice looking treat to bring with you for any gathering.  I mean, in addition to your great smile and winning personality.

Brownie extreme close up!!!

April 20, 2014

Super Easy Rainbow Cake

I'm sure we've all seen the rainbow cake/cheesecake pins all over Pinterest, which often don't actually link to a recipe.  After investigating a few and some Google searching, I realized the "recipe" is really all about the technique of laying your dyed batter so you get the rainbow look in the end product.  That lesson learned, you can do this with any cake recipe, including simple boxed cake mix!  Keep it simple with white (premade) frosting and sprinkles, and this cake can lead you to crazy impressive results for minimal effort.  BINGO.

Look at that beauty!  Full on double rainbow across the plate.


So the trick here is that you mix your cake batter, separate out into 6 equal portions in bowls, mugs, whatever you have on hand, and dye each portion a different color.  You layer the batter by pouring into the center of your cake pan, and then pour the following colors in the center one by one.  This approach spreads out the layers below evenly.

See?

What's fun is deciding how to layer or change up your rainbow.  My cake is kind of reversed/upside down.  I poured in the purple first, then did the rainbow in reverse.  This gave me the fun red center spreading out to a thin purple edge, but had I started with red as the first color and flipped my cakes upside down, you can see how I'd have perfect Rainbow Brite style rainbows going on.  Bottom line?  Be creative, don't overthink it, and just have fun with the colorful result.

Ingredients

  • 1 box yellow cake mix and required ingredients (likely eggs and vegetable oil)
  • 1 container frosting
  • Food coloring (at least red, yellow, and blue)
  • Sprinkles

Directions
  1. Prepare cake batter according to package directions.  Divide equally into 6 different mugs/containers- probably ~2/3 cups in each.
  2. Dye each portion a different color of the rainbow.
  3. Prepare cake pan(s).  I used two 9" round nonstick pans, which I coated with butter.  Pour half of your first batter color into the center of one pan, and the other half into the center of the other, to have identical cakes.  Pour half of the second color slowly and evenly into the center of your 1st batter color in pan 1; repeat in pan 2.  This should slowly spread out the first color, with the 2nd color making a circle in the middle.  Repeat with remaining colors.  When done, wiggle and/or tap your batter if it isn't filling the pan fully or is lopsided.  I did, and it wiggled the whole mixture well without making the colors bleed.
  4. Bake according to package directions.  Cool completely.
  5. Optional- trim the rounded top off of each cake to get a more professional look, not the rounded look I have.  In my opinion, though, rounded makes sense for a rainbow cake!
  6. Frost the top of one cake, layer on the 2nd, and cover the entire cake in frosting.  Add sprinkles and you're done!  

March 19, 2014

Nutella French Toast Rolls

Every once in a while, the internet presents you with something so amazing, so perfect, that it MUST be a part of your life immediately.  This week, the internet blessed me with Nutella rolls.  A friend posted a pic on FB, I needed info STAT, her husband shared the very simple recipe, and I made them tonight.  Heaven.

EXTRA LARGE PIC FOR EXTRA LARGE DELICIOSITY.

Ingredients
  • Slice of bread, crusts cut off, rolled thin
  • ~1 tablespoon Nutella per slice of bread
  • 1 egg, beaten
  • 1 tablespoon milk
  • Pat of butter
  • Cinnamon sugar to sprinkle on top
Directions
  1. Cut crusts from bread and roll out with a rolling pin.  Spread Nutella down the center of each slice of bread.  Roll up one nutella-free side to the other.
  2. Set a pan on medium heat and melt a pat of butter in the pan.
  3. In a small bowl, whisk together egg and milk with a fork.  Dredge rolled bread in egg mixture and shake off excess.
  4. Lay rolled bread gently in heated pan and cook until golden on each side, about 1-2 minutes per side.
  5. Sprinkle with cinnamon sugar as soon as removed from pan.  Serve warm.
What is so perfect about this recipe is that you can quickly whip up just a couple rolls as a snack like my pregnant self did, or churn out a dozen in short order for breakfast or dessert with the family.
It's a new world, people.  A delicious new world.

November 12, 2013

Christmas Crafts!

Hello, Buddy the Elf, what's your favorite color?  Mine is SPARKLES!  Ok maybe I'm not that extreme, but I have no shame in getting started on Christmas things a bit earlier because 1. Momma has a busy schedule and 2. It was an excuse to have a few quiet hours with friends on a Saturday.

Fist up, a tasty but unfortunate looking pinstrosity in the form of an apple tart.  It had all things fall going for it, but with a phyllo dough crust it just didn't break up into squares well.  You know what would be fun and evil?  Putting out this beautiful dessert and letting your guests feel the guilt of massacring it.  Then you don't have to make any half-hearted attempts to say how pretty it was when it came out of the oven.

Before cutting.  Oooh, ahh, the beauty!

After cutting.  Why do you hate us?

Next up is the insanely simple and adorable batch of Christmas cards I made.  I found a pack of 50 blank cards at Michaels- already with a fold in place and envelops and everything!  I thought I was going to have to use raw card stock for these, and it was a happy surprise to find a kit all ready to go.  Drew on the cute lines and bows with thin sharpie, wrote Merry Christmas with a nice thick silver sharpie, and hot glued red and green ornaments all over the place.  Ta da- adorable and simple.

Last up was my wreath.  I made this wonderful candy corn wreath for Halloween, and really loved the technique.  I had a clear vision of a similar wreath, all in white, with these squares of shiny patterned snowflake fabric interspersed throughout.  A pretty red ribbon gives the idea of a candy cane without being precisely literal.  Now, I was only able to get about 1/3 of the squares pinned during the party.  The rest were done catching up on The Vampire Diaries, SNL, Big Bang Theory, and watching what was left of The Dark Knight Rises because I was too indifferent to channel surf much.  Anyway, end result is pretty adorbs.

And last up, this was a Sunday craft that I didn't get to during the Pinterest party.  Happy buttons hot glued over a foam ball, in a couple strategic layers to cover up the gaps.  That thing is heavy.  I could whack a burglar pretty hard and at least give him a black eye if he gets too close to my Christmas presents.  You know, once I have a tree and presents out.  Christmas ornament/mace: what every crafty mom needs.

Ok, time to put down the peppermint mocha.  This Christmas/winter-time post has gotten me too wound up!

October 27, 2013

Witches' Fingers (chocolate covered pretzels)

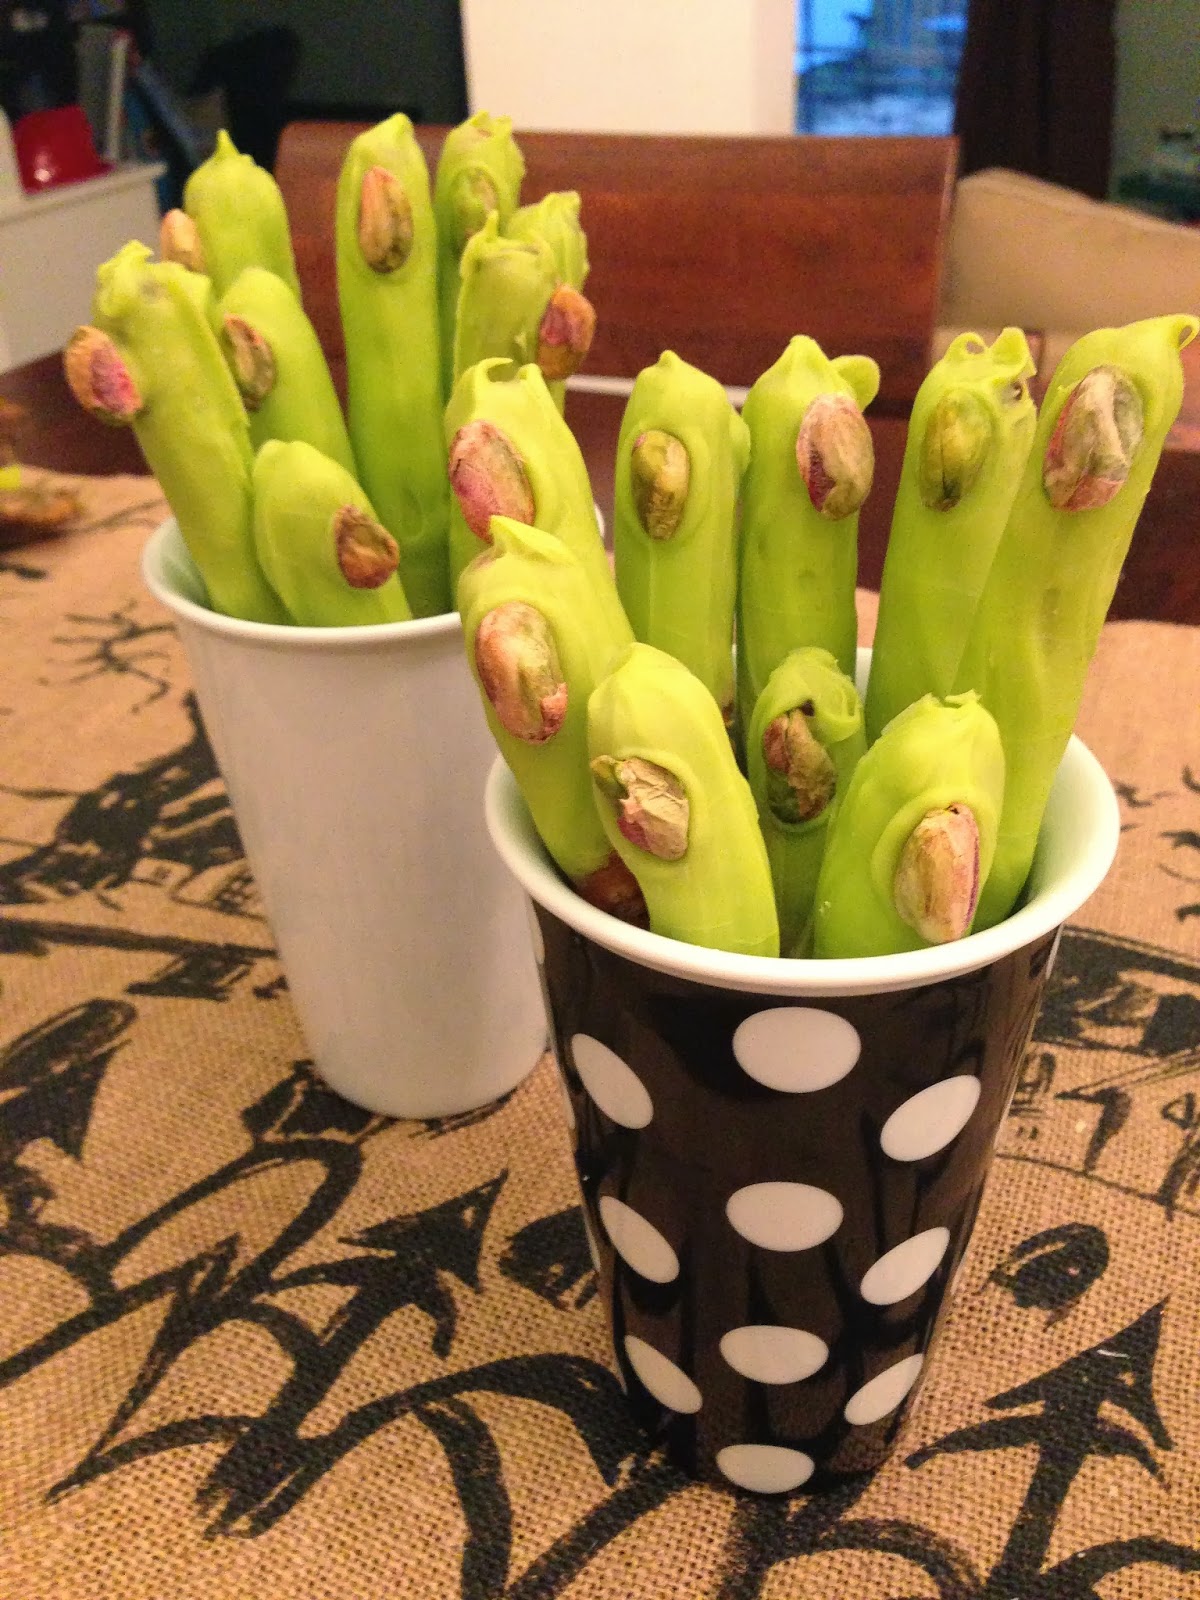
I was very proud of myself for the ORIGINAL Halloween creation (no Pinterest to steal my thunder here!), which was a huge hit all around.  Cover pretzel rods with green chocolate, add a creepy pistachio finger nail, and you're set.  Tasty and ghoulish = just right for Halloween.


Ingredients
  • 1 bag pretzel rods (about 20 rods)
  • 1 bag Wilton green colored chocolate discs
  • 1 tablespoon butter (optional)
  • About 24 pistachios, shelled
  • Witches' Fingers label (optional)
Directions (pictures below)
  1. Line a cookie sheet with parchment paper or Silpat sheet.
  2. Melt chocolate according to package directions.  Optional: mix in butter while melting to make a smoother consistency.
  3. Pour melted chocolate into a tall glass.  I came up with this technique because I'm a velociraptor (read: clever girl), and realized this would mean I could just dip the rods in the chocolate instead of trying any number of inefficient ways to cover the awkward shape in chocolate.
  4. Dip each rod into the glass of chocolate until covered at least 1/2 way.  Lay flat on prepared cookie sheet.  Repeat until all rods are covered with chocolate.
  5. Place a pistachio on the end of each chocolate covered part of the rod, to be the "fingernail".
  6. Suggested additional decorations: extra blobs of chocolate to look like warts; raisins to look like moles; cover parts of the pretzel with torn up marshmallow to make fingers lumpy or have large knuckles.
  7. Place cookie sheet in freezer for 5 minutes or until chocolate is set.
  8. Store in an airtight container at room temperature or in refrigerator if storing for several days.
  9. When serving, I recommend a cute printable like the one I made just using Word.
 Fill the glass with chocolate.  So much easier to cover the pretzels by dipping!  Stir occasionally.

Aaaand dip!

So easy!  Even my 3-year-old was able to do some.

Line em up on your Slipat- or parchment paper-covered cookie sheet.  Also, photobombs by the family dog are welcome.  Add pistachio fingernails.

Freeze until set, then arrange for display.  I really like how perfect these to-go coffee mugs were because they hid the pretzel part, just showing the creepy fingers.


Labels make everything better, no?

September 10, 2013

Mini Pumpkin Cheesecakes

Can we talk about some crazy good pumpkiny goodness?  I've been dying to make this recipe since October 13, 2013.  I can say that because it's from last year's Food Network page-a-day calendar.  This stupid recipe makes 18 mini cheesecakes, which is the exact wrong amount.  Too much to make just to have at home, and too little to make for the office.  SURE I could just double the recipe and take it to work, but my brain doesn't always work that way.  It has rules, like wanting the recipe to be just right as it is without having to double or halve things.  This is why it took me a year to make it.
Anyway, quantity issues aside, this is some seriously good stuff.  The gingersnap crust is so perfectly perfect I can't handle it, and don't let the sour cream topping scare you.  It's just right.  Enjoy.


Ingredients

  • 18 gingersnap cookies
  • 8-oz package cream cheese, room temperature
  • 2/3 cup granulated sugar
  • 1/3 cup firmly packed light brown sugar
  • 1/4 teaspoon fine salt
  • 2 large eggs, room temperature
  • 1/3 cup plus 1 1/4 cup sour cream
  • 1/3 cup heavy cream
  • 15-oz can pure pumpkin puree (Watch out- many canned "pumpkin" purees are actually butternut squash.  GASP.  This horror was shared at last weekend's Pinterest Party I made these for. The horror.  Check your label.)
  • 1 tablespoon pumpkin pie spice, plus more for dusting
Directions
  1. Preheat oven to 300°.  Line 18 muffin cups with paper liners.  Place 1 whole gingersnap in the bottom of each lined cup.  Set tins aside.
  2. In the bowl of a stand mixture set to medium-high and using the paddle attachment, beat the cream cheese, granulated sugar, brown sugar, and salt until smooth and creamy, 2-3 minutes.
  3. Scrape down the sides, reduce the speed to low, and beat in the eggs, one at a time, until combined.  Beat in 1/3 cup sour cream and the heavy cream.  Stir in the pumpkin puree and pumpkin pie spice by hand until the batter is smooth.
  4. Divide the batter evenly among the cookie-lined paper cups, filling almost to the top.
  5. Bake until the filling is just set, 40-50 minutes (mine took longer).  A sharp knife inserted into the center will come out moist, but clean.
  6. Top each cheesecake with about 1 tablespoon of the remaining sour cream, and gently spread with a spoon.  This can be a bit tricky when the sour cream is cold and the cheesecakes warm.  Just a heads up.
  7. Cool completely in tins on a wire rack.  Then refrigerate until cold, about 4 hours or overnight.  Top with a dusting of pumpkin pie spice.
Well hello, you handsome yummy devil.

August 17, 2013

The Perfect Brownie

I need not make any other brownie ever again: this is the one.  Superwoman Martha does it again, this time in the form of the best combination of peanut butter and chocolate and cakey soft brownie-ness with just a touch of salt to make it all amazingly yum.  The first batch of brownies I whipped up for a friend's baby shower was devoured with nary a picture (woops!) so of course the solution was to make a second batch later in the week.  ;)  A big benefit of this recipe is that it lends itself to making two batches in the same week very easily!  Mostly pantry staples are used, and just half of a baker's chocolate bar (meaning you can use the other half when you HAVE to have another batch!).


Ingredients
    Chocolate batter
  • 1/2 cup (1 stick) unsalted butter, cut into small pieces, plus more for pan
  • 2 ounces unsweetened chocolate, coarsely chopped
  • 4 ounces semisweet chocolate chips
  • 2/3 cup all-purpose flour
  • 1/2 teaspoon baking powder
  • 1/4 teaspoon coarse sea salt
  • 3/4 cup granulated sugar
  • 3 large eggs
  • 2 teaspoons pure vanilla extract
   Peanut butter mixture
  • 4 tablespoons (1/2 stick) unsalted butter, melted
  • 1/2 cup confectioners' sugar
  • 3/4 cup smooth peanut butter
  • 1/4 teaspoon coarse sea salt
  • 1/2 teaspoon pure vanilla extract
Directions
  1. Preheat oven to 325°.  Butter an 8-inch square baking pan and cut a sheet of parchment paper to fit, leaving a couple inches to hang over the handles (to make the brownies easier to lift out later).  Butter the parchment paper, too.
  2. Set a pot of water to simmer.  Place the butter and both types of chocolate in a large glass bowl that will fit over the pot.  Set the bowl over the simmering water, and stir mixture until melted and smooth.  Lift bowl off of pot (using dish cloth or pot holders) and set on counter to cool slightly.
  3. In a small bowl, whisk together flour, baking powder, and salt.
  4. Whisk the granulated sugar into the chocolate mixture.  Add the eggs, and whisk until smooth.  Whisk in vanilla, then the flour mixture, mixing until well combined.
  5. Stir the peanut butter mixture ingredients together in a medium bowl until smooth.
  6. Pour one third of the chocolate batter into the prepared pan, spreading and/or tilting the pan to evenly coat the bottom.  Drop dollops of the peanut butter mixture on top of the batter, about 1 inch apart.  Drizzle the remaining chocolate batter on top, and gently spread to fill the pan.  Drop dollops of remaining peanut butter mixture on top, filling in between the spaces of the bottom dollops.  Gently swirl peanut butter and chocolate portions together by running a butter knife lengthwise and crosswise through the layers, touching the tip of the knife to the pan as you drag so that you reach through all the layers.
  7. Bake about 45 minutes, until a toothpick or knife inserted into the brownies comes out with a few crumbs, but is not wet.  Let cool in pan about 15 minutes.  Lift out and let cool completely on a wire rack before cutting into squares.  Store in an airtight container.
Look how beautiful these are!


August 10, 2013

Homemade Friendly's Wattamelon Roll: Sherbert Shaped Like a Watermelon

When I was growing up, my family visited with our extended family in Sandusky, Ohio every summer.  One of our favorite parts of that trip was getting a Wattamelon Roll from Friendly's.  For whatever reason, we never indulged in this at home (maybe because this excellent dessert isn't offered in Maryland).  It was this mix of different flavors of sherbert, with chocolate chip "seeds" mixed in with the pink middle part.  LOVED it.  Because I can't find it in my area, I took a Pinterest pit stop to indulge this childhood nostalgia.
This recipe proved to be a success!  Or at least, gave me the confidence and technique to make one myself.  I can't wait to give it to my little brother as a birthday surprise tonight.  :)


Ingredients

  • 1 pint lime sherbert, softened
  • 1 pint lemon sherbert, softened
  • 1 pint berry sherbert (really, anything pink or swirled with pink will do for the center), softened
  • 1/2 cup mini chocolate chips


Directions

  1. Use a springform pan or pie pan to assemble your dessert.  Springform is nice because you can simply remove the ring when ready to serve, but you can make do with a pie plate just fine.  Scoop enough lime ice cream to create an outer ring about 1 inch thick (mine is too big- oops!).  Shape a bit into a ring, but don't worry about perfecting because your sherbert will be sliding all around the dish.
  2. Freeze for 10 minutes, or until sherbert is firm.  Remove from freezer, and smooth outer lime ring.  I cut the middle away to create a nice ring shape, and put the excess back in the container.  Then I smoothed the top of the ring.
  3. Scoop enough lemon sherbert to form a smaller ring, about 1/2 inch thick (mine is a nice proportion).  Freeze for 10 minutes or until firm, then shape and smooth as you did with the lime layer.
  4. Mix pink sherbert with chocolate chips until evenly incorporated.  Spoon into center of dessert, and spread evenly.  Freeze for 10 minutes or until set.  Cover with saran wrap and keep frozen until ready to serve.
  5. Serve cut into wedges, just like watermelon slices!

July 4, 2013

Mini S'Mores Bites

As my husband so gently pointed out to me, I'm in love with s'mores-based treats.  When DQ released their  s'mores blizzards, I was ON that stuff.  Heaven.  So are these bites, which I thought would be a perfect accompaniment to fireworks viewing tonight.  I got the recipe from Sweet Pea's Kitchen, but made a fair number of changes on the fly.  Enjoy.


Ingredients
  • 7 whole graham crackers
  • 1/4 cup powdered sugar
  • 6 tablespoons unsalted butter, melted
  • 2 large chocolate bars (8.5 oz total).  I used Hershey's Symphony with almonds and toffee and it was an AMAZING choice.
  • 12 large marshmallows
Directions
  1. Preheat oven to 350°.
  2. Break graham crackers into chunks and place in a food processor.  Pulse until finely crushed.  Add the powdered sugar, and with the food processor on, slowly pour in the butter through the chute.  Mix until thoroughly incorporated.  When I opened the container, I had to stir my graham cracker mix a bit more because there were parts that didn't have as much of the butter incorporated.
  3. Scoop about 2 teaspoons of graham cracker mixture into each cup of a 24-cup mini muffin pan.  Press into the bottom of each cup to form a little crust.  Bake 5 minutes or until edges are bubbly.
  4. While crusts bake, break apart chocolate bars into the mini bars.  Run kitchen scissors under water, then cut the marshmallows in half horizontally.
  5. Remove mini muffin pan from oven, then top each crust with a chocolate bar and a marshmallow, cut side down.  Bake another 3 minutes so that marshmallows are puffy and just golden.
  6. Cool in pan on a wire rack 15 minutes, then remove gently.  Cool completely on the wire rack.
  7. Place remaining chocolate in a small bowl, and microwave at 20-second intervals until melted.  Dip the top of each treat into the chocolate, or simply drizzle the chocolate onto the marshmallows.
  8. Rest until chocolate is set.  Store in an airtight container for up to 2 week.


Ice Cream Sandwich with Strawberries

Sometimes, I'm a culinary genius.  And by "culinary" I mean "someone who cuts up food and puts it in a bowl", as in, no actual cooking required.  That's the most genius part of the whole thing.

I present to you this genius idea: cut up an ice cream sandwich, and add some strawberries.  Eat like a Sunday.  Your mind will be blown by the simple deliciosity.


Ingredients
  • 1 ice cream sandwich (or 2 if you've been extra good)
  • 1 cup strawberries
Directions
  1. Cut up the ice cream sandwich and strawberries into bite-size pieces and sprinkle into a bowl.  Devour.